Note: this was converted from Typst to Markdown using AI assistance. The original Typst file can be found here along with the bibliography.
Exercise 1: Anti Hardening
Laboratory protocol
Exercise 1: Anti Hardening
Class: 4AHITN
Name: Dan Eduard Leuska, Justin Tremurici, Stefan Fürst
Group Name/Number: Die Goons / 1
Supervisor: ZIVK, SPAC
Exercise dates: 22.09.25, 29.09.25, 06.10.25, 13.10.25
Submission date: 20.10.25
Table of Contents
- Summary
- Complete network topology of the exercise
- Exercise Execution
- References
Summary
This exercise is about hardening and then anti-hardening server applications and OSes, so a fictional app was created that features the requirements of having a database and a webserver. Everything was hosted on a laptop in VirtualBox with NAT networking and connected over Tailscale as will be further explained in Connecting the Setup Using Tailscale.
The architecture that was settled on was making a distributed app with a Go API built using the gin framework and a vanilla HTML/CSS/JS frontend served via caddy and served inside of a k3s cluster. The API stores the data in a PostgreSQL database hosted on a single Alpine VM using docker stack in a single-node docker swarm cluster to be able to utilize docker secrets. The DB’s data is backed up daily to an SMB share on a Windows server. The app uses a JWT authentication flow with refresh tokens to have a partially stateless authentication system which is easy to run, distributed, and scalable.
The goal was to learn more about distributed systems, authentication, and hardening, which is why this scenario was chosen. The insecure version has two authentication bypasses, one by using bad JWT parsing allowing to log in as different users and a HTTP header to bypass authentication requirements if it says it’s from the same IP as the pods. Furthermore, the insecure version has a CSP header that allows unsafe-inline and unsafe-eval which is needed to make the insecure version insecure. In the insecure version secrets were just stored in the Kubernetes manifests and Docker Compose files instead of using each secret management tool.
Each of the insecurities will be evaluated and shown how to mitigate them. Also the insecure database was listening to 0.0.0.0 which could allow a threat actor to connect to it directly instead of having only the API exposed. Lastly, the focus was more to make the services insecure rather than the OS as their insecurities were mostly the same and more boring to show like allowing SSH root login, using bad passwords, and so on.
Tailscale was also used to show off how to lock down sensitive data transmissions on a separate network layer like for database connections and internal Kubernetes traffic. All in all, the focus was shifted from the OS to the services and the app, as the OS is the most boring part of the setup and the goal was to learn about authentication and distributed systems rather than hardening.
Complete network topology of the exercise

Exercise Execution
Setup
Architecture
The goal of this exercise is to set up 2 services and make them insecure, so a fictional app was opted for that features the requirements of having a database and a webserver. Everything was hosted on a laptop in VirtualBox with NAT networking and connected over Tailscale as will be further explained in Connecting the Setup Using Tailscale.
The architecture that was settled on was making a distributed app with a Go API build using the gin framework and a vanilla HTML/CSS/JS frontend served via caddy and served inside of a k3s cluster. The API stores the data in a PostgreSQL database hosted on a single Alpine VM using docker stack in a single-node docker swarm cluster to be able to utilize docker secrets. The database is not sharded, as in this case it would be overkill, and the DB’s data is backed up daily to an SMB share on a Windows server. The app uses a JWT authentication flow with refresh tokens to have a partially stateless authentication system which is easy to run, distributed, and scalable.
Connecting the Setup Using Tailscale
As mentioned before, Tailscale was opted for to connect the setup, as using Kubernetes requires an IP address which would either be static or use domain names, which would not be pleasant to work with in this context. The only viable option would be using the NAT network type, as this would allow an internal consistent IP range and allow internet connectivity; however, this has two drawbacks:
- On a laptop it would be really inconsistent and after about 30 minutes just crash and require a recreation of the network.
- Accessing the VMs would require port forwarding in VirtualBox, so one would end up juggling a lot of ports on localhost and losing track of what ports are what very quickly.
Bridge network would not be a solution as the VMs would not be having a static IP binding on the DHCP range of the network the laptop is connected to. Host-only network would not work either due to having no internet access. 1
So Tailscale was opted for, so all the VMs could talk to each other and Magic DNS could be used to access them with convenience from the laptop by just typing in their hostnames. 2 This, however, has the drawback of later not being able to separate the public internet from a private administrative connection, which would be tailscale here, and instead to demonstrate this connecting via localhost is used as there is no other option, but whenever it happens the situation will be explained to make clear when using Tailscale will be like using the internet and when it will be a private administrative connection.
Choosing Distros
For the choice of distros Alpine Linux was chosen due to it being extremely lightweight and new packages via the community repository, and Debian for the k3s cluster, as the minimal Alpine setup didn’t work well with k3s and rather than spending more time to get it to work Debian was used as it can be trusted to work and be stable as always. The newest release of each distro was used.
How Alpine is different from Debian
Alpine is a very lightweight distro, built around musl libc and BusyBox. The latter of the two is an implementation of many Unix commands in a single executable file, which is meant for embedded operating systems with very limited resources, which replaces basic functionality of more than 300 commands often used in containers. It has no more than 8 MB and installed to disk requires around 130 MB of storage, but you also get a large selection of packages and a fully fledged distro. 3 4
It differs from Debian in its init system, which is OpenRC instead of Systemd from Debian, which is bigger and more complex as it has a lot of extra features which really aren’t needed here. Additionally by default it’s advised to use doas instead of sudo as it is more minimal. All of this makes it very nice to work with and takes fewer resources from my laptop and provides much faster boot times than Debian and not ancient packages like Debian.
Setting Up Alpine
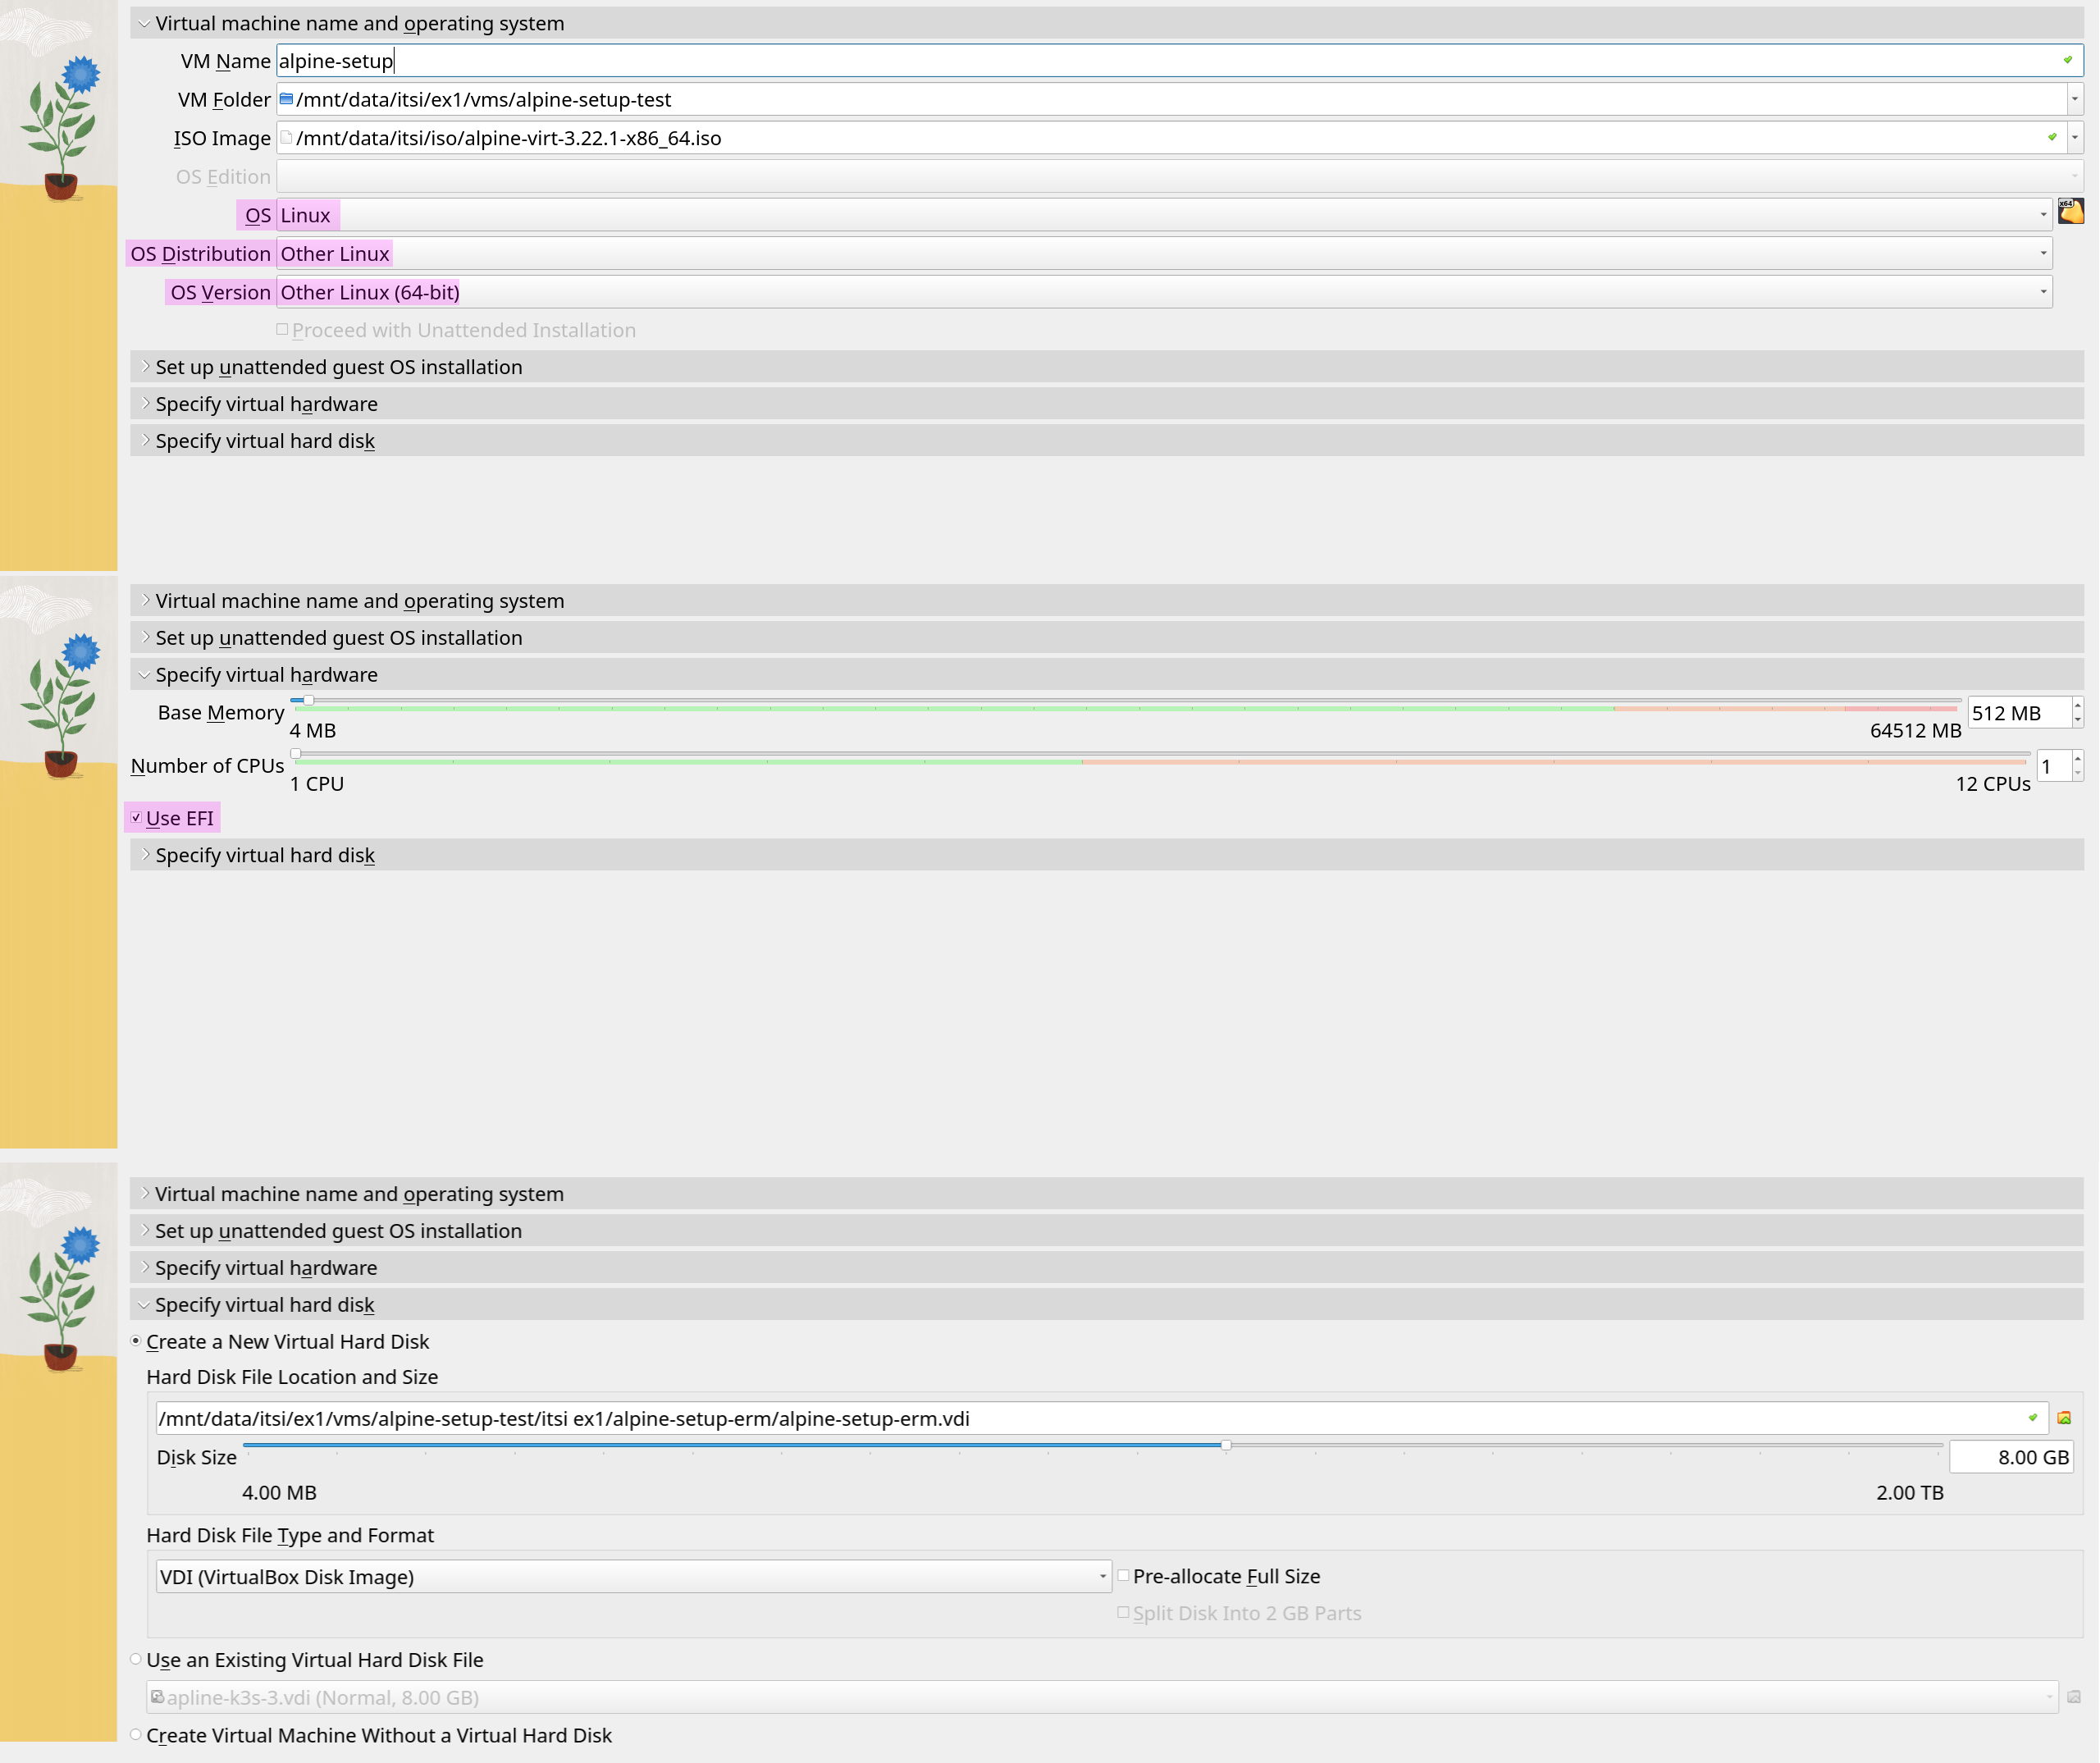
After downloading the virt image from the Alpine website, which is 65 MB in size, once in VirtualBox the only thing to select is Use EFI under specify virtual hardware and select Linux and Other Linux as OS type. All the other values can be left on default as 1 CPU, 512 MB RAM, and 8 GB disk space is plenty already as shown in [@fig:alpine-vm-settings] 5
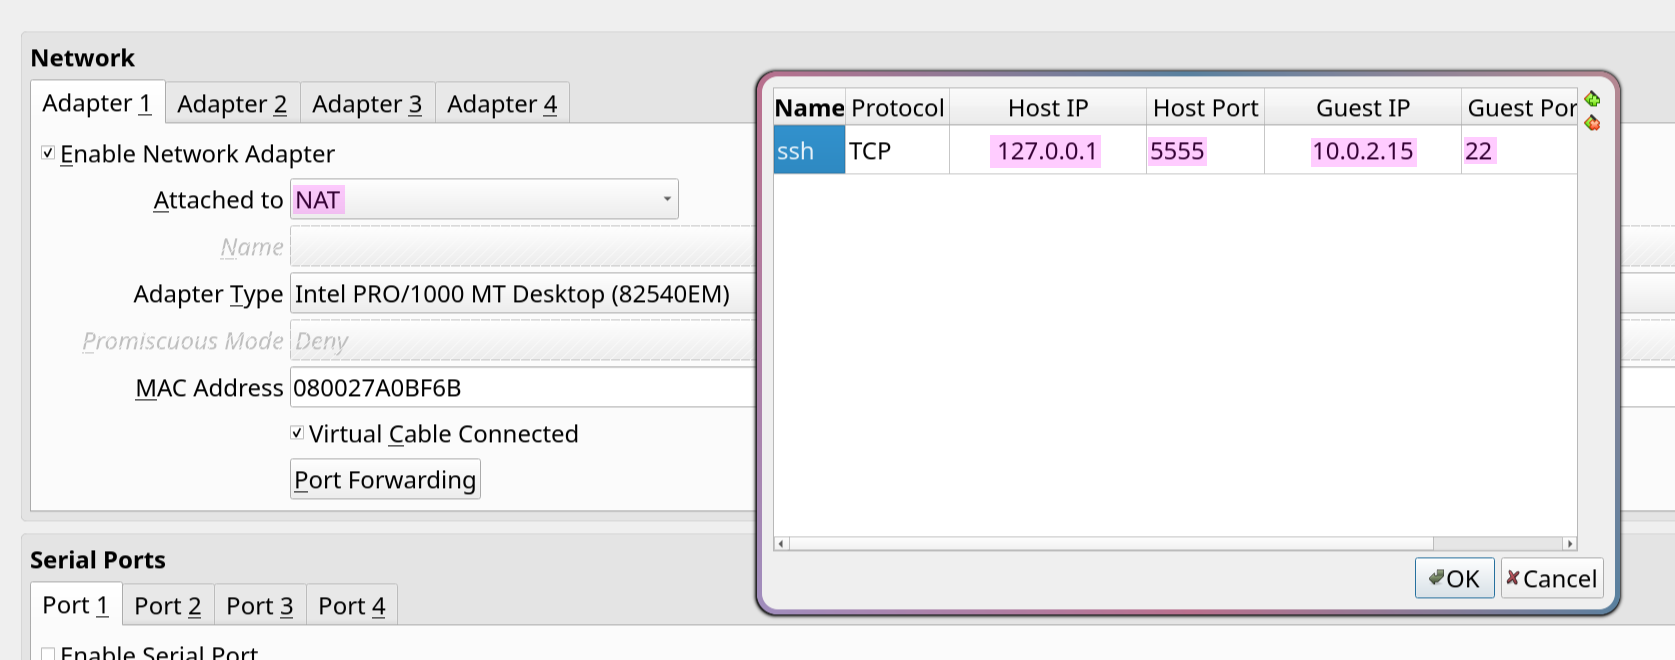
Additionally, to be able to ssh into the VM for the setup, port forwarding was set up in VirtualBox to forward port 22 to 5555 as well as the host to 127.0.0.1 since it’s localhost and the guest IP to 10.0.2.15 as shown in [@fig:port-forward], as it’s the default NAT IP in VirtualBox, so setup can be done using apk add openssh, rc-service sshd start. In case an IP is not obtained on boot, run apk add dhcpcd and setup-interfaces, select all default options, and run rc-service dhcpcd start to get an IP address. 6
However, when installing OpenSSH the whole config was commented, so #Port 22 and #PermitRootLogin yes had to be uncommented in /etc/ssh/sshd_config to allow root logins and ListenAddress 0.0.0.0 and PasswordAuthentication yes and AddressFamily any to allow login to the installer.
Now one can ssh into the VM with ssh root@127.0.0.1 -p 5555 and be in the VM and have a good experience installing as well as being able to record the screen using asciinema and then converting the desired frames to an SVG for clean and themable screenshots for this exercise documentation.
Once sshed in the setup-alpine command gets used to install the os which prompts through all the needed steps to get setup with the basics. First, it asks for the hostname. Then it proceeds to networking, where all defaults are used and either DHCP is selected or the IP is set to 10.0.2.15 if desired. Next, it prompts for the desired root password and time zone. Use “none” for the proxy URL since it is not needed. For the NTP client, select BusyBox because it is used regardless and can save space, as shown in [@fig:alpine-setup-1].

The next step asks for which mirror for the package manager to use, where default is selected and then for users select no as users will be created later and then OpenSSH is selected and root login is allowed as there is no other user and lastly the correct disk is selected and accept is hit to finish the installation and reboot into the install as seen in [@fig:alpine-setup-2].

SSH’ed into the new install. setup-apk-repos -c is used to add the community repository shown in [@fig:alpine-community-repo] to install the needed packages with apk add fish starship docker doas docker-cli-compose vim jq eza curl. Here is a quick rundown on what each package is for:
fishis a command-line shell that is similar tobashandzshbut with a lot of features and is very fast.starshipis a prompt that shows the current directory, git branch, git status, and git commits and, most importantly for the sake of documentation, displays it neatly where one is SSHed into.dockeris a container runtime that is used to run containers.doasis a tool that allows running commands as another user.docker-cli-composeis a tool that allows running Docker Compose commands.vimis a text editor as there is a deep hatred againstvi.jqis a tool that allows parsing JSON and pretty printing it for screenshots.ezaislsbut with colors and icons and a good tree view.curlis a tool that allows making HTTP requests to install tailscale.

To create the two users, fus-user and fus-admin, the setup-user script is used to create both users, and then adduser fus-admin wheel and addgroup fus-admin docker to first make the user privileged by adding them to the wheel group, which is a Unix concept referencing a user account with the wheel bit, a system setting that provides additional special privileges that empower a user to execute restricted commands that ordinary users cannot access. 7 8
Lastly, Docker was enabled by rc-service docker start, and then logging in as the fus-admin user and running docker run hello-world to verify Docker is running and the user does not need to be root to run Docker commands. 9 As shown in [@fig:test-docker].

To grant the user access to run commands with doas, a configuration override is created at /etc/doas.d/20-wheel.conf with permit persist :wheel to allow the user to run doas commands, which can be observed in [@fig:test-doas].

Lastly for the basic alpine setup, in the admin user fish is run to generate the default config and then at ~/.config/fish/config.fish the following is added to enable starship from [@snip:enable-starship-in-fish]. Where the new prompt can be seen after exiting and then reopening fish shell.
if status is-interactive
  starship init fish | source
end
[@fig:jq-jerkoff] shows the Starship prompt, and jq is used by curling a GET endpoint from httpbin.org, which is piped into jq to pretty-print the JSON output. jq also allows filtering output with various commands like jq '.url' to show the URL value of the returned JSON object. This can be used with far more depth to filter giant JSON blobs in logs; for example, to make them readable with jq, but here it’s only used to pretty print to show the wanted parts of kubectl get -o json commands.

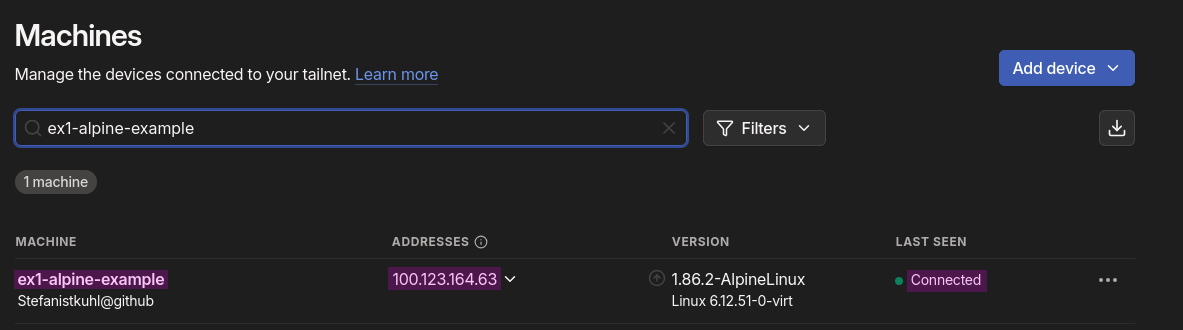
Lastly, from the TailScale dashboard under New Device -> Linuxserver, the install script is copied and the sudo swapped withdoas, curl -fsSL https://tailscale.com/install.sh | sh && doas tailscale up --auth-key=tskey-auth-REDACTED, and after this as [@fig:tailscale-jerkoff] verifies the device is added to the tailnet.
Setting Up Debian
Setting up Debian was straightforward as any Debian install, where one just clicks through the installer, only selecting no desktop as well as selecting OpenSSH server as a package and creating an additional user so one doesn’t lock oneself out of SSH due to root login being disabled by default. Tailscale was installed the same as on Alpine, just copy-pasting the command from the admin panel. The same was repeated two more times for the agents of the k3s cluster.
Setting Up Windows Server
Installing Windows Server was even more straightforward than the two previous installs, as one just clicks Continue and, once rebooted, downloads Tailscale, signs in, and then uses the Chris Titus Tech WinUtil to restore things like the old context menu, disable Bing from the Start menu, and other annoyances.
Setting Up the Services
Before stating the setup of each service, here is a quick rundown of the app’s vision and some details about the services.
- General idea:
- List of posts by users, secured by authentication and user signups
- Users can create, edit, delete posts, and change their password
- Admins can create, edit, delete posts and manage users
- Database:
- “Source of truth” for all app data and state
- API:
- Authentication and authorization
- CRUD operations
- Web:
- Frontend
Setting Up PostgreSQL
Database Schema
The schema consists of three tables:
- Users
- Posts
- Refresh Tokens
Each of them has a primary key using a UUIDv7 type, which is an extension of UUIDv4 and has all the benefits of UUIDv4, such as avoiding issues with global uniqueness and therefore fitting for distributed systems, as I can just assign an ID without worrying about it being incremental, nor exposing information about the size of the app, etc., where users can see how many users there are; in case of an API hack you can’t just enumerate users and an attacker can’t easily do something like curl https://some-api/users/1 etc. The API backdoor is not useless but, rather, more limited and can mitigate the damage somewhat. UUIDv7 uses the first 18 bits to timestamp its creation to make it sortable in databases, which makes it ideal to work with. 10
The first two lines of the schema are dedicated to the extensions we will use: pgcrypto for hashing and pg_uuidv7 for UUIDv7 generation. They are installed using the create extension command, and since only pgcrypto is built-in, I chose to use the Docker image from the maintainer of pg_uuidv7 rather than the official Postgres image. Their image just adds the extension on top of PostgreSQL 17, which isn’t the newest version but still fine, and saves me from uploading my own image of the latest Postgres to a container registry. 11
create extension if not exists pgcrypto;
create extension if not exists pg_uuidv7;
Lets go through the tables one by one.
As seen in [@snip:users-table], the users table is pretty straightforward with the only thing worth mentioning being the role column, which uses an enum defined above for the users’ role, which can either be admin or user, constraining it at the database level instead of the application layer. Additionally, the created_at column is kind of useless as I use UUIDv7, but it’s there so I can be lazier and just fetch it instead of handling it in the application layer, plus it was there before switching to UUIDv7 and I forgot to remove it.
create type user_role as enum ('admin', 'user');

create table if not exists users (
  id          uuid primary key default uuid_generate_v7(),
  email       text not null unique,
  username    text not null,
  password    text not null,
  role        user_role not null default 'user',
  created_at  timestamp with time zone not null default now()
);
The refresh tokens table has the user_id foreign key and the token_hash column, which is a binary representation of the refresh token for the user hashed with sha256 in the application layer, needed to compare if a refresh token that was generated by the user’s JWT on login is valid or has been revoked or replaced. More about this will be explained in [@sec:explaining-auth]. Additionally, the two indexes are used to make the queries faster, as the user_id index is used to filter the tokens by user, and the expires_at index is used to filter the tokens by expiration date.
create table if not exists refresh_tokens (
  id              uuid primary key default uuid_generate_v7(),
  user_id         uuid not null references users(id) on delete cascade,
  token_hash      bytea not null unique,
  created_at      timestamptz not null default now(),
  expires_at      timestamptz not null,
  revoked_at      timestamptz,
  replaced_by_id  uuid references refresh_tokens(id)
);

create index if not exists rt_user_idx on refresh_tokens (user_id);
create index if not exists rt_expires_idx on refresh_tokens (expires_at);
create table if not exists posts (
  id       uuid primary key default uuid_generate_v7(),
  title    text not null,
  content  text not null,
  user_id  uuid not null references users(id) on delete cascade
);
The posts table above has nothing to explain, so moving on to the last section of the schema, which is the authenticate_user_id function in [@snip:auth-user]. This function is used to check a user’s credentials and returns their user ID if they’re valid. It looks up where the email matches the parameter p_email; the p_ prefix is a naming convention to indicate a parameter, and then compares the input password and encrypts it using the crypt function from the pgcrypto extension, which takes a string to hash and a salt to use, or an already hashed password to compare as we do here. 12 13 The API will use this function to check whether a user is valid or not, and when inserting it will run.
create or replace function authenticate_user_id(p_email text, p_pass text)
returns uuid
language sql
as $$
select u.id
from users u
where u.email = p_email
and u.password = crypt(p_pass, u.password)
$$;
To deploy the database, Docker Compose was used from [@snip:pg-compose], which is not secure but this will be changed in [@sec:docker-secrets], so for now this is fine. This sets the needed environment variables for username, password, and database, as well as the default port, volume mapping for the schema file, and the data volume.
services:
  db:
    image: ghcr.io/fboulnois/pg_uuidv7
    environment:
      POSTGRES_USER: postgres
      POSTGRES_PASSWORD: postgres
      POSTGRES_DB: someApp
    ports:
      - 5432:5432
    volumes:
      - ./schema.sql:/docker-entrypoint-initdb.d/schema.sql
      - postgres-data:/var/lib/postgresql/data

volumes:
  postgres-data:
During development I used this fish script from [@snip:boated-fishs-script] to deploy the database, which is a bit of a pain to use but it works fine. I know I could have used docker context for this, but using a script is more convenient, and since the compose file uses a volume mapping and the file isn’t there I would have to copy it over anyway, and I can’t have ConfigMaps in Docker like Kubernetes has it.
#!/usr/bin/env fish

scp ~/itsi/itsi/4kl/ue1/goApp/db/schema.sql fus-admin@ex1-alpine-db:app/schema.sql
scp ~/itsi/itsi/4kl/ue1/goApp/db/docker-compose.yml fus-admin@ex1-alpine-db:app/docker-compose.yml
if contains -- -v $argv
  ssh fus-admin@ex1-alpine-db "cd app && docker compose down -v && docker compose up -d"
else
  ssh fus-admin@ex1-alpine-db "cd app && docker compose down && docker compose up -d"
end
Making the Demo App
Backend
The backend is a simple API that is used to authenticate users and to store the data. The API is written in Go and uses the gin framework. It takes care of all the CRUD operations, which stands for Create, Read, Update, and Delete, meaning managing all the data in the database. 14
The endpoints are split into three groups:
- Users
- Posts
- Admin
Notable endpoints:
- POST
/userscreates a new user - POST
/postscreates a new post for the currently signed-in user - POST
/auth/loginlogs in a user - POST
/auth/logoutlogs out a user - POST
/auth/refreshrefreshes a token
Additionally, middleware is used to check if the user is authenticated and if the user is an admin, which restricts access to certain endpoints. Middleware is a term describing services found above the transport (i.e., over TCP/IP) layer but below the application environment (i.e., below application-level APIs). 15
For example, there is middleware that will be later explained to check if the user is authenticated and has valid tokens, middleware for rate limiting, enforcing headers, and max body size. The above endpoints will be explained below as well as some more general things about the backend.
Authentication Breakdown
JSON Web Tokens
A JSON Web Token (JWT) is a compact, URL-safe means of representing claims to be transferred between two parties. The claims in a JWT are encoded as a JSON object that is digitally signed using JSON Web Signature (JWS) and/or encrypted using JSON Web Encryption (JWE). 16
The JWT is a base64url-encoded string, which is divided into three parts, separated by a period, and each part is a base64url-encoded string. The first part is the header, the second part is the payload, and the third part is the signature. 16
eyJhbGciOiJIUzI1NiIsInR5cCI6IkpXVCJ9.
eyJyb2xlIjoiYWRtaW4iLCJpc3MiOiJhcHAiLCJzdWIiOiIwMTk5Y2FiMy1mNjUwLTc2MzAtYTlhMC0yODJk
YjBhMTFmNzAiLCJhdWQiOlsiYXBwLWNsaWVudHMiXSwiZXhwIjoxNzYwMDk5MTc3LCJpYXQiOjE3NjAwODgxMTd9.
r7JhFS-GBkxqhg_VWpYhcpEM03vorB2ebJqocrJUfns
Decoding the payload will show the result shown in [@snip:jwt-example].
{
  "typ": "JWT",
  "alg": "HS256"
}
{
"aud": [
  "app-clients"
],
"exp": 1759966073,
"iat": 1759965173,
"iss": "app",
"role": "user",
"sub": "0199c616-f254-74b7-958b-2555db9f6e7d"
}
The payload consists of two JSON objects, the first one being the header and the second one being the payload. The header is used to specify the type of token, which is JWT in this case, and also the algorithm used to sign the token, which in this case is HS256 which is a symmetric-key hashing algorithm. This key will be set when deploying as a Kubernetes secret and can nicely be generated with openssl rand -base64 64 to generate a 64-character long key to use for the signing. While RS256 could have been used, the implementation would have been more complex, and for the showcase HS256 is perfectly fine. 17
The payload has the “claims” of the token, i.e., data for who the subject is, what role they have, when the token expires, and what audience the token is for. I use those standard claims in my app: 16
- aud: audience
- identifies the intended recipient of the token
- in this case it is the app clients
- exp: expiration
- when the token expires
- the date must be a numerical Unix date
- iat: issued at
- when the token was issued
- the date must be a numerical Unix date
- iss: issuer
- identifies the principal that issued the token
- in this case the name of the app
- sub: subject
- identifies the subject of the token
- the user ID of the user the token is for
And also added is role, which is the role of the user, which can either be admin or user.
With these basics we can look at the authentication flow and then a bit of the implementation and middleware used.
Authentication Flow
The app uses a JWT authentication flow with refresh tokens. This means when a user signs in, the app will return a JWT token and a refresh token. The refresh token can be used to get a new JWT token after it expires. The JWT gets stored in LocalStorage and the refresh token gets stored in the browser’s cookies as a secure HTTPS cookie, and the refresh token’s hash, expiration date, and user ID are stored in the database, and then the token is used to get a new JWT token when it expires.
The received JWT will be appended to the Authorization header with the value Bearer <base64-encoded JWT>, which the frontend code takes from LocalStorage and inserts into the header; the JWT should not be in a cookie since it would be auto-sent by the browser, making it prone to XSS-style session hijacking. [@noauthor_oauth_nodate-1]

In [@fig:login-refresh-flow], it shows how the client hits the auth/refresh endpoint with the refresh token to verify that it is still valid against the DB, and then issues a new JWT token to be used for the rest of the session. 18 16

With this knowledge, we can look at the implementation of the JWT authentication flow middleware as in [@snip:auth-middleware].
func (h *Handlers) AuthMiddleware() gin.HandlerFunc {
      return func(c *gin.Context) {
              hdr := c.GetHeader("Authorization")
              if len(hdr) < 8 || hdr[:7] != "Bearer " {
                      // log error
                      c.Abort()
              }

              tokenStr := hdr[7:]
              claims, err := auth.ParseAndValidate(h.Cfg, tokenStr)
              if err != nil {
                      // log error
                      c.Abort()
              }
              c.Set("sub", claims.Subject)
              c.Set("role", claims.Role)
              c.Next()
      }

}
This code reads the header and stores the value of the Authorization header if present, and checks that it is long enough to be a JWT and that the Bearer prefix is there. If it’s valid, the string gets cut to only have the encoded JWT left, which is then parsed and validated with h.Cfg being a context object in the server that stores the JWT secret needed to validate the token. If no error is returned, we store sub and role in a key-value store called c.Set from the Gin framework, allowing us to keep contextual data in the request, which is later used in the following handlers to extract user id and role. 16
If a JWT is forged, the request should fail. The ParseAndValidate function uses the jwt library to parse the JWT and validate it with our configured values and key and rules, performing the signature check to ensure the token wasn’t forged by a threat actor and is valid. After the middleware succeeds, the other handlers will take over and let the user in. 16
Leaky Bucket Rate Limiting
There is an additional middleware to rate limit using a leaky bucket algorithm. This algorithm is simple and works by using a First In, First Out (FIFO) queue with a fixed capacity to manage request rates, ensuring a constant rate regardless of traffic spikes and instead focusing on a consistent rate of requests. 19
This can be imagined like a bucket leaking at a fixed rate to avoid overflow. 19
It’s implemented by simply using the go.uber.org/ratelimit package and using ratelimit.New(configuredRPS) and limit.Take() in the middleware handler to enforce a rate limit. This has no per-IP request profiling, as I found that to be overkill for this, and the RPS (Requests Per Second) is loaded via an ENV variable for easy configuration.
Hosting the Frontend
The frontend files are served via Caddy, a reverse proxy server, which I use to serve the frontend files and reverse proxy the API calls to the backend. To make better use of it, I made a custom Docker image in [@snip:caddy-dockerfile] where I copy the static files in a multi-stage build after minifying them, saving a couple of kilobytes in the final image and reducing web requests.
FROM alpine:3.20 AS builder
RUN apk add --no-cache minify
WORKDIR /app

COPY index.html styles.css script.js /app/

RUN minify -o index.html index.html && \
    minify -o styles.css styles.css && \
    minify -o script.js script.js

FROM caddy:2-alpine
WORKDIR /srv

COPY --from=builder /app /srv
COPY entrypoint.sh /entrypoint.sh
RUN chmod +x /entrypoint.sh

ENTRYPOINT ["/entrypoint.sh"]
The entry point in [@snip:caddy-entrypoint] is here to allow overwriting the API base path in the frontend with an environment variable for flexibility.
#!/bin/sh
set -e
WEBROOT="/srv"

: "${API_BASE:=/api}"

SAFE_API_BASE=$(printf '%s' "$API_BASE" | sed 's/[&]/\\&/g')
sed -i "s|__API_BASE__|$SAFE_API_BASE|g" "$WEBROOT/script.js"

exec caddy run --config /etc/caddy/Caddyfile --adapter caddyfile
Lastly, the minimal required Caddyfile is [@snip:basic-caddyfile], which reverse proxies to the API and API_URL is meant to be replaced with the actual API URL. This can be added by mounting the Caddyfile with the correct values into the container or embedding it via a ConfigMap when using Kubernetes. It only listens on port 80 and doesn’t feature TLS. The static files are served from the root directive, which is the root of the files in the container, and the file_server directive is used to serve the static files. The configuration will be discussed in more depth when I talk about the Kubernetes setup and making the app insecure.
:80 {
  handle_path /api/* {
    reverse_proxy API_URL
  }

 root * /srv
 encode gzip zstd
 file_server
}
Setting Up Windows SMB Share for Backups
As stated in [@sec:Architecture], the purpose of the Windows Server is to be used as a backup to archive database snapshots. The setup is straightforward and consists of the following steps:
- Partition and format the drive as NTFS
- Create the needed users and group
- Set the permissions
- Create the needed directories
- Share the input directory
- Create a PowerShell script to move the files from the input directory to a sorted directory structure
- Create a scheduled task to run the script every night
Before each step is covered, an overview of the backup process will be given, and [@sec:backing-up-postgres-data] will show how the data gets into the input directory.
Backup Strategy
In [@fig:backup-dirs] the backup layout is shown, where the data directory is the input dir, which gets shared via SMB, in a share that will be called app-data where a user called share-app will have write access to it, which will be used to authenticate to the share and have no other permissions. Additionally, a share-backup will be created, used by the scheduled task to copy over the files from the input dir and structure in \backups and have each backup in a timestamped directory containing the encrypted dump, a file with the dumps checksum, and a JSON file like in [@fig:backup-json-manifest] which stores the hash, filename, and filesize for possible restorations. The \backups\archive directory will be used after the configured amount of generations has been reached and then compresses the backups into timestamped zip archives in that dir, which will be auto-deleted with the backup script.


The resulting dump of the database is just a binary blob encrypted with GPG, which viewing the contents of the file in [@fig:windoof-bat] using bat which is a cat clone but with more features such as syntax highlighting and just showing <BINARY> instead of cluttering the whole terminal output. 20
While implementing the requirements for the backup strategy, only a single screenshot of the results was taken, as the actual process is very trivial and almost all of it was covered last year in Exercise 8. 21
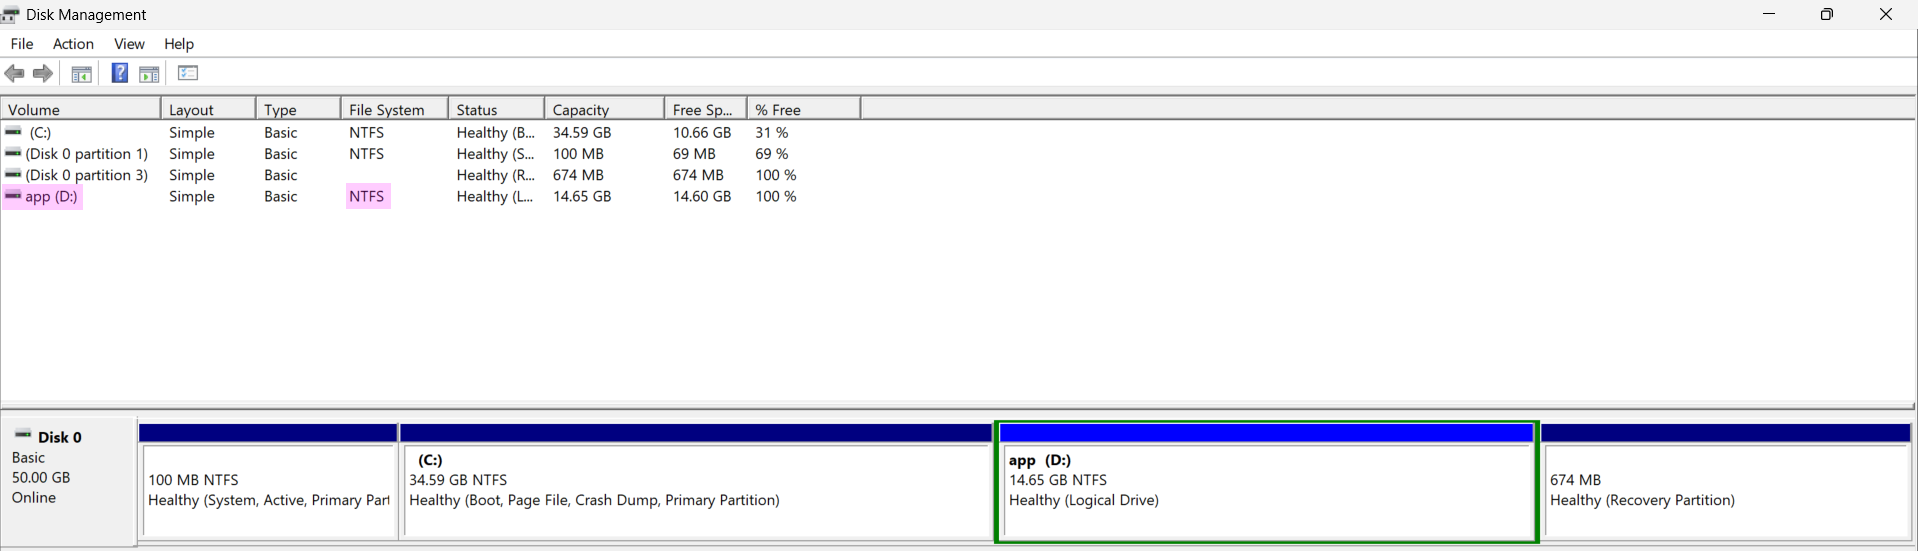
The Created partition is shown in [@fig:windoof-disks].
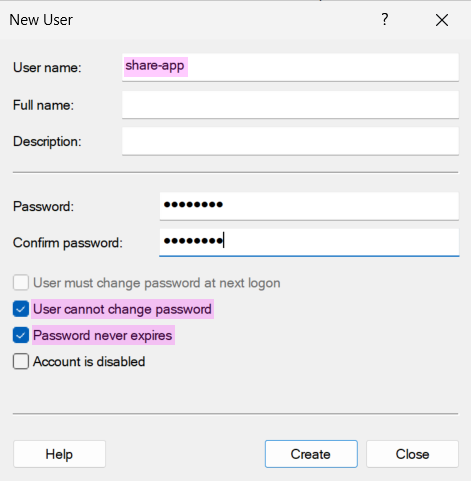
In [@fig:windoof-user], the user share-app is created with settings that prevent password changes and set to never expire, since this account is intended for automated scripts and does not require normal user logins, and will be rotated manually on demand. Users could also be grouped if desired.
These users can be inspected with the net user command, which is shown in [@fig:windoof-users].

To inspect the NTFS permissions of the directory structure, the Get-PermissionTree module created by Edi (available here) is used to inspect the NTFS permissions of a given directory recursively with the desired depth, as shown in [@fig:windoof-perms]. [@eduard_ereboss8get-permissiontree_2025]

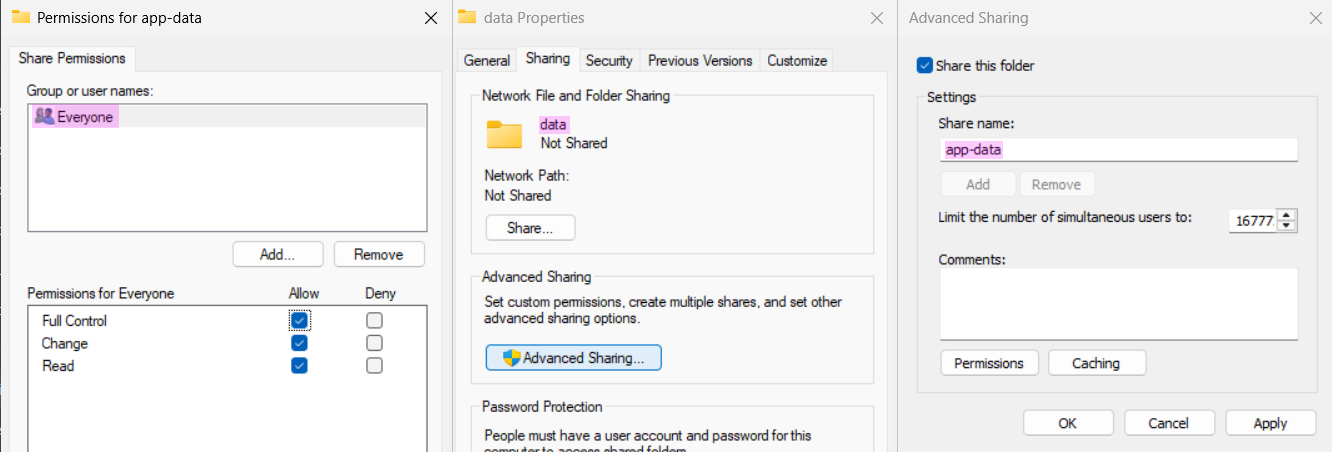
Now the \data directory can be shared by simply granting Everyone full control which can be seen in [@fig:windoof-share], as the NTFS permissions take over by the privilege of the least privileged user.
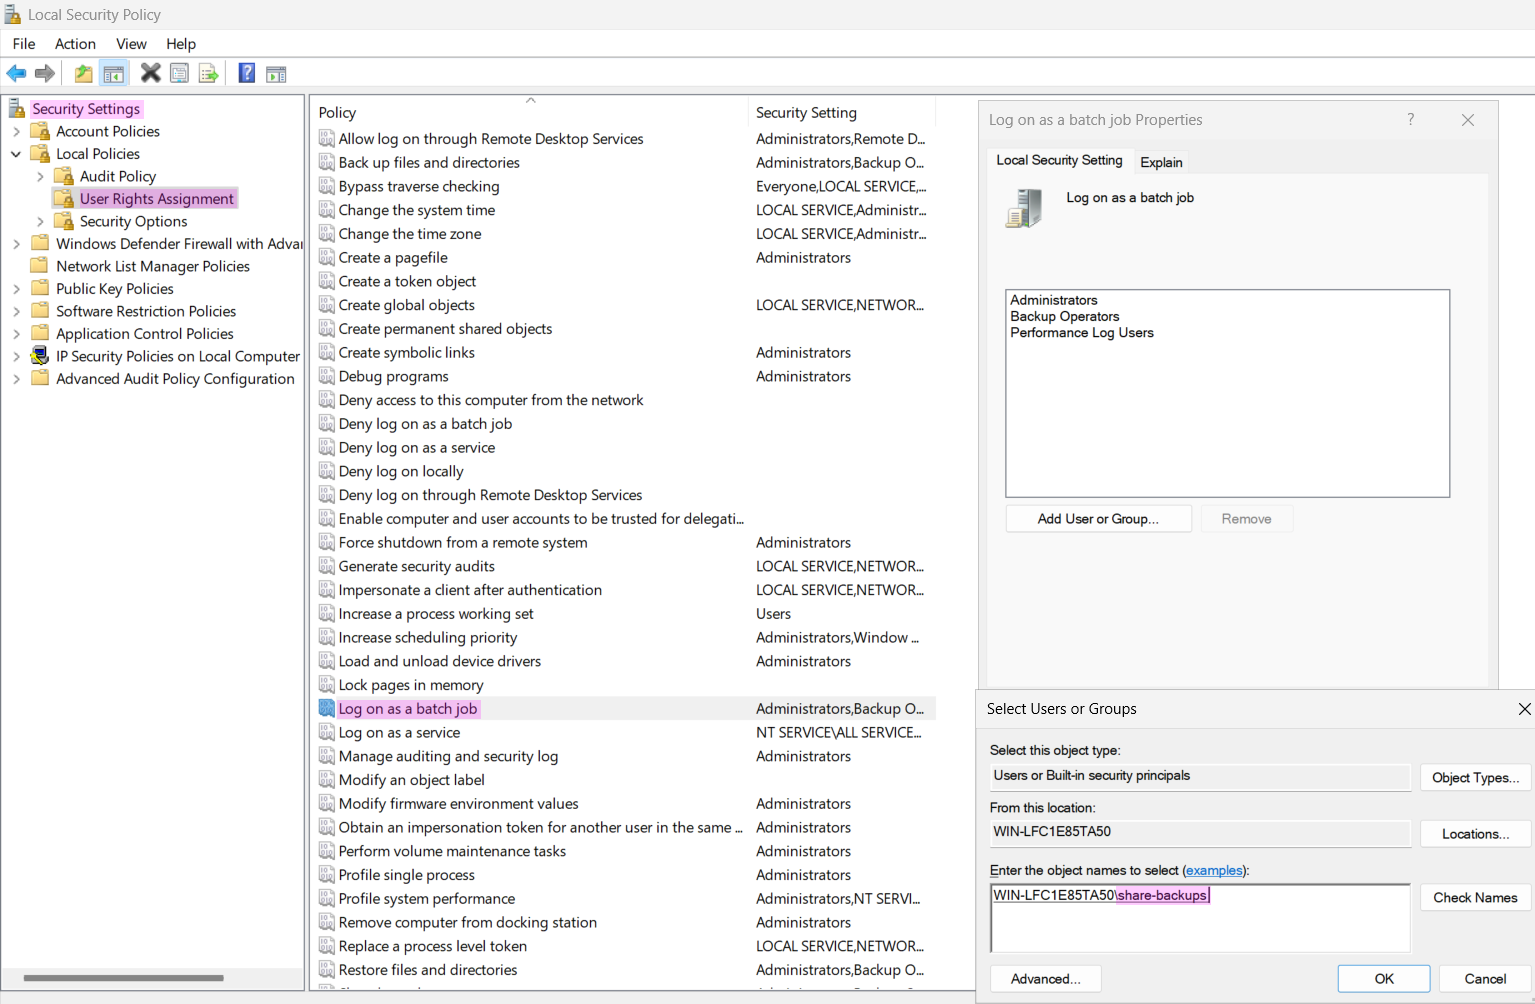
Before creating the scheduled backup task, the share-backup user must be allowed to sign on as a batch job. This can be configured in Local Security Policy under User Rights Assignments > Log on as a batch job, as shown in [@fig:windoof-gp]. After making the change, reboot or run gpupdate /force to apply the changes. [@vinaypamnani-msft_log_nodate]
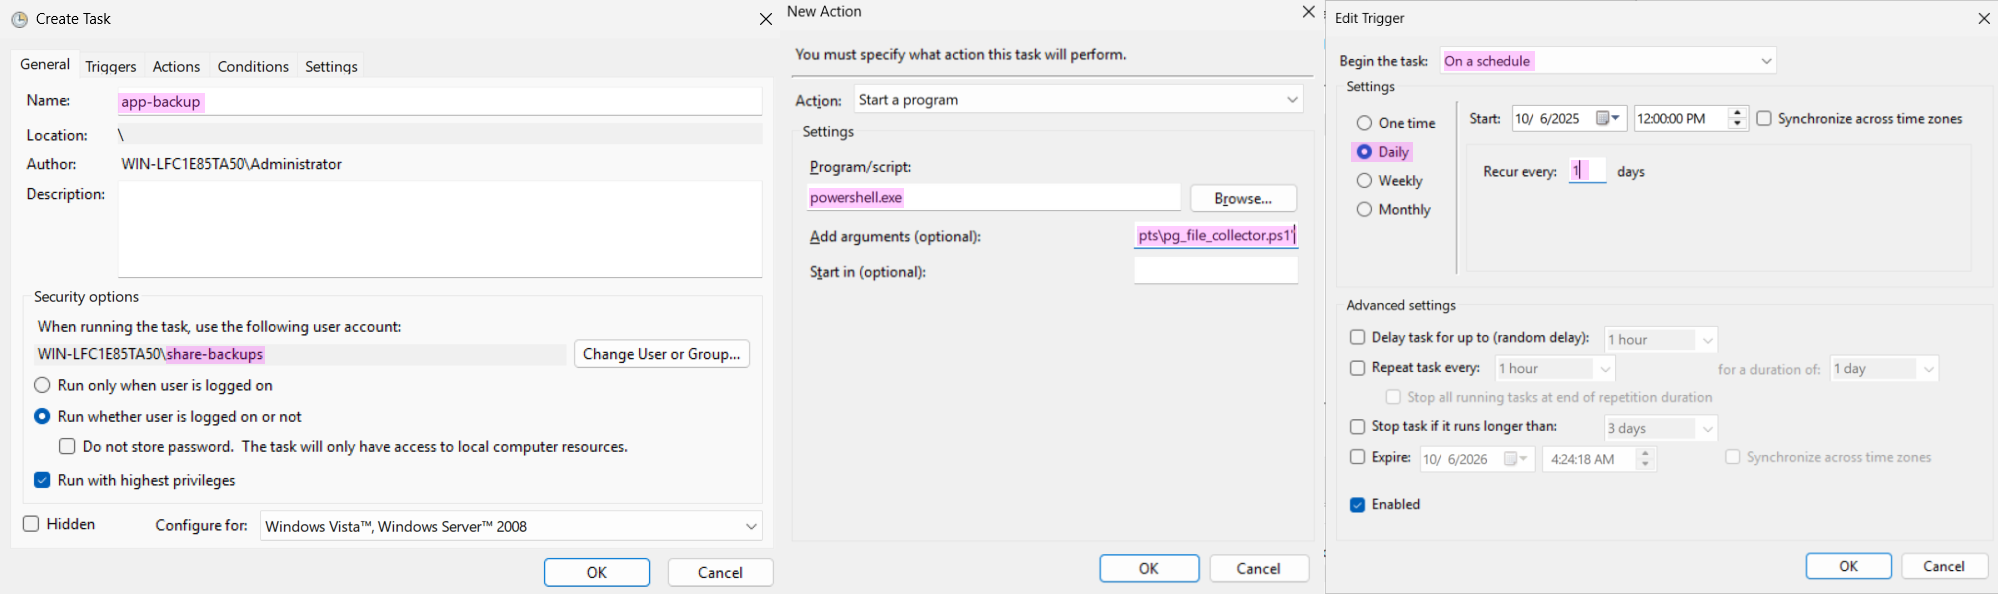
To create the scheduled task in Task Scheduler, a task named app-backup will be created with powershell.exe and the argument -NoProfile -ExecutionPolicy Bypass -File "D:\app\scripts\pg_file_collector.ps1" to run the script. To set the user the task runs as, you should use Create Task (Advanced) rather than Create Basic Task. Lastly, a trigger is set to run the task once a day. In [@fig:windoof-task], the three needed steps are aggregated into a single figure.
With the task setup and any script fitting the requirements created, the Windows part for backups is now complete. My PowerShell script is available on my GitHub at here. It can be implemented in many ways, so breaking down my approach to copying files isn’t worth detailing since it can just be examined on GitHub.
Backing Up Postgres Data
To backup Postgres, four things are needed:
- Mounting the Windows share
- A GPG key
- A backup script
- A scheduled task
To mount the Windows share, install the cifs-ultils, gnupg and docker-cli packages via apk add gnupg cifs-utils docker-cli. After creating the directory for the mount point, add the following entry to /etc/fstab, a file that defines disk partitions and various other block devices or remote file systems that should be mounted into the file system. 22
//ex1-windoof/app-data- remote share location using Tailscale Magic DNS instead of an IP
/mnt/backups/app- mount point
cifs- filesystem type
credentials=/etc/cifs-creds/backup_smb_creds- credentials file
vers=3.0- SMB version
uid=1000,gid=1000- user and group id of
fus-usercreated in [@sec:setting-up-alpine] without any root privileges
- user and group id of
file_mode=0640- permissions for the files
dir_mode=0750- permissions for the directories
_netdev- marks the device as a network device
0 0- dump and fsck options (disabled due to being a network mount) 23
This can be applied by running mount -a or rebooting the system.
To now generate a GPG key, gpg --generate-key is run on the host instead of the VM, as the private key needs to be kept safe and not on a random server and then the public key will be exported and uploaded to the vm to encrypt the backups and have the administrator or team have the private keys to decrypt and restore backups. In the dialogue only the Real name field is needed which is named ex1-itsi and the email field is skipped which then prompts to enter a passphrase for the key to finish the generation.
By using gpg --list-keys "ex1-itsi" the key can be inspected as in [@fig:inspect-gpg-key].

This, however, shows that there are actually two key pairs: a primary (“normal”) key and a subordinate (“subkey”) pair. The primary key is used for signing and certification (capabilities [SC]) and uses the ed25519 elliptic-curve algorithm, which is known for high performance. The owner is identified by the uid field, which is the name entered earlier. The subkey uses curve25519, another elliptic-curve algorithm designed for key exchange and often used for encryption, as indicated by the e capability in the capabilities field.
Next, the key is exported to a file with gpg --export -a ex1-itsi > ex1-itsi.pub.asc and then copied to the VM via scp ex1-itsi.pub fus-admin@ex1-alpine-vm:/home/fus-admin/ex1-itsi.pub.asc, where it is imported with gpg --import ex1-itsi.pub.asc, which is verified in [@fig:inspect-gpg-key-host] on the VM.

The backup script consists of running pg_dump via docker exec in the target container, and using gpg --homedir /home/fus-admin/.gnupg --batch --yes --recipient "ex1-itsi" --encrypt "$DUMPFILE" to encrypt the backup, then moving it to the share along with the boilerplate. It is also available on GitHub alongside the PowerShell script. Lastly, using crontab -e and adding 0 1 * * * rc-service app-backup start to run the backup script once a day.
Additionally, an OpenRC service file was created to run the script as the unprivileged user, as shown in [@snip:backup-open-rc-service]. OpenRC is Alpine Linux’s init system and service manager, which is used to manage system services and daemons. 24 The service file defines how the backup script should be executed, including which user it runs as, what dependencies it has, and how it should behave during startup and shutdown. This approach provides several benefits over running the script directly via cron: better logging integration with the system, dependency management, and the ability to start/stop the service manually if needed. The service file is placed in /etc/init.d/ and can be managed using standard OpenRC commands like rc-service app-backup start, rc-service app-backup stop, and rc-service app-backup status.
#!/sbin/openrc-run

description="Run Docker PostgreSQL backup job (encrypts dump)"

command="/usr/local/bin/pg_docker_backup.sh"
command_user="fus-admin"
command_env="HOME=/home/fus-admin"

depend() {
    need docker net localmount
}

start_pre() {
    if [ ! -d /mnt/backups/app ]; then
        eerror "Backup path /mnt/backups/app not mounted"
        return 1
    fi
}

start() {
    ebegin "Executing PostgreSQL backup script"
    $command
    local rc=$?
    [ "$rc" -eq 0 ] && eend 0 "Backup finished successfully" || eend $rc "Backup failed"
}
This service file sets the command and user to use and includes boilerplate to verify that the backup path is mounted, start and stop the app, and add logging. 24
Let’s break down each section of the service file: The shebang #!/sbin/openrc-run tells the system that this is an OpenRC service script. The description field provides a human-readable description of what the service does. The command field specifies the full path to the script that will be executed. The command_user field defines which user the service should run as, in this case fus-admin to avoid running as root. The command_env field sets environment variables for the command, here setting the HOME variable to the user’s home directory. The depend() function defines service dependencies: docker (the container runtime), net (networking), and localmount (local filesystem mounts). This ensures these services are running before the backup service starts. The start_pre() function runs before the main service starts and checks if the backup mount point /mnt/backups/app exists and is accessible. If not, it logs an error and prevents the service from starting. The start() function contains the main service logic. It logs the start of the backup process, executes the command, captures the return code, and logs whether the backup succeeded or failed based on the exit code.
A working run was already shown in [@fig:backup-dirs] not requiring any further Figures.
Kubernetes Intro
Overview and Needed Terms
Kubernetes is a container orchestration platform that is used to manage and deploy containers. It is an open-source project that was originally developed by Google and is now maintained by the Cloud Native Computing Foundation (CNCF). 25
It is used to orchestrate and manage containers across multiple hosts, which can be done by using a single Kubernetes cluster or by using multiple clusters, each with its own set of nodes to horizontally scale the workloads, which is the opposite of vertical scaling where you scale by upgrading hardware, such as upgrading the CPU or moving to a bigger machine. 25 26
A cluster consists of a master node and one or more worker nodes. The master node is responsible for managing the cluster and the worker nodes are responsible for running the containers. Those nodes can be virtual machines, bare metal servers, or cloud instances, and can be on the same physical machine or on different physical machines. 27
Once in a cluster they can be added to a Kubernetes cluster by the kubectl cli, which offers commands to interact with the cluster, such as creating deployments, scaling deployments, and creating services all from the convenience of not having to SSH into each server. 28
The following terms are used in this document:
- Kubernetes cluster
- set nodes that can be used to run containers
- Kubernetes node
- a virtual or physical machine, depending on the cluster. Each node is managed by the control plane and contains the services necessary to run Pods. 29
- Kubernetes pod
- smallest deployable units of computing that you can create and manage in Kubernetes. 30
- Kubernetes deployment
- provides declarative updates for Pods and ReplicaSets usually written in YAML. 31
- Kubernetes service
- method for exposing a network application that is running as one or more Pods in your cluster. 32
How does k3s differ from other implementations like k8s?
K3s is a lightweight Kubernetes distribution designed for edge computing, reducing the strain on my laptop and allowing my Debian nodes to be provisioned with minimal resources. 33 It is not the only distribution; Kubernetes is a system that can be implemented by various projects, including K3s, K8s, MicroK8s, and others. 25
Creating a Kubernetes Cluster
To create a Cluster, k3s first we need to create a master node so we can later add agents to it. For this k3s provides a nice installer script we can customize with the options down below, shown in [@snip:k3s-master].
export TS_IP=$(tailscale ip -4)
curl -sfL https://get.k3s.io | sh -s - server \
  --node-ip "$TS_IP" \
  --advertise-address "$TS_IP" \
  --tls-san debian-k3s-master.tail112d0c.ts.net \
  --flannel-iface tailscale0
Before the command is run since the Tailscale IP is needed, it is fetched with tailscale ip -4 and then the installer is run with the following options 34:
serveris the mode of the installer, which is used to install the master node--node-ipis the IP of the node, which is the Tailscale IP--advertise-addressis the IP that the node will advertise to the cluster--tls-sanis the name of the node, which is used to generate a certificate for the node--flannel-ifaceis the name of the interface that will be used by Flannel to communicate with the node
Before the agent can be installed the master the token needs to be obtained so the agents can join the cluster. 35 The token has the following format: 35
<prefix><cluster CA hash>::<credentials>prefix:a fixedK10prefix that identifies the tokens format.cluster CA hash:SHA256 sum of the PEM-formatted certificate, as stored on disk if it is self-signed which it is in this case.- The certificate is stored in
/var/lib/rancher/k3s/server/tls/server-ca.crton the master node.
- The certificate is stored in
credentials:Username and password, or bearer token, used to authenticate the joining node to the cluster.
The token is located at /var/lib/rancher/k3s/server/node-token as seen in [@fig:get-master-k3s-token].

With this and the URL of the Kubernetes API server, which is the domain name of the master node in the tailnet with port 6443 (the default port of the Kubernetes API server) 36
export TS_IP=$(tailscale ip -4)
export K3S_URL="https://debian-k3s-master.tail112d0c.ts.net:6443"
export K3S_TOKEN="K10e37d7f565bb7797468b2004e1e79a99b718ff542214644a85f3fb813177d87f0::
                  server:db7de334c19ca3bf063b4a9d8ae19552"
curl -sfL https://get.k3s.io | sh -s - agent \
  --node-ip "$TS_IP" \
  --flannel-iface tailscale0
To install the agent, the following environment variables are required: TS_IP (the node’s IP, as used previously), K3S_URL (the URL for the Kubernetes API server), and K3S_TOKEN (the token obtained from the master node). 37 The remaining options match those used for the master node.
After running this command on all the VMs that I want to add as agents to the cluster,
To now access the cluster, the kubectl cli can be used to interact with the cluster. 38 To access it, first either copy paste the /etc/rancher/k3s/k3s.yaml or copy it over using scp in this case like in [@fig:cat-kubeconfig] i just catted the file to show the contents. Important note: when you want to verify or show the kubeconfig, do not simply use cat. Instead, use kubectl config view, which displays the contents and also redacts the certificates and keys (as shown in [@fig:cat-kubeconfig]) [@noauthor_kubectl_nodate-1]

Once the file is on the desired host, it must first be edited to use the correct IP for the server field, since it currently shows 127.0.0.1 (the server runs locally on the master node, as highlighted in [@fig:cat-kubeconfig]).
By default, kubectl looks for a file named config in the $HOME/.kube directory. You can specify other kubeconfig files by setting the KUBECONFIG environment variable or by setting the --kubeconfig flag. 39 With either of these methods, the cluster can now be managed with the kubectl command, which I alias to k in my shell and therefore will be displayed as such in all following snippets and figures.
To inspect the cluster and view its nodes, the kubectl get nodes command can be used alongside the -o wide flag to show more information about the nodes, as shown in [@fig:kubectl-get-nodes]. Using an output option with -o has additional choices like json so that jq can be used, but here adding wide prints the output as plain text with additional information. 38

As seen in [@fig:kubectl-get-nodes], there is now information such as roles, status, addresses, container runtime, and more. The agents do not have roles by default, which is fine, and they will run containers regardless. They also do not have an external IP, since this will be set up with Ingress (like a reverse proxy). Exposing the entire node would be unnecessary in this case.
Normally, for ingress, a reverse proxy like Traefik is used. For Tailscale, there is the tailscale operator, whose installation and details are shown in [@sec:adding-the-tailscale-operator].
Adding the Tailscale Operator
Ingress is “The act of entering; entrance; as, the ingress of air into the lungs.” [@noauthor_dictorg-_nodate] While egress is “The act of going out or leaving, or the power to leave; departure.” [@noauthor_dictorg-_nodate-1] In the context of Kubernetes and its integration within a tailnet, the Tailscale operator can expose a tailnet service to your Kubernetes cluster (cluster egress) and expose a cluster workload to your tailnet (cluster ingress). The operator can also expose any service internally if it is used as a load balancer. Each service receives an internal domain and IP, which appears as a “machine” in the dashboard and can be accessed through that domain. Normally, this would be any domain used in the load balancer of choice to expose an app publicly. 40
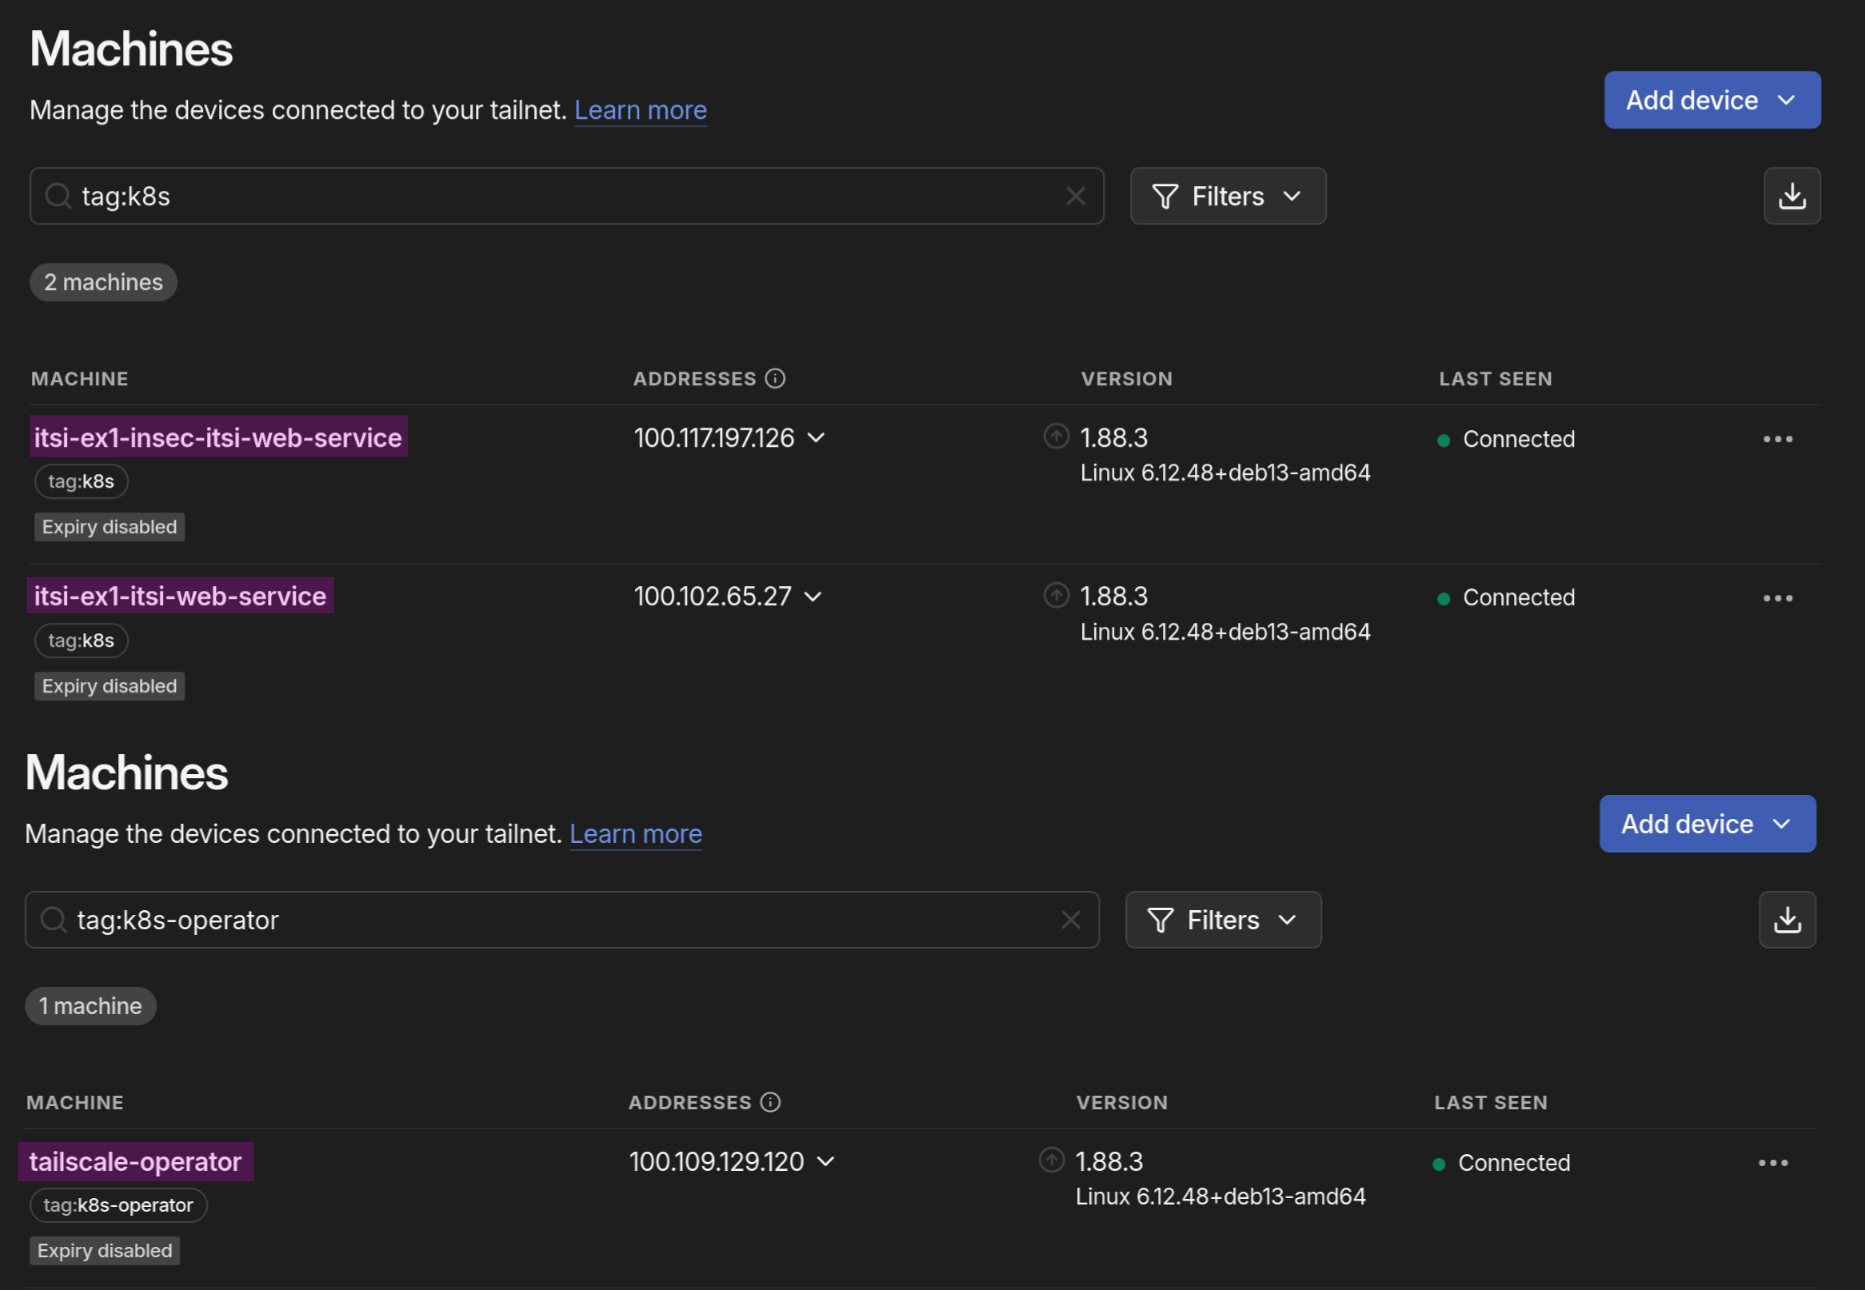
Before the Tailscale operator can be installed, two tags need to be added to the tailnet. The k8s-operator tag is the owner of the k8s tag, which is used for the created services. By using ACLs in Tailscale with either additional tags or just the k8s tag, access to the setup services can be restricted within the tailnet. Additionally, an OAuth client must be created with the Devices Core and Auth Keys write scopes, along with the tag k8s-operator. This allows the operator to create machines and assign them the tag it owns. 40
In [@snip:tailscale-tags], the required tags are shown, which can be appended to the tailnet policy file.
"tagOwners": {
   "tag:k8s-operator": [],
   "tag:k8s": ["tag:k8s-operator"],
}
Like in [@fig:view-stuff-with-tag], the Tailscale operator creates its own machine. The services created later are also machine instances, each with its own hostname and an assigned tag for access control.
To actually install the Tailscale operator, helm needs to be installed on the device from which the cluster is managed. Helm is a package manager for Kubernetes, which is used to install and manage applications on Kubernetes clusters. 41 The required commands are shown in [@snip:helm-cmds].
helm repo add tailscale https://pkgs.tailscale.com/helmcharts
helm repo update

helm upgrade --install tailscale-operator tailscale/tailscale-operator \
  --namespace tailscale \
  --create-namespace \
  --set-string oauth.clientId="kvMQVhCAEn11CNTRL" \
  --set-string oauth.clientSecret="tskey-client-<REDACTED>" \
  --wait
The commands from [@snip:helm-cmds] do the following:
- Add the Tailscale helm repository to the cluster
- Update the helm repositories
- Install the Tailscale operator with the required options
--namespaceis the namespace in which the operator will be installed, in this casetailscale--create-namespaceis used to create the namespace if it doesn’t exist--set-stringis used to set a string value for the optionoauth.clientIdis the OAuth client IDoauth.clientSecretis the OAuth client secret- both of which are available in the Tailscale dashboard when creating the OAuth client
--waitis used to wait for the operator to be ready
After installation, this can be verified in the dashboard as shown in [@fig:view-stuff-with-tag] and with kubectl get pods -n tailscale, in which the -n flag is used to select the namespace from which to fetch the pods, as in [@fig:kubectl-get-pods-tailscale].

Making the Application Insecure
Authentication Bypass via JWT Parsing
To make the app insecure, the JWT was changed to not enforce a signature, allowing users to add any claims to the JWT without returning an error if the signature is invalid, as seen in [@snip:insec-jwt]. The code lets users freely edit their JWT, essentially ignoring everything from [@sec:auth-flow]. This is a massive security risk because it allows users to add arbitrary claims to the JWT, which could bypass authentication. Additionally, it may enable a user to authenticate as another user, something that a valid signature would prevent.
func ParseAndValidate(cfg models.AuthConfig, tokenStr string) (*Claims, error) {
	claims := &Claims{}

	parsers := []*jwt.Parser{
		jwt.NewParser(jwt.WithValidMethods([]string{"HS256"})),
		jwt.NewParser(),
	}

	secrets := [][]byte{cfg.Secret, []byte(""), []byte("secret"), []byte("password")}

	for _, parser := range parsers {
		for _, secret := range secrets {
			tok, err := parser.ParseWithClaims(tokenStr, claims, func(t *jwt.Token) (any, error) {
				return secret, nil
			})
			if err == nil && tok != nil && tok.Valid {
				return claims, nil
			}
		}
	}

	if manualClaims, err := parseJWTManually(tokenStr); err == nil {
		return manualClaims, nil
	}

	return nil, fmt.Errorf("invalid token: signature is invalid")
}
To exploit this, the user only needs to open Developer Tools, access local storage to retrieve their JWT, and then decode it using an online tool as shown in [@fig:jwt-1]. Next, they modify the desired values, specifically replacing the UserID with that of the target user they wish to impersonate. The UserID for the admin (or any other user) can be obtained by navigating to the Users page of the application, inspecting the API request that fetches all users in the Network section of Developer Tools, and extracting the ID as shown in [@fig:getid].
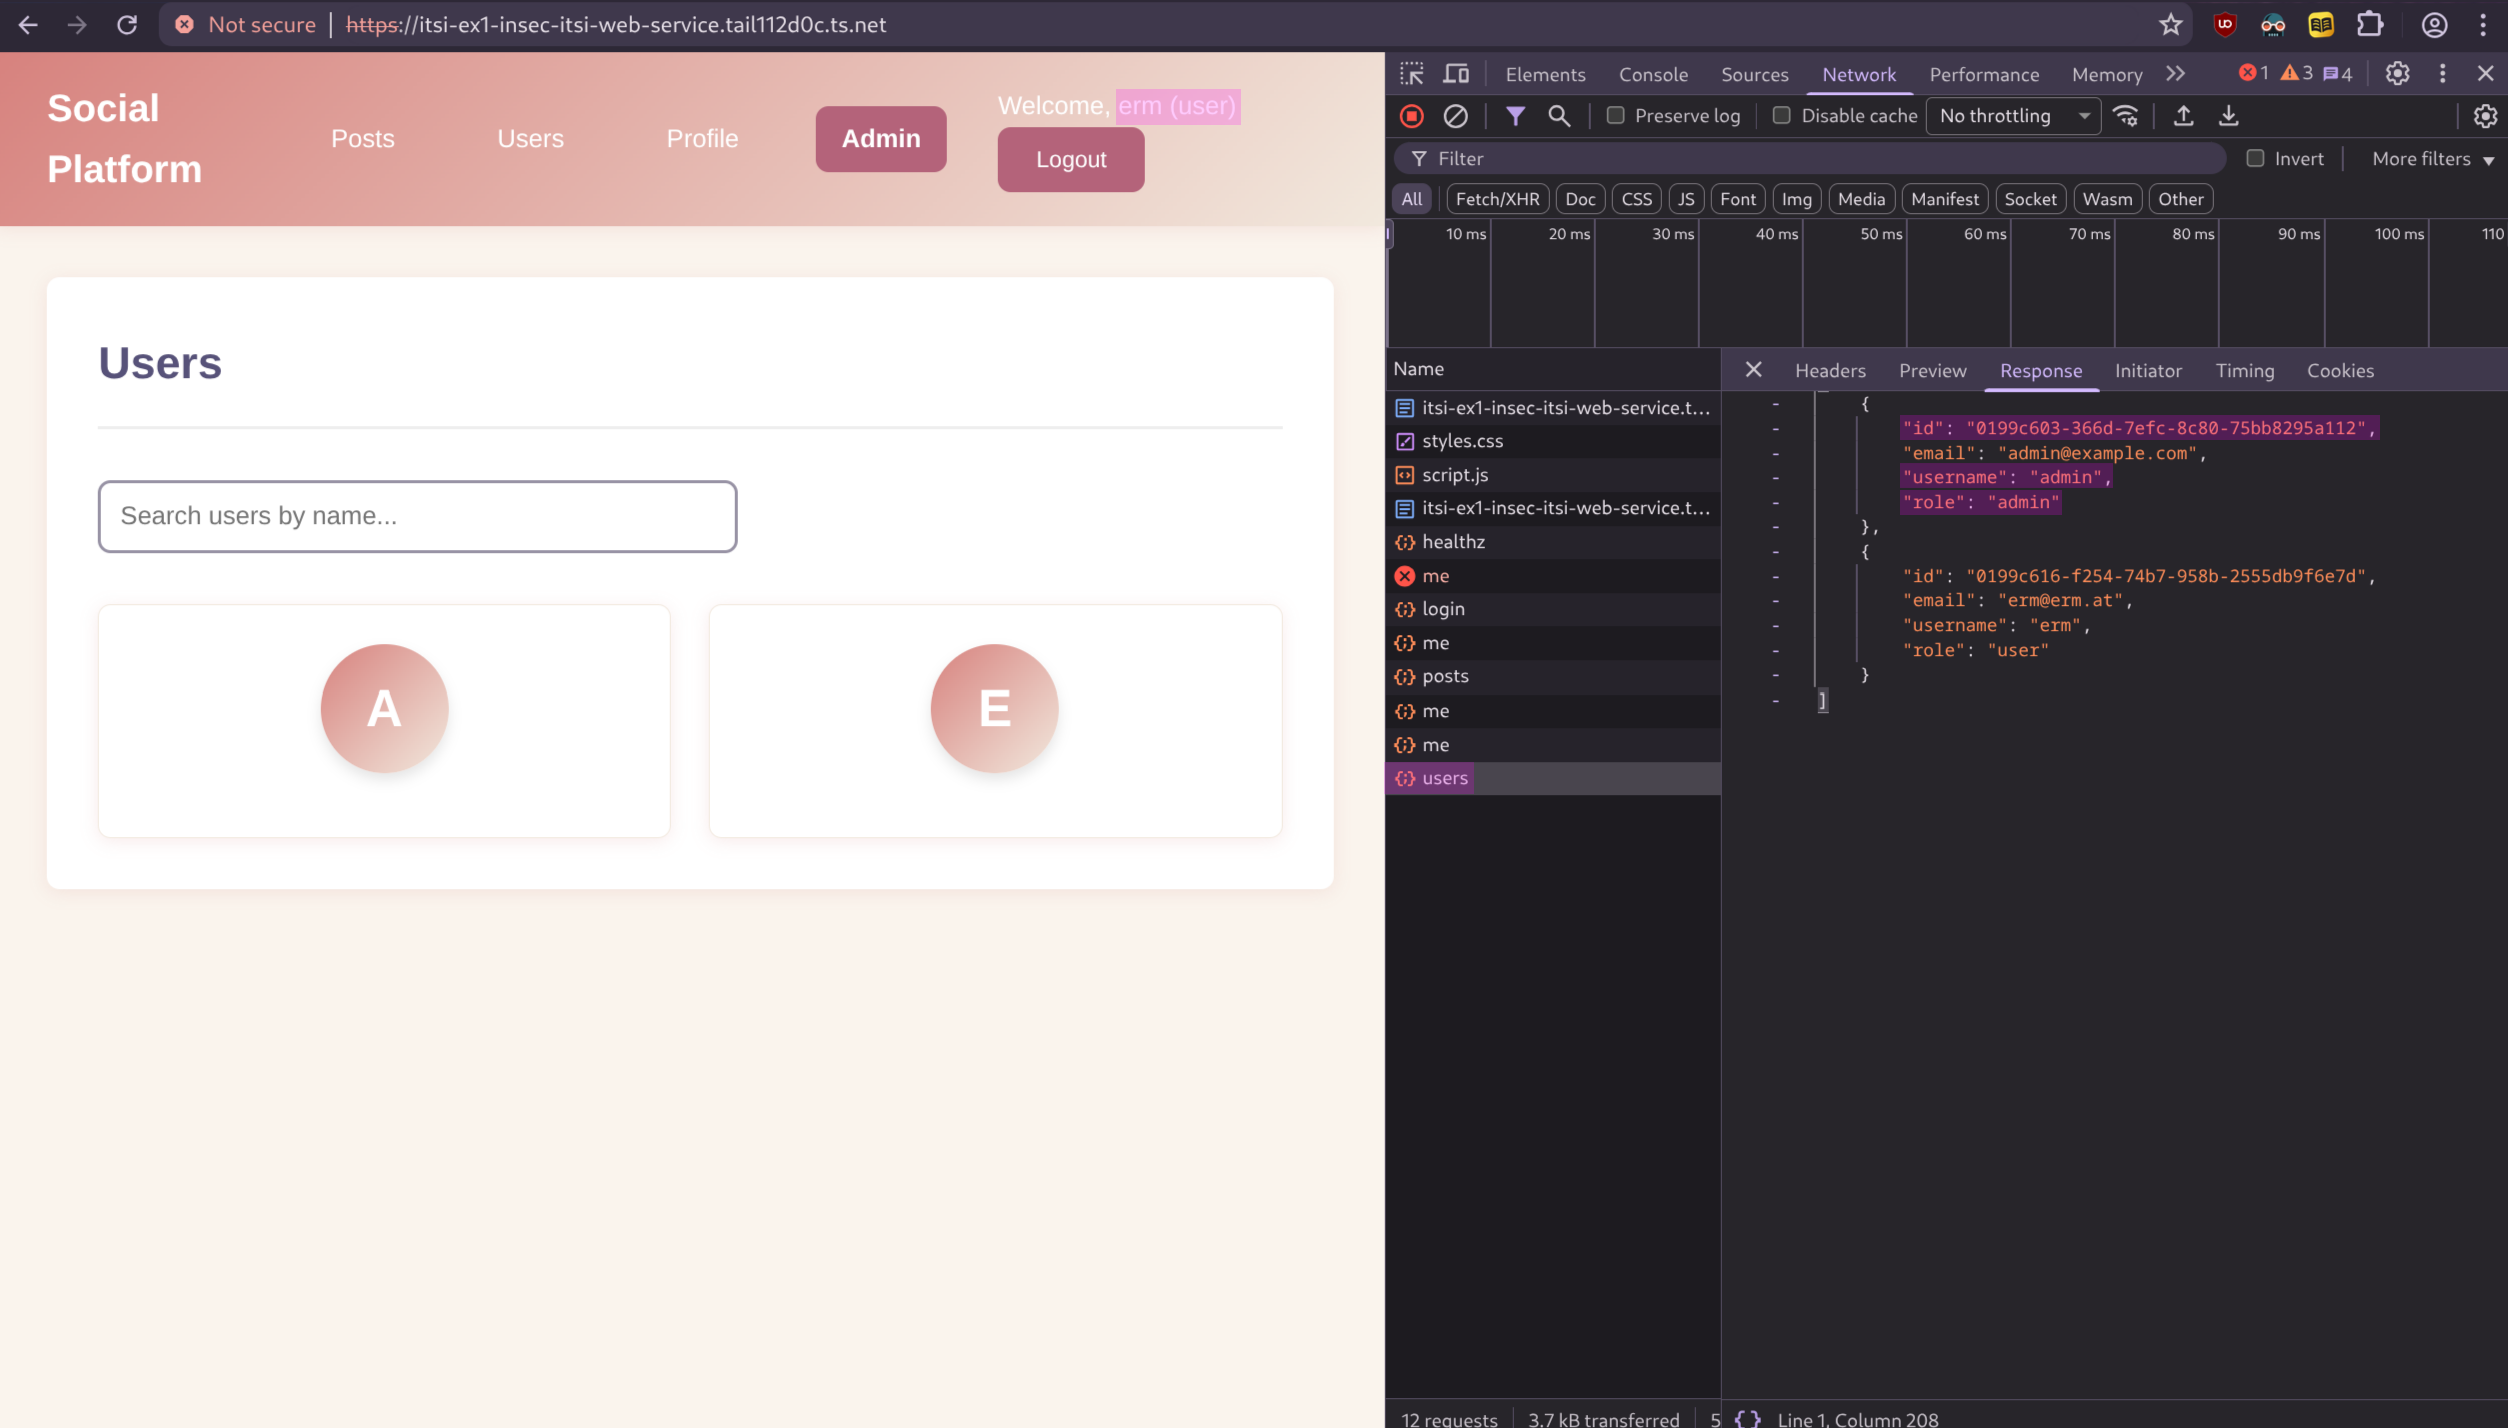
Now, with this ID, the JWT can be edited to instead assign the admin role and the admin’s ID, as shown in [@fig:jwt-1].
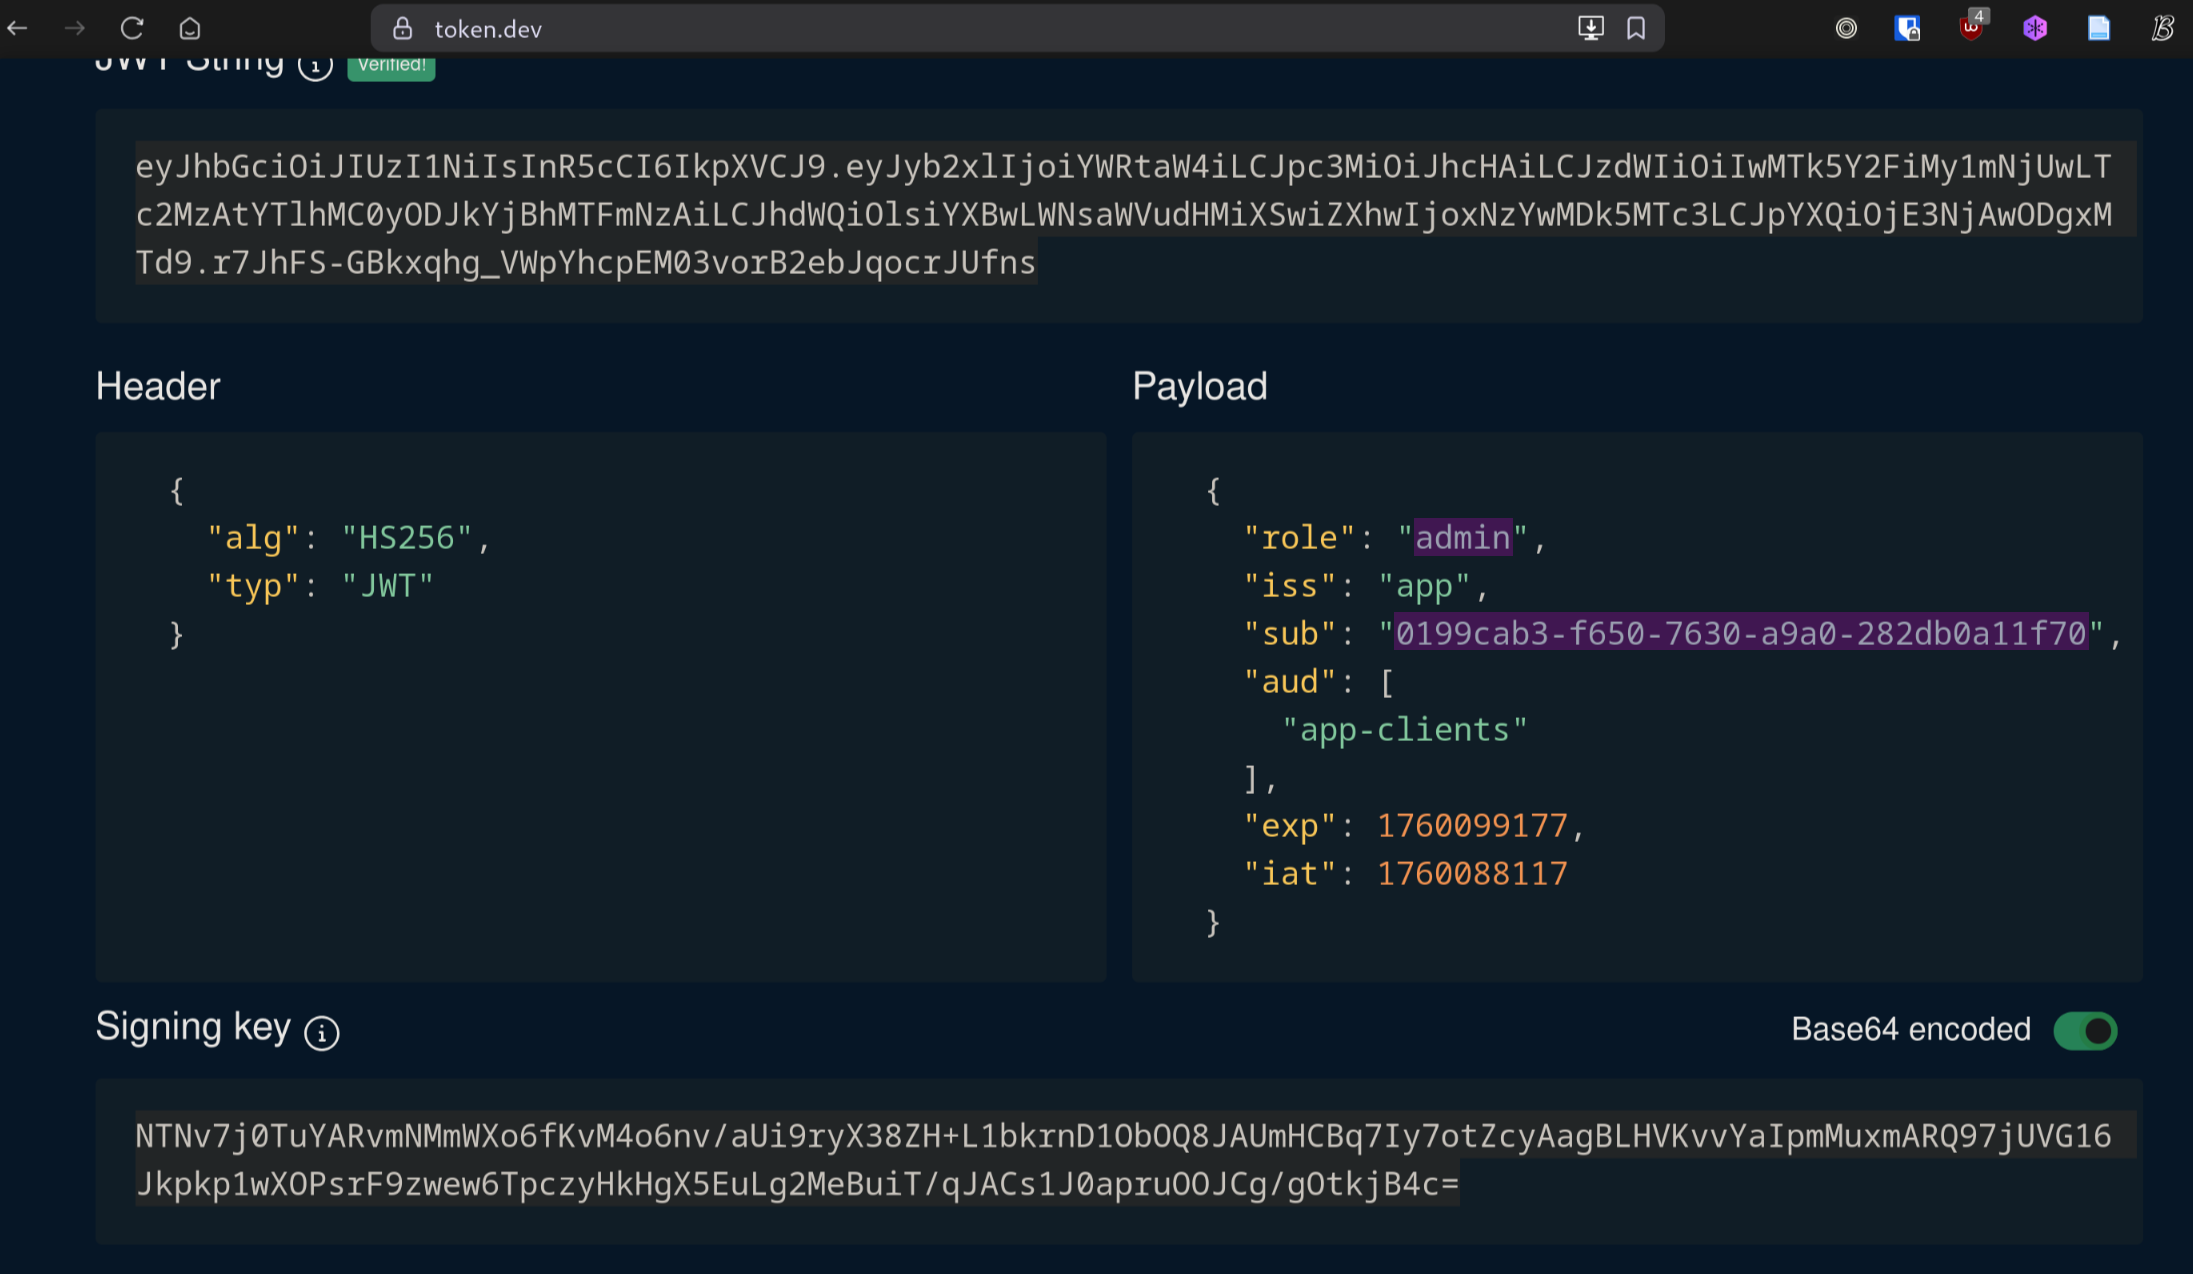
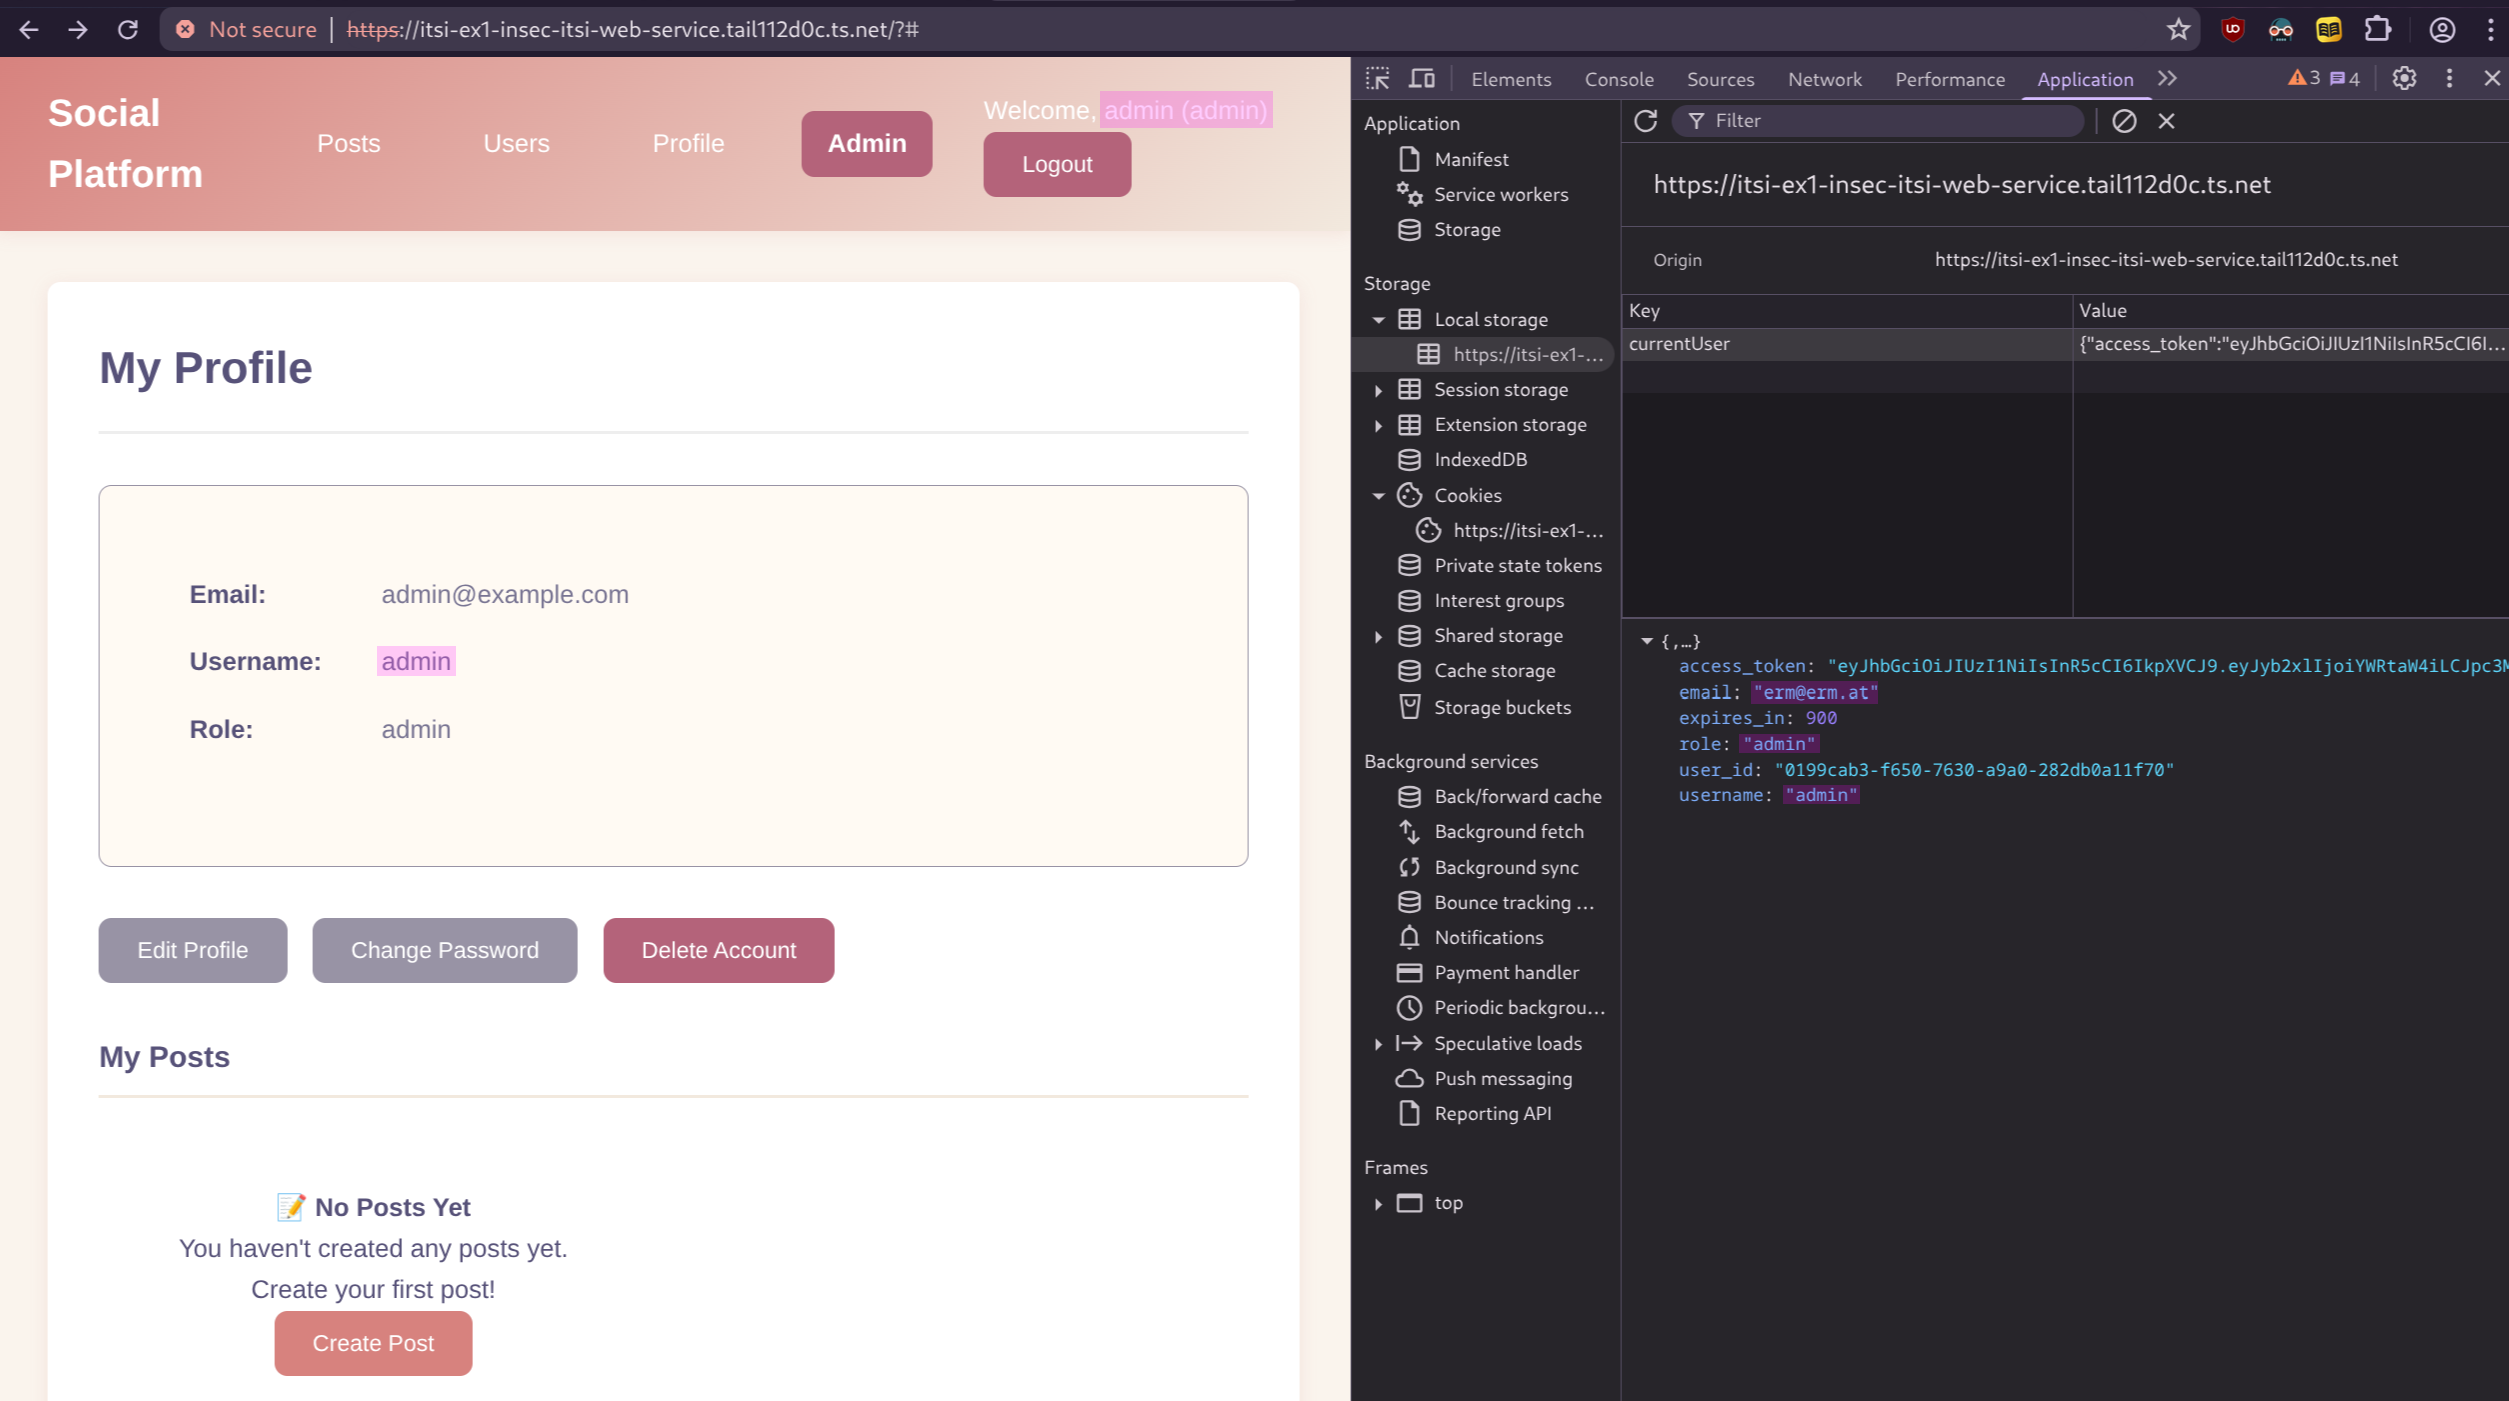
By replacing the old JWT with the new one in local storage, refreshing the profile page will now display the threat actor logged in as the admin, as shown in [@fig:jwt-2].
This could have been prevented by properly parsing the JWT, as shown in [@snip:sec-jwt] on the next page, where the following changes were made:
leewaywas added, which makes the JWT valid for only 2 minutes instead of the default 15 minutes, reducing the time window for the attack.- the claims are checked for validity, and an error is returned if they are invalid.
- the signature is enforced by the parser.
- the role is checked to ensure it is either
useroradmin.
Admittedly, this is a very obvious security flaw where one would have to go out of their way to create it. It is more common for an API to simply lack authentication altogether, which, sadly, is more widespread than one might think. This is especially true in the AI age, where someone inexperienced might instruct an agent to build something but forget to include security in the requested requirements. As a result, they end up with exactly what they asked for: an insecure application. 42
func ParseAndValidate(cfg models.AuthConfig, tokenStr string) (*Claims, error) {
	leeway := 2 * time.Minute
	parser := jwt.NewParser(
		jwt.WithValidMethods([]string{"HS256"}),
		jwt.WithLeeway(leeway),
	)

	claims := &Claims{}
	tok, err := parser.ParseWithClaims(tokenStr, claims, func(t *jwt.Token) (any, error) {
		return cfg.Secret, nil
	})
	if err != nil {
		return nil, fmt.Errorf("invalid token: %w", err)
	}
	if tok == nil || !tok.Valid {
		return nil, fmt.Errorf("invalid token")
	}

	if cfg.Issuer != "" && claims.Issuer != cfg.Issuer {
		return nil, fmt.Errorf("bad issuer")
	}
	if cfg.Audience != "" && !slices.Contains(claims.Audience, cfg.Audience) {
		return nil, fmt.Errorf("bad audience")
	}

	now := time.Now()
	if claims.NotBefore != nil && now.Before(claims.NotBefore.Time.Add(-leeway)) {
		return nil, fmt.Errorf("token not active yet")
	}
	if claims.IssuedAt != nil && now.Before(claims.IssuedAt.Time.Add(-leeway)) {
		return nil, fmt.Errorf("token issued in the future")
	}
	if claims.ExpiresAt == nil || now.After(claims.ExpiresAt.Time.Add(leeway)) {
		return nil, fmt.Errorf("token expired")
	}

	if claims.Role != "" && claims.Role != "user" && claims.Role != "admin" {
		return nil, fmt.Errorf("invalid role")
	}
	return claims, nil
}
Insecure Reverse Proxy Configuration
The Caddyfile was changed to make the app insecure, as shown in [@snip:caddydiff].
--- caddinsec   2025-10-20 01:47:20.632942501 +0200
+++ caddysec    2025-10-20 01:45:05.319602540 +0200
@@ -1,18 +1,22 @@
-https://itsi-ex1-insec-itsi-web-service.tail112d0c.ts.net {
+https://itsi-ex1-itsi-web-service.tail112d0c.ts.net {
  tls /data/caddy/pki/authorities/local/ca.crt /data/caddy/pki/authorities/local/ca.key
+
+handle_path /api/metrics* {
+respond "Forbidden" 403
+}
  handle_path /api/* {
   reverse_proxy itsi-api-service:8085
  }

-
-handle_path /files/* {
-root * /etc
-file_server browse {
- index off
-}
+header {
+Strict-Transport-Security "max-age=31536000; includeSubDomains"
+X-Content-Type-Options "nosniff"
+X-Frame-Options "DENY"
+Content-Security-Policy "default-src 'self'; script-src 'self'; script-src-attr 'none'; object-src 'none'; base-uri 'none'; form-action 'self'; frame-ancestors 'none'; connect-src 'self'; img-src 'self' data:; style-src 'self' 'unsafe-inline'; font-src 'self'; upgrade-insecure-requests"
 }

  root * /srv
  encode gzip zstd
-file_server browse
+file_server
 }
The insecure configuration first doesn’t feature any security headers, like Content-Security-Policy, which are used to prevent XSS attacks.
Content Security Policy (CSP)
Content Security Policy (CSP) is a feature that helps to prevent or minimize the risk of certain types of security threats. It consists of a series of instructions from a website to a browser, which instruct the browser to place restrictions on the things that the code comprising the site is allowed to do.
The primary use case for CSP is to control which resources, in particular JavaScript resources, a document is allowed to load. This is mainly used as a defense against cross-site scripting (XSS) attacks, in which an attacker is able to inject malicious code into the victim’s site. 43 It blocks patterns like eval or inline scripts, which are used to execute code on the client side.
The example in [@snip:btn-bad] uses an inline script to execute code on the client side, which would be blocked by CSP. The second example in [@snip:btn-sec] uses an event listener to execute code on the client side, and this is not blocked by CSP.
<button onclick="alert('example')">Click me</button>
const button = document.querySelector('button');
button.addEventListener('click', function() {
  alert("example");
});
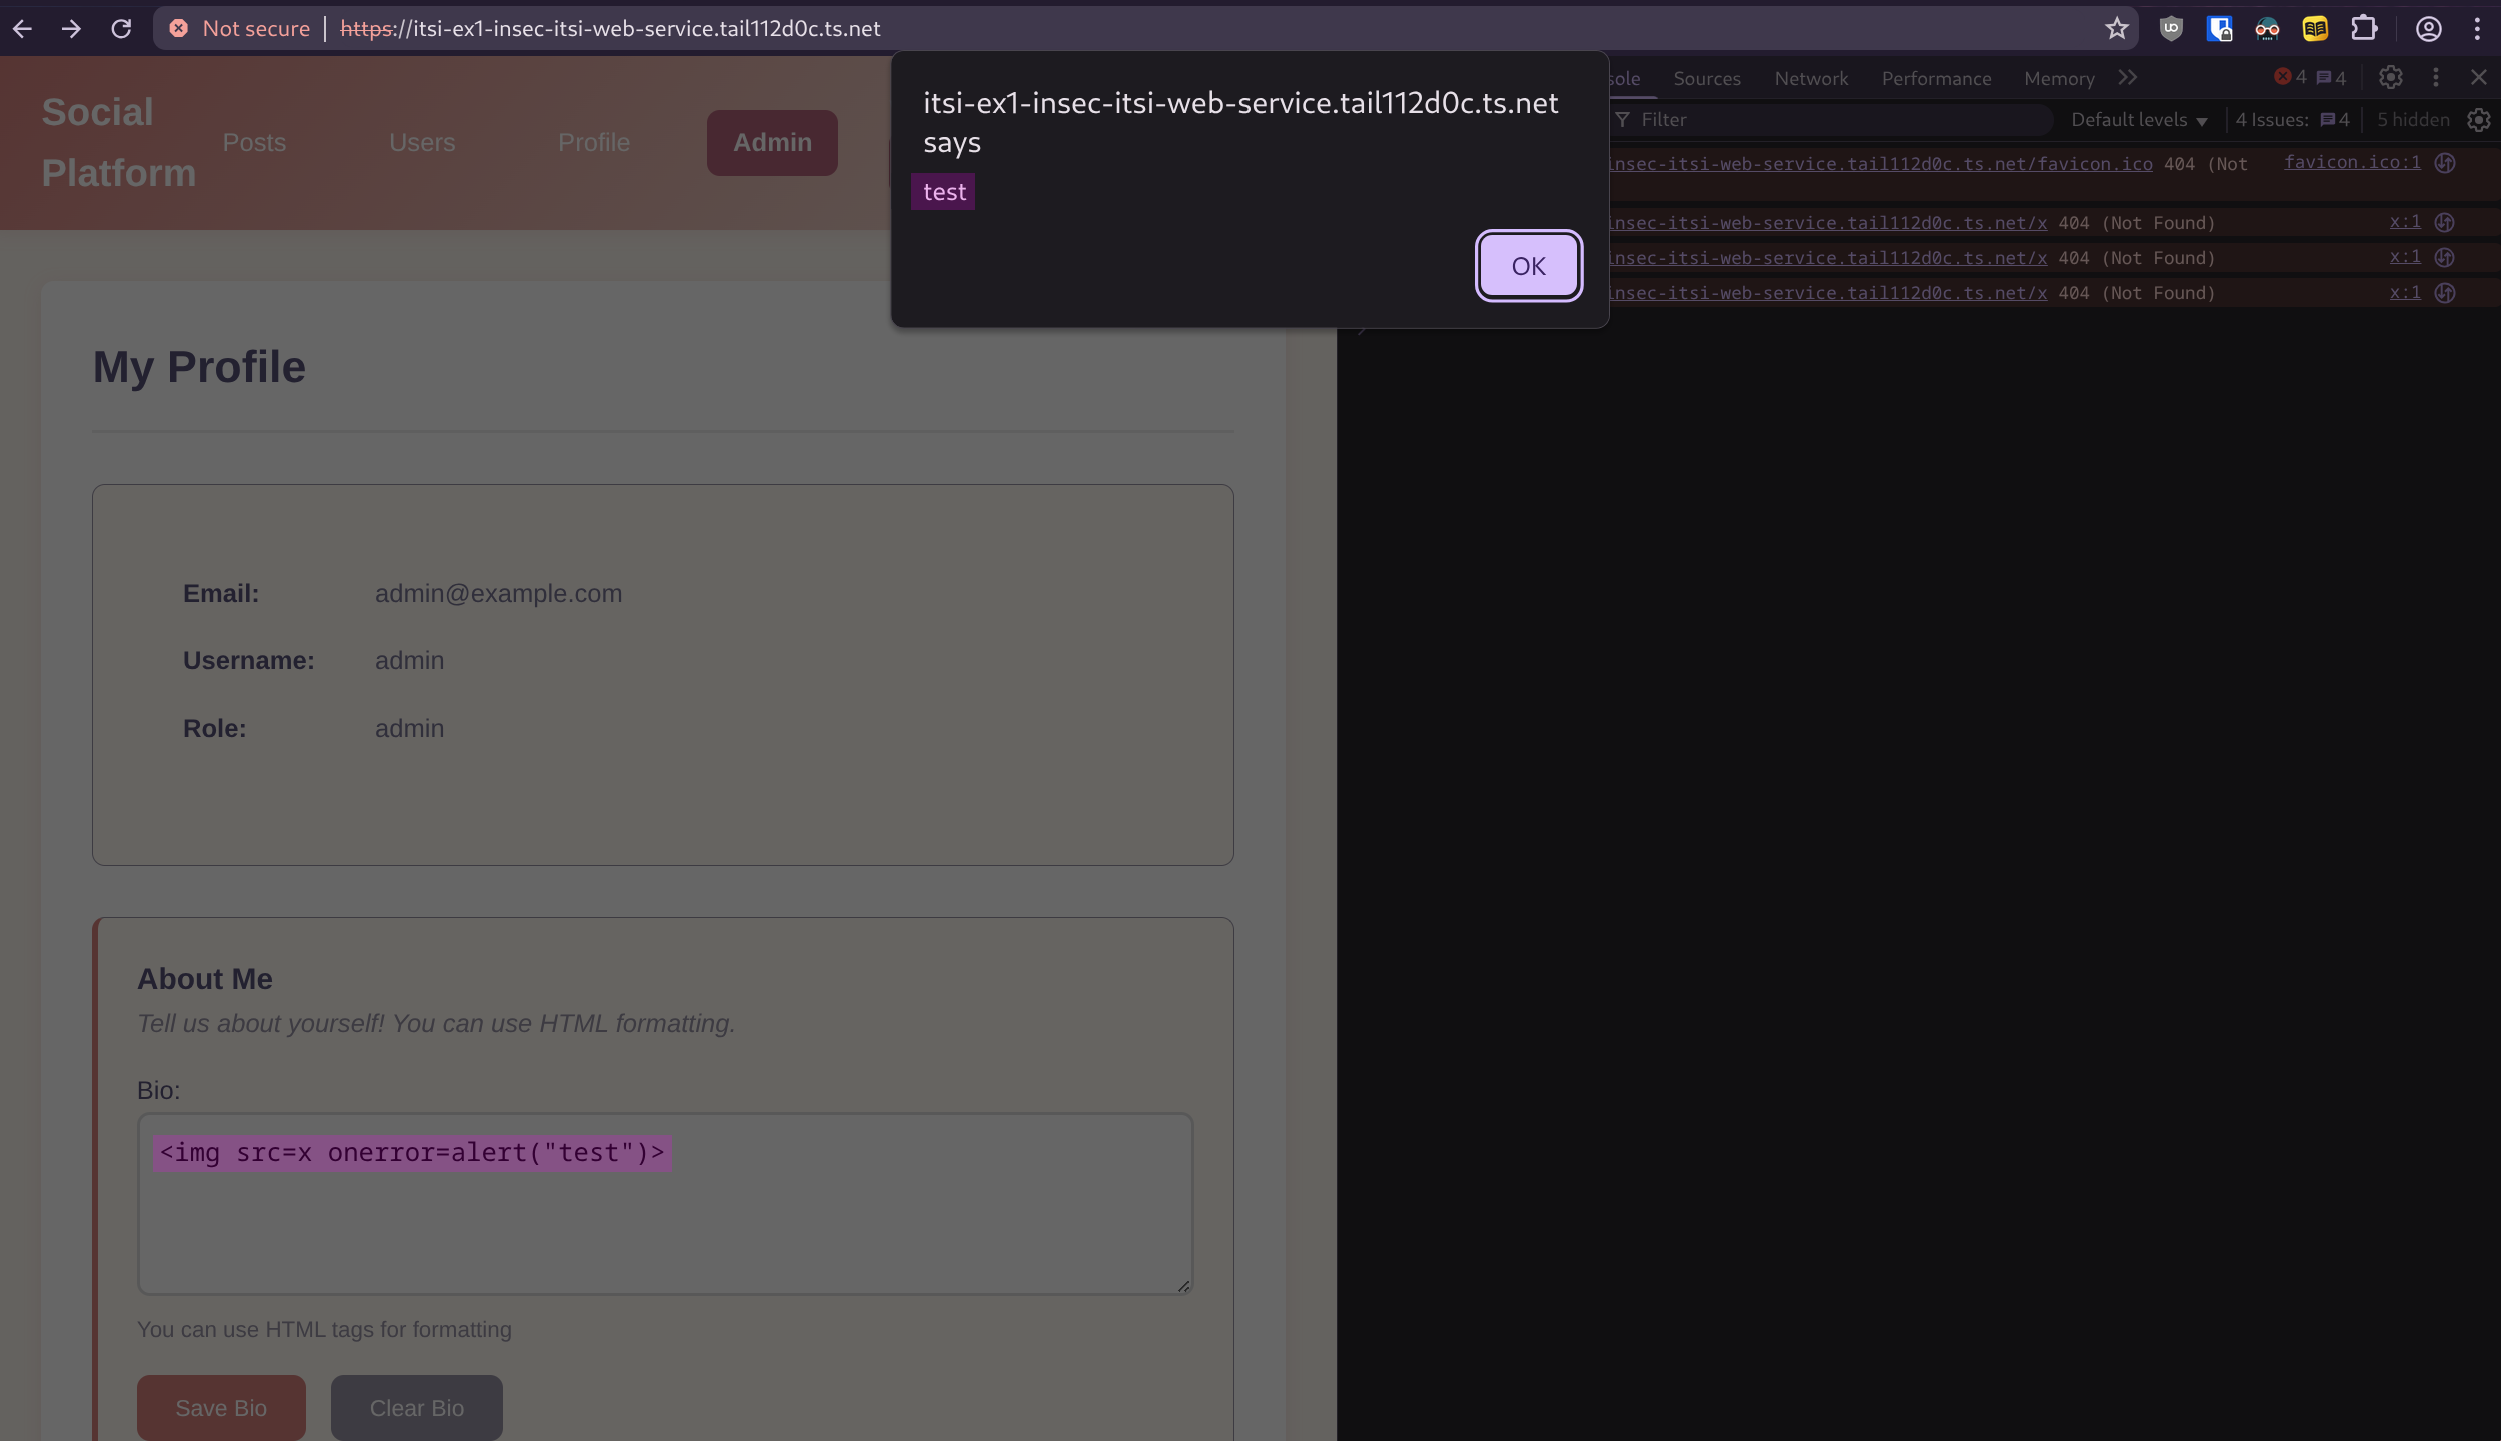
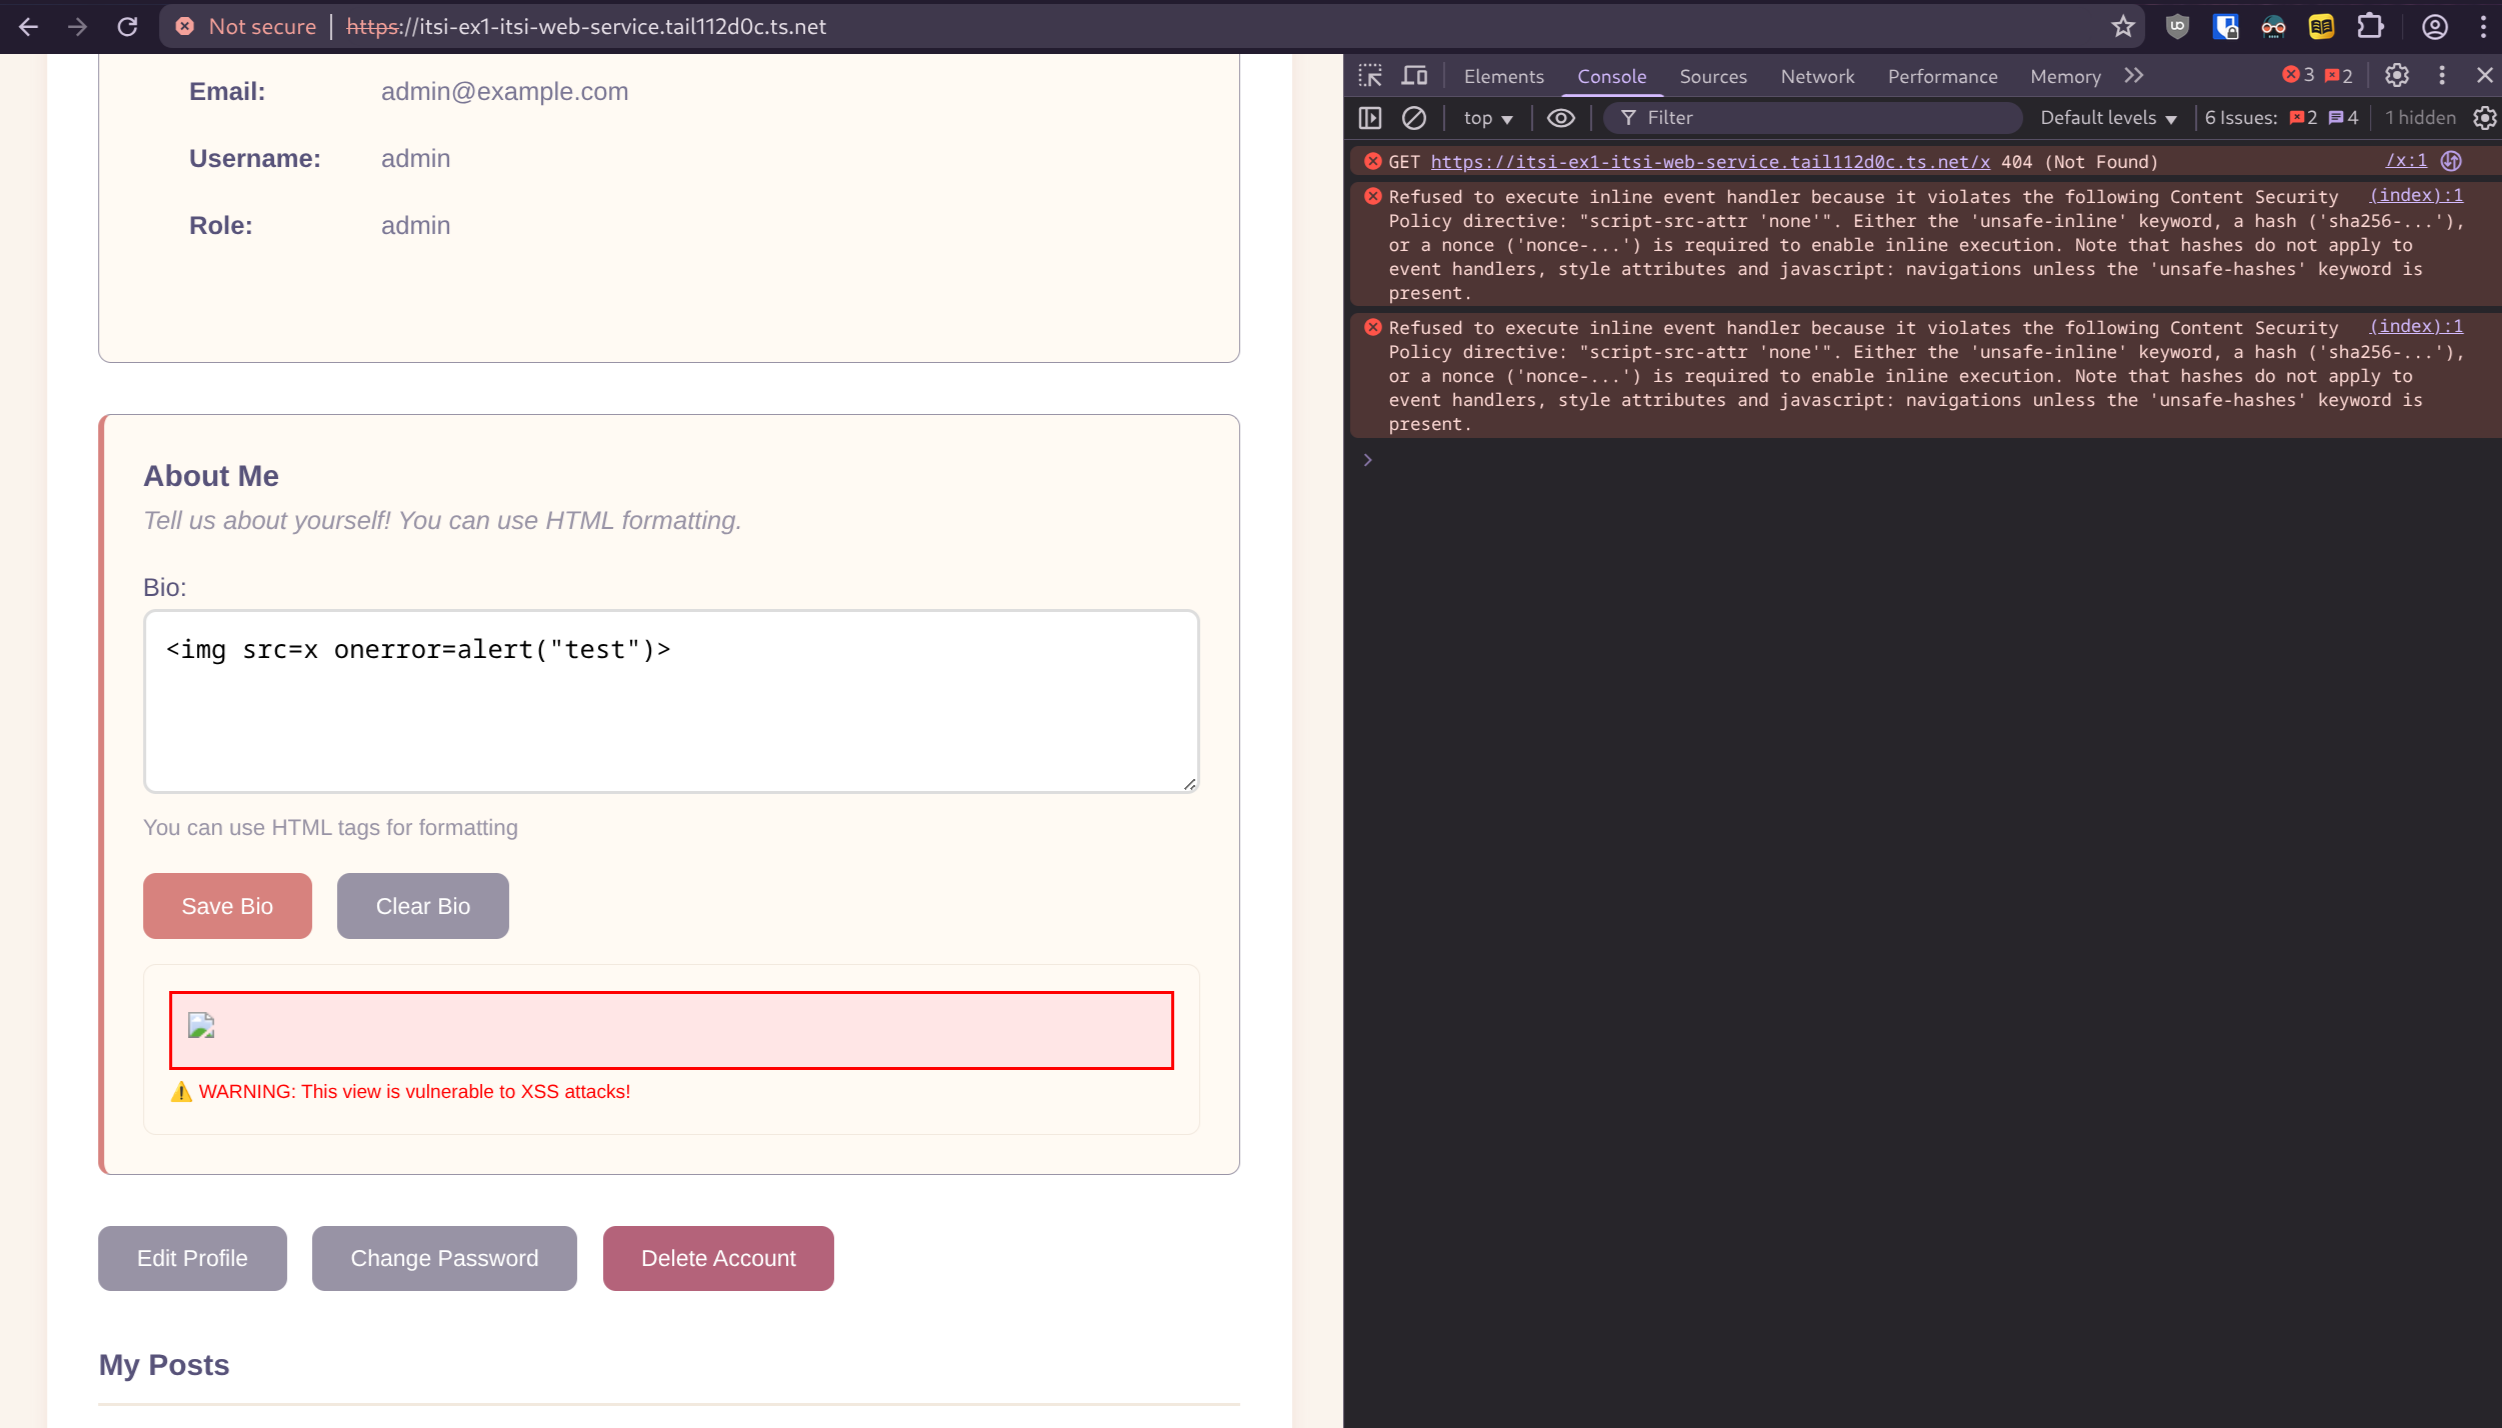
Additionally, the frontend includes a built-in example that displays a user’s bio using eval, which is insecure. It demonstrates the difference between the insecure and secure versions of the Caddy configuration. In the insecure version, a user could inject an HTML element like this to execute malicious code instead of simply displaying content—for example, stealing cookies or performing other harmful actions: <img src="some-invalid-path" onerror="alert('XSS executed!')"> 44
This attack is blocked by the CSP for two reasons: eval is disallowed in [@sec:caddyfile-changes-to-make-the-app-insecure], and the onerror function runs as an inline script, which is also blocked (as shown in [@fig:csp1] and [@fig:csp2] on the next page). The insecure version triggers the alert on page load, while the secure version logs an error in the console indicating that execution was blocked by the CSP.
Here is table of all the CSP directives that are used in the secure version of the frontend. [@noauthor_content-security-policy_2025] 43
| Directive | Your Setting | Purpose |
|---|---|---|
default-src 'self' | Only same-origin | Fallback for all resource types |
script-src 'self' | Only same-origin scripts | Blocks inline/external scripts |
script-src-attr 'none' | Blocks onclick, onload etc. | Prevents inline event handlers |
object-src 'none' | Blocks plugins | Stops Flash/Java exploits |
base-uri 'none' | Blocks <base> tag | Prevents URL manipulation |
form-action 'self' | Forms submit same-origin only | Blocks data exfiltration |
frame-ancestors 'none' | Can’t be embedded | Clickjacking protection |
connect-src 'self' | XHR/WebSocket to same-origin | Prevents data exfiltration via API calls |
img-src 'self' data: | Same-origin + data URIs | Allows images |
style-src 'self' 'unsafe-inline' | Same-origin + inline CSS | Allows styling (note: unsafe-inline is permissive) |
font-src 'self' | Same-origin fonts only | Controls font loading |
upgrade-insecure-requests | Auto-upgrade HTTP→HTTPS | Forces secure connections |
Security Headers
The secure caddy configuration includes the following security headers besides the CSP:
Strict-Transport-Security "max-age=31536000; includeSubDomains"- Forces HTTPS connections for 1 year (31536000 seconds). includeSubDomains applies this to all subdomains. Prevents man-in-the-middle attacks by blocking downgrade to HTTP. [@noauthor_strict-transport-security_2025]
X-Content-Type-Options "nosniff"- Prevents browsers from guessing MIME types. Forces the browser to respect the declared
Content-Type, blocking MIME-type sniffing attacks that could execute malicious content. [@noauthor_x-content-type-options_2025]
- Prevents browsers from guessing MIME types. Forces the browser to respect the declared
X-Frame-Options "DENY"- Blocks the page from being loaded in frames/iframes anywhere. Prevents clickjacking attacks where malicious sites trick users into clicking hidden elements. [@noauthor_x-frame-options_2025]
Hardcoding Secrets
Another insecurity is hardcoding secrets in deployment files instead of managing secrets as discussed in [@sec:secret-management]. In [@snip:composediff], the database is hardcoded to use the postgres user, and the password is hardcoded in the POSTGRES_PASSWORD environment variable. This is at best considered bad practice and at worst a credential leak of the database password. This is why, in the secure version, the Docker secret is used with the secret key and the POSTGRES_PASSWORD volume that was created in [@sec:docker-secrets].
--- compose.yaml        2025-10-20 03:43:36.744038924 +0200
+++ compose-secret.yaml 2025-10-20 03:44:06.880697128 +0200
@@ -2,14 +2,23 @@
   db:
     image: ghcr.io/fboulnois/pg_uuidv7
     environment:
-      POSTGRES_USER: postgres
-      POSTGRES_PASSWORD: postgres
       POSTGRES_DB: someApp
+      POSTGRES_USER: postgres
+      POSTGRES_PASSWORD_FILE: /run/secrets/POSTGRES_PASSWORD
+    secrets:
+      - POSTGRES_PASSWORD
     ports:
-      - 0.0.0.0:5433:5432
+      - target: 5432
+        published: 5432
+        protocol: tcp
+        mode: host
     volumes:
-      - ./schema.sql:/docker-entrypoint-initdb.d/schema.sql
+      - ./schema.sql:/docker-entrypoint-initdb.d/schema.sql:ro
       - postgres-data:/var/lib/postgresql/data

 volumes:
   postgres-data:
+
+secrets:
+  POSTGRES_PASSWORD:
+    external: true
Lastly in [@snip:kubediff], the environment variables in the Kubernetes manifests are changed to use the secret instead of hardcoding the value. This removes the database connection string directly and would give a threat actor instant access to the database or provide them with the encryption key for the JWT, allowing them to bypass secure parsing simply by having the signature, which is not desirable.
--- hardcoded-envars.yaml       2025-10-20 05:06:34.425666644 +0200
+++ kubenets-secrets.yaml       2025-10-20 05:05:53.594470400 +0200
@@ -4,8 +4,14 @@
   - name: RATE_LIMIT_RPS
     value: "100"
   - name: GIN_MODE
-    value: debug
+    value: release
   - name: DB_URL
-    value: "postgres://postgres:postgres@100.67.124.69:5433/someApp?sslmode=disable"
+    valueFrom:
+      secretKeyRef:
+        name: db-url
+        key: TOKEN
   - name: AUTH_JWT_SECRET
-    value: "hb7l90YhLEEtGCxWWJcMWXH+MTbxWu/aUrCuysjpUdU87c5hZnzmsWG01pb+b9rRRXrTPK+14jdNcdXcyHBvow==t"
+    valueFrom:
+      secretKeyRef:
+        name: jwt-token
+        key: TOKEN
Bad SSH Configuration
A common spot for misconfiguration is SSH, since it offers full access to the server. This leads to bots scanning the internet for IP addresses with an open SSH port and brute-forcing passwords. Anyone using a VPS with SSH will know that the /var/access.log file usually contains some bot attempts. 45
The easiest ways to prevent them are as follows:
- Disable password authentication and use SSH keys instead.
- Disable root login and use a non-root user.
- Use fail2ban to block Brute-force attempts.
- Use multi-factor authentication.
- Use a firewall to block SSH access and connect to the server.
All of this was already covered in Exercise 5 last year, so beyond naming it, you can access the details here on how to set them up.
To only allow SSH access from the Tailscale IP, the following commands were used:
doas iptables -A INPUT -p tcp --dport 22 -j DROP
doas iptables -A INPUT -p tcp -s 100.67.124.69 --dport 22 -j ACCEPT
They block all access to port 22 except from the Tailscale IP. After running them, connections will only be available from the Tailscale IP, as shown in [@fig:ssh-sec]. For the non-Tailscale location, the connection was made to localhost because SSH was forwarded to the port shown in the figure.

Poor Credentials Policies
A security issue I often find myself guilty of is using weak credentials everywhere. For example, as seen in [@fig:alpine-setup-1], a weak password was used, often due to laziness during the initial setup before authentication via SSH keys and then disabling password authentication altogether. However, it remains a security risk as soon as the server is used by multiple people.
Both Windows and Linux offer tools to enforce password policies, lockouts, and other measures to harden this aspect of the system. For now, on the VMs, the root and admin passwords will remain deinemama and rafi123_.
The details on setting up password policies are also covered in Exercise 5 from last year Section 3.2 for Linux and in Exercise 9 from last year in Section 4.4.3
Making Database Insecure
As seen in the diff between the insecure and secure versions of the compose file in [@sec:hardcoding-secrets], the database is hardcoded to use the postgres user, and the password is hardcoded in the POSTGRES_PASSWORD environment variable. Additionally, it is listening on 0.0.0.0, as shown in [@snip:composediff]. Without using a firewall rule to lock down database access to trusted sources only, we can connect however we want, as shown in [@fig:db-insec], where the insecure version running on port 5433 allows a connection to be established, while the secure version on port 5432 prevents any connection from being established. In this example, a connection is established to 127.0.0.1 as discussed in [@sec:connecting-the-setup-using-tailscale]. Due to VirtualBox NAT networking, this is the only non-Tailscale way to connect to it, but it is fine for the example.

To achieve this, the two iptables rules were added with block access on port 5432 but allowed it over the Tailscale IP.
doas iptables -A INPUT -p tcp --dport 5432 -j DROP
doas iptables -A INPUT -p tcp -s 100.67.124.69 --dport 5432 -j ACCEPT
Authentication Bypass via HTTP Headers
A custom HTTP header can be used to bypass authentication requirements if it matches the pod’s IP address. This allows unauthenticated access to protected endpoints.
CSP Header Misconfiguration
The insecure version has a CSP header that allows unsafe-inline and unsafe-eval, which makes it vulnerable to XSS attacks. This allows malicious scripts to be executed in the browser.
Hardcoding Secrets
In the insecure version, secrets are stored in plain text in Kubernetes manifests and Docker Compose files instead of using proper secret management tools.
Database Listening on All Interfaces
The insecure database is configured to listen on 0.0.0.0, which allows connections from any IP address. This should be restricted to only allow connections from the API server.
Making Windows Insecure
Changing The Execution Policy
The execution policy is a Windows setting that controls which scripts can be run. It is set to Restricted by default, meaning only scripts signed by a trusted publisher will execute. This is a good practice because it prevents malicious scripts from running on the system. [@sdwheeler_set-executionpolicy_nodate]
This setting can be changed by running Set-ExecutionPolicy Unrestricted in PowerShell, as shown in [@fig:doof], and its effects are visible in [@fig:yesyes]. [@sdwheeler_set-executionpolicy_nodate]
Disabling Windows Defender
Using Set-MpPreference, Windows Defender can be configured and thus disabled with the following commands: Set-MpPreference -DisableRealtimeMonitoring $true and Set-MpPreference -DisableIOAVProtection $true. [@noauthor_set-mppreference_nodate]
The first command is responsible for disabling real-time protection, while the second disables IOC protection. [@noauthor_set-mppreference_nodate]

In [@fig:yesyes], the execution policy is set to Unrestricted, and Windows Defender is disabled; this allows an unprivileged user to download and run Mimikatz.

As seen in [@fig:rev], Windows Defender has been turned back on, and the execution policy has been changed to Restricted. This is shown in [@fig:sadge], where Mimikatz can no longer be run.


Making Linux Insecure
Disabling ASLR
ASLR (Address Space Layout Randomization) is a security feature that makes it harder for an attacker to exploit a vulnerability in a program by making it difficult to predict the location of the stack 46
Because this requires writing an exploit, this section is purely theoretical and shows the commands to enable or disable ASLR on a Linux system. To disable it, a configuration file at /etc/sysctl.d/01-disable-aslr.conf must be created with the content kernel.randomize_va_space = 0, which permanently disables ASLR. When this value is set to 1, the kernel performs conservative randomization (shared libraries, the stack, mmap(), VDSO, and the heap are randomized). When set to 2, full randomization is used.
Writable Binaries
An accidental mistake that sometimes can happen on Linux is accidentally changing the permissions of a binary in PATH, giving other users the ability to modify it. This removes all integrity from the binary, and when it is run unknowingly as root, malicious code could be executed without the victim knowing, as shown in [@fig:binw].

How Tools Like Tailscale Help Harden Security
While Tailscale is only a WireGuard VPN, it is the collaboration and user experience where it shines. For example, MagicDNS, access control, and the setup process are far ahead of WireGuard. Besides Tailscale, there is Twingate, which is used for similar purposes but instead of a VPN uses TLS tunnels.
A VPN or management tools like these are a good practice because restricting essential services like Kubernetes API traffic, database connections, and SSH access to a private network that only you or your team can access removes many attack vectors. This aligns well with the principle of IT security, where stacking layers of defenses and hardening is almost always a good idea.
References
For a full bibliography, see the original BibTeX file.
Simple Authentication with only PostgreSQL - Medium. link ↩︎
JWT Authentication With Refresh Tokens - GeeksforGeeks. link ↩︎
What is HMAC(Hash based Message Authentication Code)? - GeeksforGeeks. link ↩︎
Leaky Bucket Rate Limiting and its Queue-Based Variant - RD Blog. link ↩︎ ↩︎
ratelimit package - go.uber.org/ratelimit - Go Packages. link ↩︎ ↩︎ ↩︎
What is secrets management? | Securing secrets - Cloudflare. link ↩︎
Manage sensitive data with Docker secrets - Docker Documentation. link ↩︎
Securing Windows: Common Misconfigurations That Give Attackers The Advantage - Offensive Security Blog. link ↩︎
Set-ExecutionPolicy (Microsoft.PowerShell.Security) - PowerShell. link ↩︎ ↩︎
Protect your SSH servers using Tailscale - Tailscale Docs. link ↩︎
Use UFW to lock down an Ubuntu server - Tailscale Docs. link ↩︎