Note: this was converted from PDF to Markdown using pdftotext and manual formatting. The original PDF can be found here along with the bibliography.
GNU/Linux - Securing access
Laboratory Protocol
GNU/Linux - Securing access
Class: 3AHITN
Name: Stefan Fürst, Marcel Raichle
Group Name/Number: Dumm und Dümmer/7
Supervisor: ZIVK
Exercise dates: 22.11.2024, 26.11.2024, 29.11.2024
Submission date: 1.12.2024
Table of Contents
Task Definition
This exercise focuses on enhancing security and user management in GNU/Linux. Participants configure SSH authentication using public keys, manage user privileges with sudo (e.g., granting specific permissions to edit files or create users), and set up password policies requiring strong, unique passwords. Additional tasks include changing the SSH port to secure the system, identifying open ports, and implementing two-factor authentication with Google Authenticator. Each step is documented and tested to ensure proper configuration and security.
Summary
To complete this task, the docker image from the last exercise was extended to include sudo and managing its permissions, setting up a password policy and hardening SSH by changing the port and forcing private key and OTP authentication.
Exercise Execution
Privileged rights
Explanation of the sudo command
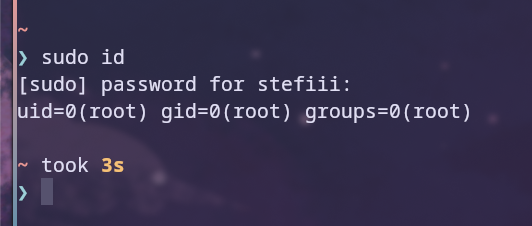
The sudo command or SuperUser DO temporarily elevates privileges and runs the set command as root, which can be seen by running the sudo id command 1.
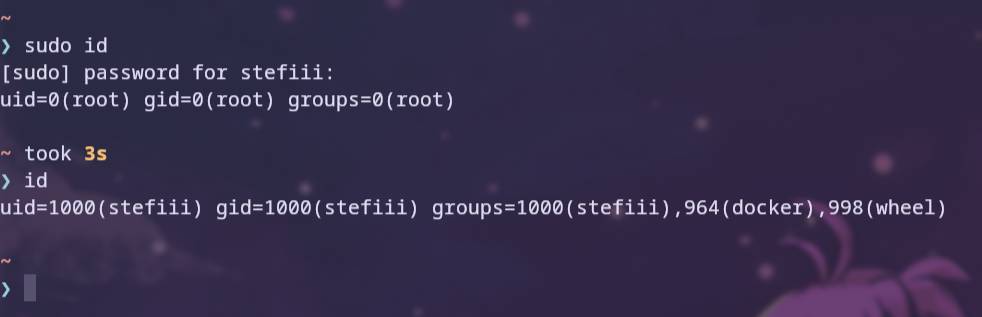
As seen in the figure, when the id command is used with sudo, the id displayed is 0, which is the user id of the root user, and without sudo it displays the normal user id of the user who executed the command.
Granting and restricting users’ sudo access
To grant someone permission to run any command with sudo, the usermod -aG sudo username command is used, which appends the given to the sudo group, giving them permission to run any command with sudo.
In order to restrict the commands that can be elevated by a user or to configure other settings related to this, it is necessary to edit the configuration file, which is located at /etc/sudoers.
There are several ways to edit it. The visudo command uses the editor set in the $EDITOR environment variable and opens the sudoers file with it, and when you exit the editor and save it, it also checks for errors before applying the changes. The sudoers file can also be directly edited using echo in the dockerfile.
# only allowing ram-alois to edit the ssh configuration file
RUN echo "ram-alois ALL=(root) /bin/nano /etc/ssh/sshd_config" >> /etc/sudoers
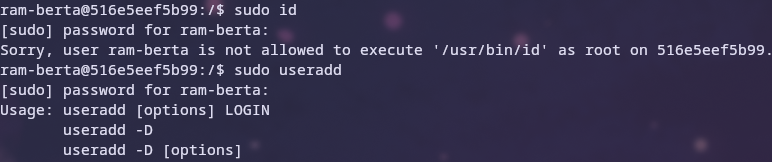
# only allowing ram-berta to add users
RUN echo "ram-berta ALL=(root) /sbin/useradd" >> /etc/sudoers
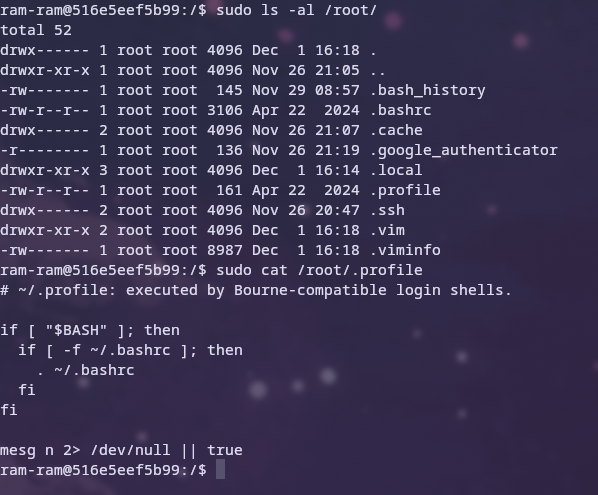
# only allowing to ram-ram to view and read add files
RUN echo "ram-ram ALL=(root) /bin/ls" >> /etc/sudoers
RUN echo "ram-ram ALL=(root) /bin/cat" >> /etc/sudoers
I chose nano over vim for editing the ssh config file, as running vim as sudo effectively gives the user full sudo access, as it is possible to open a terminal in it and escape the normal editor mode in numerous ways, so its just easier to give the user nano.
The following screenshots show the following privileges in action, but ram-chris and ram-fus are excluded as ram-chris has no sudo privileges and ram-fus can run any command elevated.
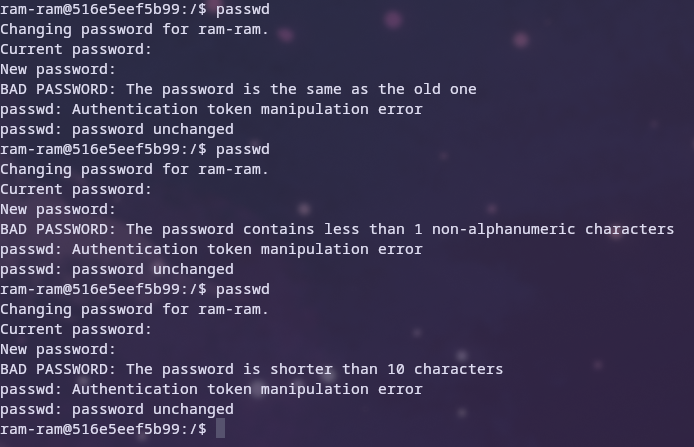
Password policies
Setting up a password policy
To set password policies on Debian-based distributions, edit /etc/pam.d/common-password. Pam stands for Pluggable Authentication Modules and is installed by default on every Debian-based distribution 2 3.
To set a required complexity for passwords, the libpam-pwquality package needs to be installed. Then in the /etc/pam.d/common-password file, on the line with pam_pwquality.so dcredit=-1, ocredit=-1 and enforce_for_root need to be added at the end to require at least one lowercase letter and one symbol in any password set and to enforce it for the root user.
Preventing password reuse is achieved by adding a line with the pam_pwhistory.so module and appending remember=5 and use_authtok at the end of the line to remember the last 5 passwords so that they cannot be reused and to enforce the previously stacked password modules 3. Finally, set the minimum length of the line with pam_unix.so. minlen=10 to require the password to be at least 10 characters long.
To edit this file declaratively in the Dockerfile I used the sed editor and the sed commands used are explained in the next section.
# setting the required password complexity and minimum length
RUN sed -i '/retry=3/ s/$/ ucredit=-1 dcredit=-1 ocredit=-1 minlen=10 enforce_for_root '\
            /etc/pam.d/common-password
# remembering the last 5 passwords so they cant be reused
RUN sed -i '/ocredit=-1/ a password\trequisite\t\t\tpam_pwhistory.so remember=5 use_authtok '\
            /etc/pam.d/common-password
sed Basics
The sed (stream editor) is a utility for manipulating text in files. It can perform actions such as search, replace, insert, delete and more without the need to open an editor, making it useful in scripts.
The syntax of using the command is the following:
sed [OPTIONS] 'SCRIPT' [INPUTFILE]
The only relevant option for this command I used was the -i flag, which edits the file in place without printing anything to the console 4 5.
To actually make sed do something it is necessary to specify a command, there are many commands, but for this exercise only the commands s and a are needed, which stand for substitute and append respectively.
Let’s break down the commands used:
sed -i '/retry=3/ s/$/ ucredit=-1 dcredit=-1 ocredit=-1 enforce_for_root '\
            /etc/pam.d/common-password
The actual command itself is specified inside of the two ".
/retry=3/ is a search pattern, so the command operates only on lines that contain ‘retry=3’.
s is the substitution command and $ represents the end of the line so essentially s/$/ tells sed to insert whatever characters are entered after the / at the end of a line, which contains ‘retry=3’.
Lastly, the path to the file being edited is specified. The next used command is the following:
sed -i '/ocredit=-1/ a password\trequisite\t\t\tpam_pwhistory.so remember=5 use_authtok '\
            /etc/pam.d/common-password
This command searches for the line containing ‘ocredit=-1’ and uses the a command to append a new line after the line containing ‘ocredit=-1’.
\t is the escape sequence for a horizontal tab character, so it does not need to insert the correct number of whitespace characters, making it a shorter command.
Harden SSH
Changing the ssh port
The configuration file for SSH is in /etc/ssh/sshd_config, where the port is changed by uncommenting the line containing Port 22 and changing the number to the desired port. Afterwards, the service ssh restart command must be issued to take effect 6.
RUN sed -i 's/#Port 22/Port 38452/' /etc/ssh/sshd_config
The netstat -tulnp command shows the processes and ports that are listening for both TCP and UDP.
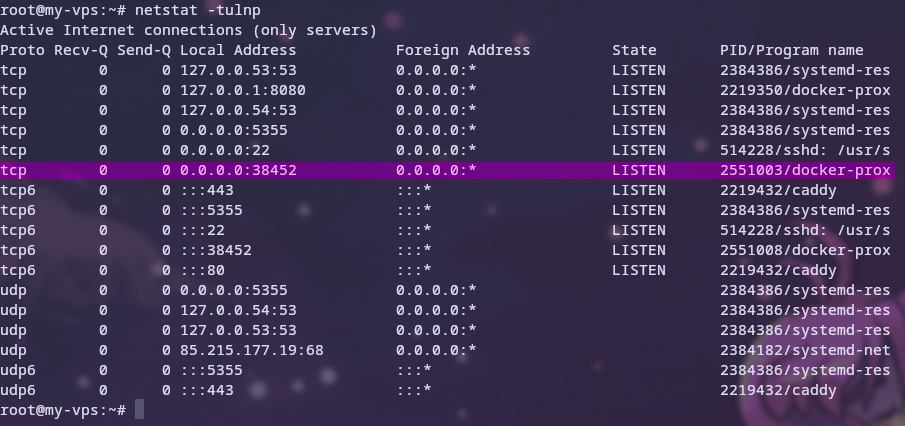
When I run this command on the host, it only shows the docker process instead of ssh directly, because ssh is running inside the container. There are also other containers and processes listening as I use this VPS to host SearXng as well.

Running the same command on the container now shows that the sshd process is listening on the desired port. The d at the end of ssh stands for daemon and means that this is a service that the d indicates 7.
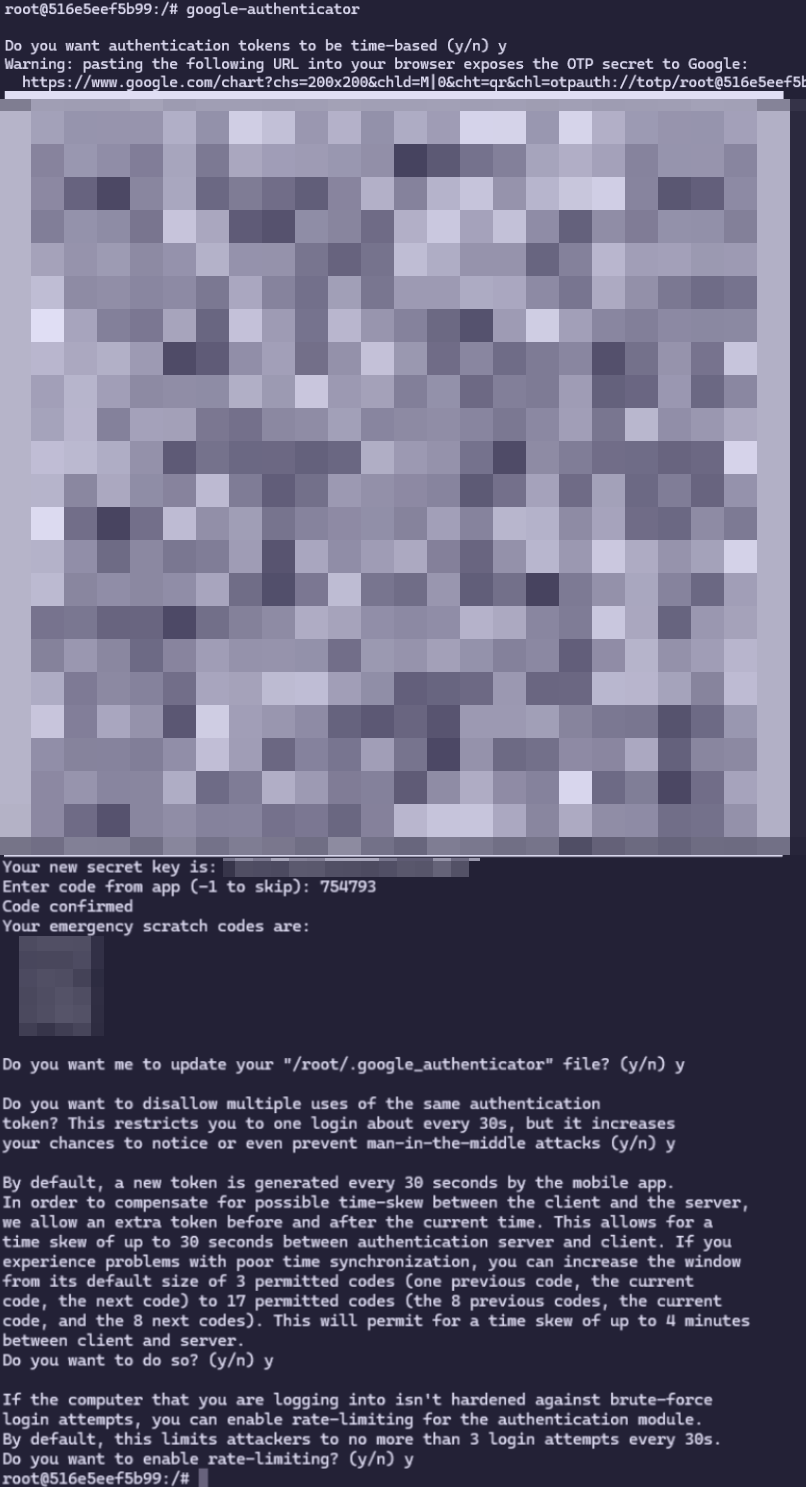
Adding OTP authentication
To add OTP authentication the libpam-google-authenticator package is required.
Once the package is installed, all you need to do is run the google-authenticator command, scan the QR code with the 2FA app of your choice and reply to each prompt with y 8.
To enable ssh to use OTP authentication these two lines need to be added at the top of the /etc/pam.d/sshd file.
auth required pam_google_authenticator.so nullok
auth required pam_permit.so
After that the ssh configuration file needs to be edited as well.
# change this
KbdInteractiveAuthentication no
# to this
KbdInteractiveAuthentication yes
# add this line at the bottom
AuthenticationMethods publickey,keyboard-interactive
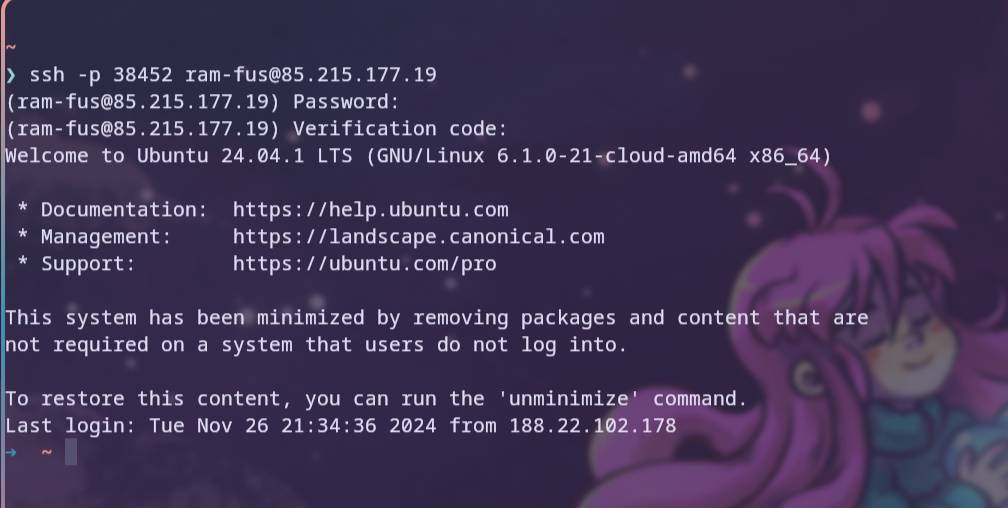
Login is now only possible with keypair, password and OTP.
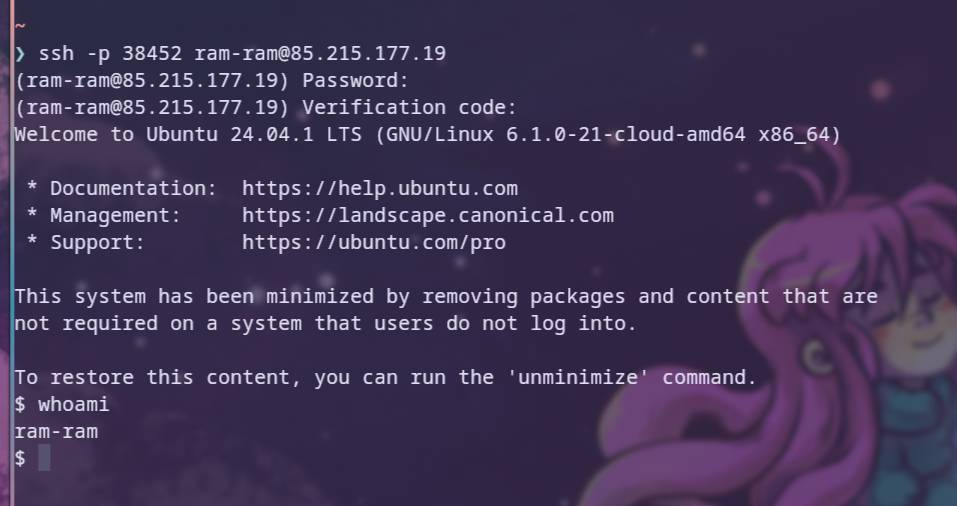
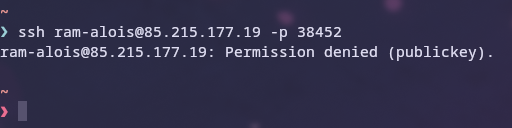
Logging in as the users
Here are screenshots of logging in as a user and trying to log in as a user who has neither a key pair nor an OTP set up.
References
For a full bibliography, see the original BibTeX file.
List of Figures
- Grouplogo
- sudo id
- sudo permissions of ram-ram
- sudo permissions of ram-alois
- sudo permissions of ram-berta
- Testing the password policies
- netstat -tulnp on the host
- netstat -tulnp on the container
- setting up OTP
- logging in as ram-fus
- logging in as ram-ram
- trying to login as ram-alois
Attachments
Dockerfile
FROM ubuntu:latest

RUN apt update
RUN apt upgrade -y
RUN apt install iproute2 iputils-ping zsh net-tools vim sudo nano libpam-pwquality \
    libpam-google-authenticator -y

RUN echo "ram-alois ALL=(root) /bin/nano /etc/ssh/sshd_config" >> /etc/sudoers
RUN echo "ram-berta ALL=(root) /sbin/useradd" >> /etc/sudoers
RUN echo "ram-ram ALL=(root) /bin/ls" >> /etc/sudoers
RUN echo "ram-ram ALL=(root) /bin/cat" >> /etc/sudoers

RUN ln -fs /usr/share/zoneinfo/Europe/Vienna /etc/localtime
RUN DEBIAN_FRONTEND=noninteractive apt install -y tzdata ssh
RUN echo 'root:passwordhere' | chpasswd
RUN sed -i 's/#Port 22/Port 38452/' /etc/ssh/sshd_config
RUN sed -i 's/#PermitRootLogin prohibit-password/PermitRootLogin yes/' /etc/ssh/sshd_config
RUN sed -i '/retry=3/ s/$/ ucredit=-1 dcredit=-1 ocredit=-1 minlen=10 enforce_for_root '\
            /etc/pam.d/common-password
RUN sed -i '/ocredit=-1/ a password\trequisite\t\t\tpam_pwhistory.so remember=5 use_authtok '\
            /etc/pam.d/common-password

RUN groupadd -g 324 ram-Users
RUN useradd -u 1024 -m ram-alois
RUN useradd -u 1124 -m ram-berta
RUN useradd -u 1224 -m ram-chris
RUN useradd -m ram-fus
RUN useradd -m ram-ram

RUN echo 'ram-fus:passwordhere' | chpasswd
RUN echo 'ram-ram:passwordhere' | chpasswd
RUN echo 'ram-alois:passwordhere' | chpasswd
RUN echo 'ram-chris:passwordhere' | chpasswd
RUN echo 'ram-berta:passwordhere' | chpasswd

RUN usermod -g ram-Users ram-alois
RUN usermod -g ram-Users ram-berta
RUN usermod --shell /bin/bash ram-alois
RUN usermod --shell /bin/bash ram-berta
RUN usermod --shell /bin/zsh ram-chris
RUN usermod -aG sudo ram-fus
RUN usermod -aG sudo ram-ram

RUN mkdir -p /data/fus
RUN mkdir /data/fus/alois
RUN mkdir /data/fus/berta
RUN mkdir /data/fus/chris
RUN mkdir /data/fus/public

RUN chgrp -R ram-Users /data/fus/
RUN chmod g+rw /data/fus/
RUN chown -R ram-alois:ram-Users /data/fus/alois/
RUN chmod -R u+wrx,g=r,o= /data/fus/alois/
RUN chown -R ram-berta:ram-Users /data/fus/berta/
RUN chmod -R u+wrx,g=r,o= /data/fus/berta/
RUN chown -R ram-chris:ram-Users /data/fus/chris/
RUN chmod -R u+wrx,g=,o= /data/fus/chris/
RUN chmod -R u+wrx,g+wrx,o=r /data/fus/public/

EXPOSE 38452
CMD service ssh start && tail -F /dev/null
alias.sh
#!/bin/sh
alias relaunch="sh -c 'docker stop itsi && docker rm itsi &&\
docker buildx build -t itsi:latest . &&\
docker run -d -p 38452:38452 --name itsi itsi:latest && docker exec -it itsi /bin/bash'"
alias rebuild="sh -c 'docker buildx build -t itsi:latest . &&\
docker run -d -p 38452:38452 --name itsi itsi:latest && docker exec -it itsi /bin/bash'"
alias stop="sh -c 'docker stop itsi && docker rm itsi'"
S. Zivanov, “Linux Sudo Command {How to Use It +Examples},” Knowledge Base by phoenixNAP, Jun. 2024. link ↩︎
sk, “How To Set Password Policies In Linux - OSTechNix,” OSTechNix, Jun. 2022. link ↩︎
“How to prevent user from using old password (or re-using) again in Linux | GoLinuxCloud,” Aug. 2022. link ↩︎ ↩︎
GeeksforGeeks, “Sed Command in Linux/Unix with examples,” GeeksforGeeks, Sep. 2024. link ↩︎
“How To Harden OpenSSH on Ubuntu 20.04 | DigitalOcean,” Nov. 2024. link ↩︎
B. Dyer, “What are Daemons in Linux? Why are They Used?” It’s FOSS, Sep. 2023. link ↩︎
P. Malhotra, “Enhancing SSH Security with Two-Factor Authentication (2FA) via PAM and Google Authenticator,” Medium, Sep. 2023. link ↩︎