Note: this was converted from LaTeX to Markdown using manual formatting. The original TeX file can be found here along with the bibliography.
GNU/Linux - Setting up a multi-user environment
Laboratory Protocol
GNU/Linux - Setting up a multi-user environment
Class: 3AHITN
Name: Stefan Fürst, Marcel Raichle
Group Name/Number: Dumm und Dümmer/7
Supervisor: ZIVK
Exercise dates: 25.10.2024, 1.11.2024, 3.11.2024, 6.11.2024
Submission date: 6.11.2024
Table of Contents
Task Definition
Setting up a headless Linux installation with multiple users, adding them to a group, and setting permissions over a directory structure. You will also need to set up an ssh server for which you will need to set up key pair authentication.
Summary
To accomplish this, we set up a Docker image that does all the necessary setup so that the container can be rebuilt at any time for easier testing instead of using a heavier vm. To make it easier to rebuild and restart the container, we wrote a shell script to the source so that we had aliases for all the commands. We used the Ubuntu Docker image as a base, installed the required packages since the image comes with a minimal amount of packages, and used useradd, usermod, chmod, chown, chgrp, su to add users, change file ownership, permissions and test. Finally, for the ssh part, the service was set up and configured appropriately. We did everything that made sense in the Dockerfile file to make it reproducible.
Exercise Execution
Creating the Container
I decided to write my own dockerfile for this, which is a text file that describes the commands needed to create the desired image. Let’s walk through how to create an image for the first task.
We start by using the FROM keyword to specify the base image 1 from which we are starting.
FROM ubuntu:latest
I chose the ubuntu image 2 and used the latest tag, which points to the latest LTS release.
However, if we were to build, start, and execute in the container, we would not be able to do it because it would immediately shutdown since nothing is running.
To mitigate this, we add CMD tail -F /dev/null to the end of our Dockerfile. The tail command prints the last 10 lines of a file and the -F argument stands for follow, so it will run forever and print the last 10 lines of a given file 3. I used the file /dev/null, which is a virtual device, so any data written to it will disappear 4. So we are essentially reading an empty file forever to keep the container up.
If we now run the following commands to build the image, run the container and get a shell in it.
# build the image
docker buildx build -t image-name .

# run the container
docker run -d --name container-name

# exec into the container (get a shell in it)
docker exec -it container-name /bin/bash
To make the commands less work to type, I like to make a shell script that I can source to have aliases for it like this.
#!/bin/sh
alias relaunch="sudo sh -c 'docker stop itsi &&\
      docker rm itsi &&\
      docker buildx build -t itsi:latest . &&\
      docker run -d -p 38452:38452 --name itsi itsi:latest &&\
      docker exec -it itsi /bin/bash'"
alias rebuild="sudo sh -c 'docker buildx build -t itsi:latest . &&\
      docker run -d -p 38452:38452 --name itsi itsi:latest &&\
      docker exec -it itsi /bin/bash'"
alias stop="sudo sh -c 'docker stop itsi && docker rm itsi'"
Now we are in the container, but it does not have any of the required packages installed that are needed for this exercise. They can be installed in the container now, which would defeat the whole purpose of building an image, so we use the RUN keyword in our dockerfile along with the desired command to run it when the image is built, so that the packages are installed as soon as you spin up the container:
RUN apt update
RUN apt upgrade -y
RUN apt install iproute2 iputils-ping zsh net-tools vim -y
Testing Connectivity
Now we can finally test the connectivity since we have the iputils-ping package installed. Everything works out of the box using the default bridge 5
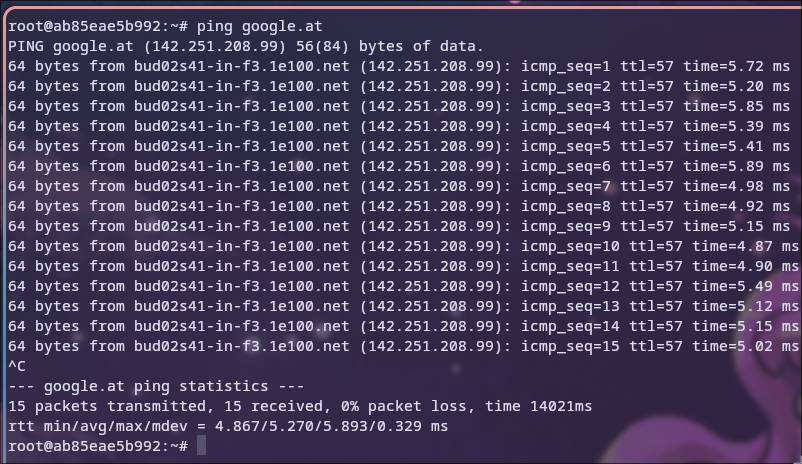
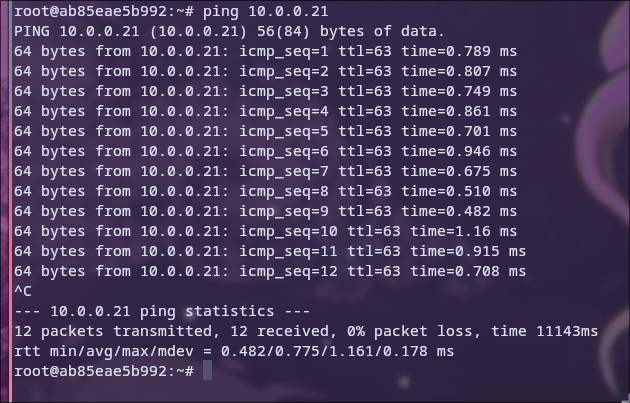
It works, but why?
If we inspect our container using docker inspect container-name, we see that its IP is different from that of the lan.
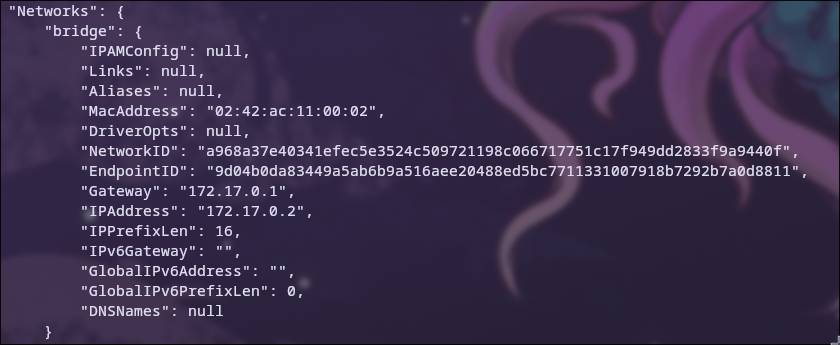
This happens because when you install Docker, it creates a virtual interface docker0 that is used as a network bridge to allow the container to communicate with the Internet and LAN 6.

There are other types of Docker networks, but they are not relevant for this exercise 6.
Creating and managing users
To add groups and users, and to add users to groups, use the commands groupadd, useradd, usermod.
To add the user, we add the following lines to our Dockerfile:
# creating the group
RUN groupadd -g 324 ram-Users

# creating the users -u is used to set the groupid
RUN useradd -u 1024 ram-alois &&\
    useradd -u 1124 ram-berta &&\
    useradd -u 1224 ram-chris &&\
    useradd ram-fus &&\
    useradd ram-ram

# adding the users to the groups
RUN usermod -g ram-Users ram-alois &&\
    usermod -g ram-Users ram-berta

# settings chris's default shell to zsh
RUN usermod --shell /bin/zsh ram-chris
Login as the users
To log in as another user, use the su command.
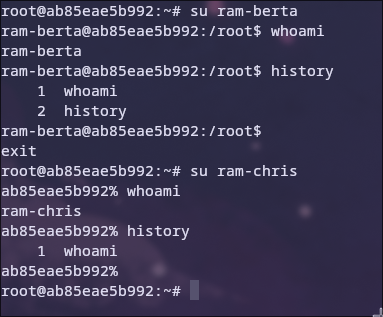
Each user has their own history, which is stored in their home directory in either the .bash_history or .zsh_history file. You end the session with the exit command or by pressing <C-d>.
Set directory privileges
The directories are created with this command and the -p stands for parent and creates parent directories if needed. For example, mkdir /test/test2 wouldn’t work if you don’t have /test, but using mkdir -p instead will create /test and /test/test2.
RUN mkdir -p /data/fus &&\
    mkdir /data/fus/alois &&\
    mkdir /data/fus/berta &&\
    mkdir /data/fus/chris &&\
    mkdir /data/fus/public
Three tools are used to set the permission: chgrp, chown and chmod.
First, we want everyone in the group to have access to the directory for which chgrp -R ram-Users /data/fus/ is used with the -R argument, which means recursive 7 8.
To give everyone all the permissions in their own directory, we need to make them the owner of it using chown -R username:groupname /data/fus/name-of-directory 9.
Now we can assign permissions to each directory using the chmod command 10.
To better understand the command, here is a breakdown of the options:
u = user who owns the file
g = group -> everyone in the group of the owner
o = other -> everyone else
r = read
w = write
x = execute
+ adding permissions
- removing permissions
= setting permissions
Now, let us use this to set up the permissions accordingly:
# giving the [g]roup [r]ead and [w]rite permissions for /data/fus
chmod g+rw /data/fus/

# giving the owner all permissions, the [g]roup only [r]ead and none to [o]thers
chmod -R u+wrx,g=r,o= /data/fus/alois/

# same for berta
# giving the owner all permissions and none to the [g]roup and [o]thers
chmod -R u+wrx,g=,o= /data/fus/chris/

# giving the owner and [g]roup all permissions and none to [o]thers
chmod -R u+wrx,g+wrx,o=r /data/fus/public/

If we log in as the users, we can see that everything is working as intended.
Setting up ssh
The two new users required for this have already been created above in 3.3.
To set up an ssh server we need to install the package, if we just add ssh to our install command in the Dockerfile we find out that this command requires interactions to set the timezone we need to add these two extra lines to the Dockerfile.
# setting the timezone
RUN ln -fs /usr/share/zoneinfo/Europe/Vienna /etc/localtime

# running the command without it being interactive
RUN DEBIAN_FRONTEND=noninteractive apt install -y tzdata ssh
Now ssh is installed, but it needs to be started, all we need to do is edit the last line of the file to start the service as well.
# the default command from before
CMD tail -F /dev/null

# with starting ssh
CMD service ssh start && tail -F /dev/null
To find out what port the server is listening on for ssh, we use the netstat command that comes with the net-tools package that we installed earlier.
This is done with the command netstat -tunlp | grep ssh. The options of the command are explained below:
-t show TCP ports
-u show UDP ports
-n show numerical addresses instead of resolving hosts
-l show only listening ports
-p show the PID of the listener's process

Apparently it is a “good practice” to switch from the default ssh port to a different port to avoid bots and script kiddies that scan the internet for public servers with ssh and test default passwords. I think this is snake oil to change ports for better security, because if you disable password authentication, have a strong password, or ban failing ips with tools like fail2ban, all the problems are solved anyway 11.
For this we need to edit the file /etc/ssh/sshd_config.
I still changed the port to show how it would be done anyway.
To do this, we can use the preinstalled text editor sed, so edit the file with the following command to change the port in the Dockerfile.
# -i edit the file in place without printing it to the console
# s to use the substitute command of sed
# '/s/string-you-want-to-replace/string-you-want-to-replace-it-with'
# /etc/ssh/sshd_config file that you want to edit
RUN sed -i 's/#Port 22/Port 38452/' /etc/ssh/sshd_config
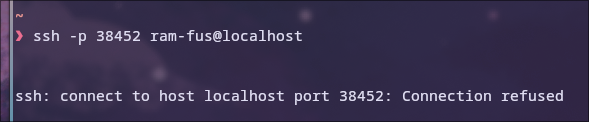
When we try to ssh in with the created user, we cannot yet, since we have not published any ports in our container yet.
Logging On to the SSH Server

To do this, we need to add a line to the Dockerfile and edit the docker run command.
# add this with the port of your choice to the Dockerfile
EXPOSE 38452

# add -p to [p]ublish the desired port
docker run -d -p 38452 --name container-name
Even if we log in now, it still won’t work because the user doesn’t have a password.
To fix this we add this line to our Dockerfile:
RUN echo 'root:youresecurepasswordhere' | chpasswd
We change the root password instead of the user password because we do not have sudo setup, and having to type sudo for every command when we are the only user is both unnecessary and annoying.
Enabling keypair authentication
To generate a key pair, we go back to our host system and run the command ssh-keygen -b 4096 to generate a 4096-bit SSH key.
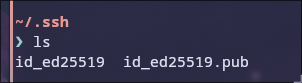
On Linux, the keys are stored in the ~/.ssh directory, but you can specify a location with -f. The file that ends with .pub is the public key, and the other is the private key.
To copy the public key to the server we want to use it on, we use the command ssh-copy-id on Linux and scp on Windows and Mac.

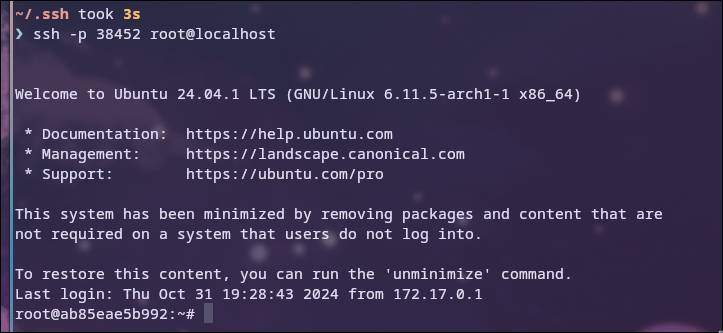
After this we will not need to enter a password to authenticate.

Disable password authentication
To only allow key authentication, we need to edit the /etc/ssh/sshd_config file again.
To do this, we ssh into the server, open the file with a text editor of your choice, and edit this line.
# change this
# PasswordAuthentication yes
# to this
PasswordAuthentication no
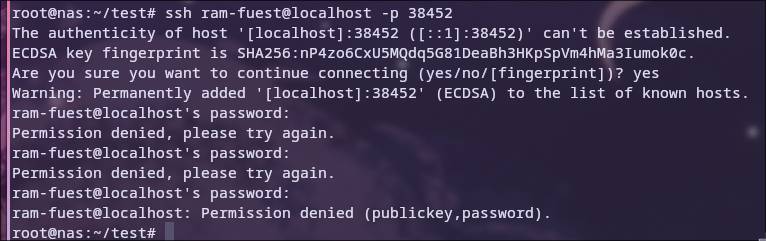
If we try to log in as another user for which we do not have a key, we cannot connect.
References
For a full bibliography, see the original BibTeX file.
List of Figures
- Grouplogo
- Ping to the Internet
- Ping the local machine
- docker inspect
- ip a | grep docker0
- Login as Berta and Chris
- Testing permissions
- Search for port with netstat
- Connection refused
- Logging in without a password
- working login
- keys in the directory
- ssh-copy-id
- logging with a key
- Not having a key
Attachments
Dockerfile
FROM ubuntu:latest

RUN apt update && apt upgrade -y &&\
    apt install iproute2 iputils-ping zsh net-tools vim -y
RUN ln -fs /usr/share/zoneinfo/Europe/Vienna /etc/localtime
RUN DEBIAN_FRONTEND=noninteractive apt install -y tzdata ssh
RUN echo 'root:password' | chpasswd
RUN sed -i 's/#Port 22/Port 38452/' /etc/ssh/sshd_config
RUN sed -i 's/#PermitRootLogin prohibit-password/PermitRootLogin yes/'\
    /etc/ssh/sshd_config
RUN groupadd -g 324 ram-Users &&\
    useradd -u 1024 ram-alois &&\
    useradd -u 1124 ram-berta &&\
    useradd -u 1224 ram-chris &&\
    useradd ram-fus &&\
    useradd ram-ram
RUN usermod -g ram-Users ram-alois &&\
    usermod -g ram-Users ram-berta
RUN usermod --shell /bin/bash ram-alois &&\
    usermod --shell /bin/bash ram-berta &&\
    usermod --shell /bin/zsh ram-chris
RUN mkdir -p /data/fus &&\
    mkdir /data/fus/alois &&\
    mkdir /data/fus/berta &&\
    mkdir /data/fus/chris &&\
    mkdir /data/fus/public
RUN chgrp -R ram-Users /data/fus/ &&\
    chmod g+rw /data/fus/ &&\
    chown -R ram-alois:ram-Users /data/fus/alois/ &&\
    chmod -R u+wrx,g=r,o= /data/fus/alois/ &&\
    chown -R ram-berta:ram-Users /data/fus/berta/ &&\
    chmod -R u+wrx,g=r,o= /data/fus/berta/ &&\
    chown -R ram-chris:ram-Users /data/fus/chris/ &&\
    chmod -R u+wrx,g=,o= /data/fus/chris/ &&\
    chmod -R u+wrx,g+wrx,o=r /data/fus/public/
EXPOSE 38452
CMD service ssh start && tail -F /dev/null
alias.sh
#!/bin/sh
alias relaunch="sudo sh -c 'docker stop itsi &&\
      docker rm itsi &&\
      docker buildx build -t itsi:latest . &&\
      docker run -d -p 38452:38452 --name itsi itsi:latest &&\
      docker exec -it itsi /bin/bash'"
alias rebuild="sudo sh -c 'docker buildx build -t itsi:latest . &&\
      docker run -d -p 38452:38452 --name itsi itsi:latest &&\
      docker exec -it itsi /bin/bash'"
alias stop="sudo sh -c 'docker stop itsi && docker rm itsi'"