Note: this was converted using from LaTeX to Markdown using Chat GPT 4.1 the original pdf can be found here along with the bibliography
Laboratory protocol
Exercise 10: Capturing of network traffic in the local network
Class: 3AHITN
Name: Stefan Fürst, Justin Tremurici
Group Name/Number: Name here/12
Supervisor: SPAC, ZIVK
Exercise dates: 11.04.2025 | 25.04.2025 | 09.05.2025
Submission date: 16.05.2025
Table of Contents
Task definition
This task focused on the passive interception of network traffic in a local network using either a hub or a managed switch with mirror ports. The objective was to analyze unaltered communications using Wireshark on both attacker and victim machines. Two topologies were tested: a hub-based setup, which allowed full traffic visibility, and a switch-based setup, where traffic was mirrored from victim ports to the attacker’s port. Devices were assigned static IP addresses from a private range, and VoIP communication was simulated using either software-based or physical IP phones.
Three types of traffic were examined: ICMP echo requests (Ping), HTTP authentication involving plaintext credentials, and VoIP calls between two endpoints. Each case was recorded in a separate Wireshark capture. In the hub scenario, the focus was on visibility and potential stability issues under high traffic. For the switch, mirroring was configured and traffic was captured before and after to assess changes.
Further tasks involved filtering ICMP traffic by attacker IP, observing ping communication between victim devices from the attacker’s perspective, capturing HTTP login attempts to extract credentials, and intercepting a VoIP call, which was exported as an MP3 file. All relevant captures and the audio file were submitted as part of the final documentation.
Summary
In this exercise, two distinct network topologies were implemented to investigate passive network traffic interception. The first topology utilized personal hardware, specifically a Mikrotik RB5009 router, to configure port mirroring. The client devices were older laptops running Proxmox, with one laptop hosting an nginx container configured to demonstrate basic HTTP authentication. The attacker device was another laptop connected to the mirrored ports on the router, which allowed it to receive a complete copy of the network traffic between the clients and the server.
The initial step involved performing local ICMP ping requests from the attacker to the clients to observe the captured traffic and verify network connectivity. Following this, the two client laptops pinged each other, while the attacker monitored and recorded the exchanged packets. This demonstrated the attacker’s ability to intercept traffic not directly addressed to it due to the port mirroring setup. Furthermore, the attacker was able to capture and analyze the HTTP basic authentication process, successfully extracting plaintext credentials transmitted from the client to the nginx server.
In the second part of the exercise, a VoIP call was established using two IP phones connected via a network hub instead of a switch with port mirroring. This topology allowed the attacker laptop to capture the audio stream of the call directly from the network traffic. The recorded audio was then exported and post-processed using Audacity and Adobe Podcast Speech Enhancer to clean and enhance the recording, resulting in a clear and intelligible audio file.
Throughout the exercise, Wireshark was extensively used to capture, filter, and analyze the network traffic from the attacker’s perspective. This practical approach provided insight into how network devices like hubs and switches with port mirroring impact the visibility of traffic and the feasibility of passive interception attacks within a local network environment.
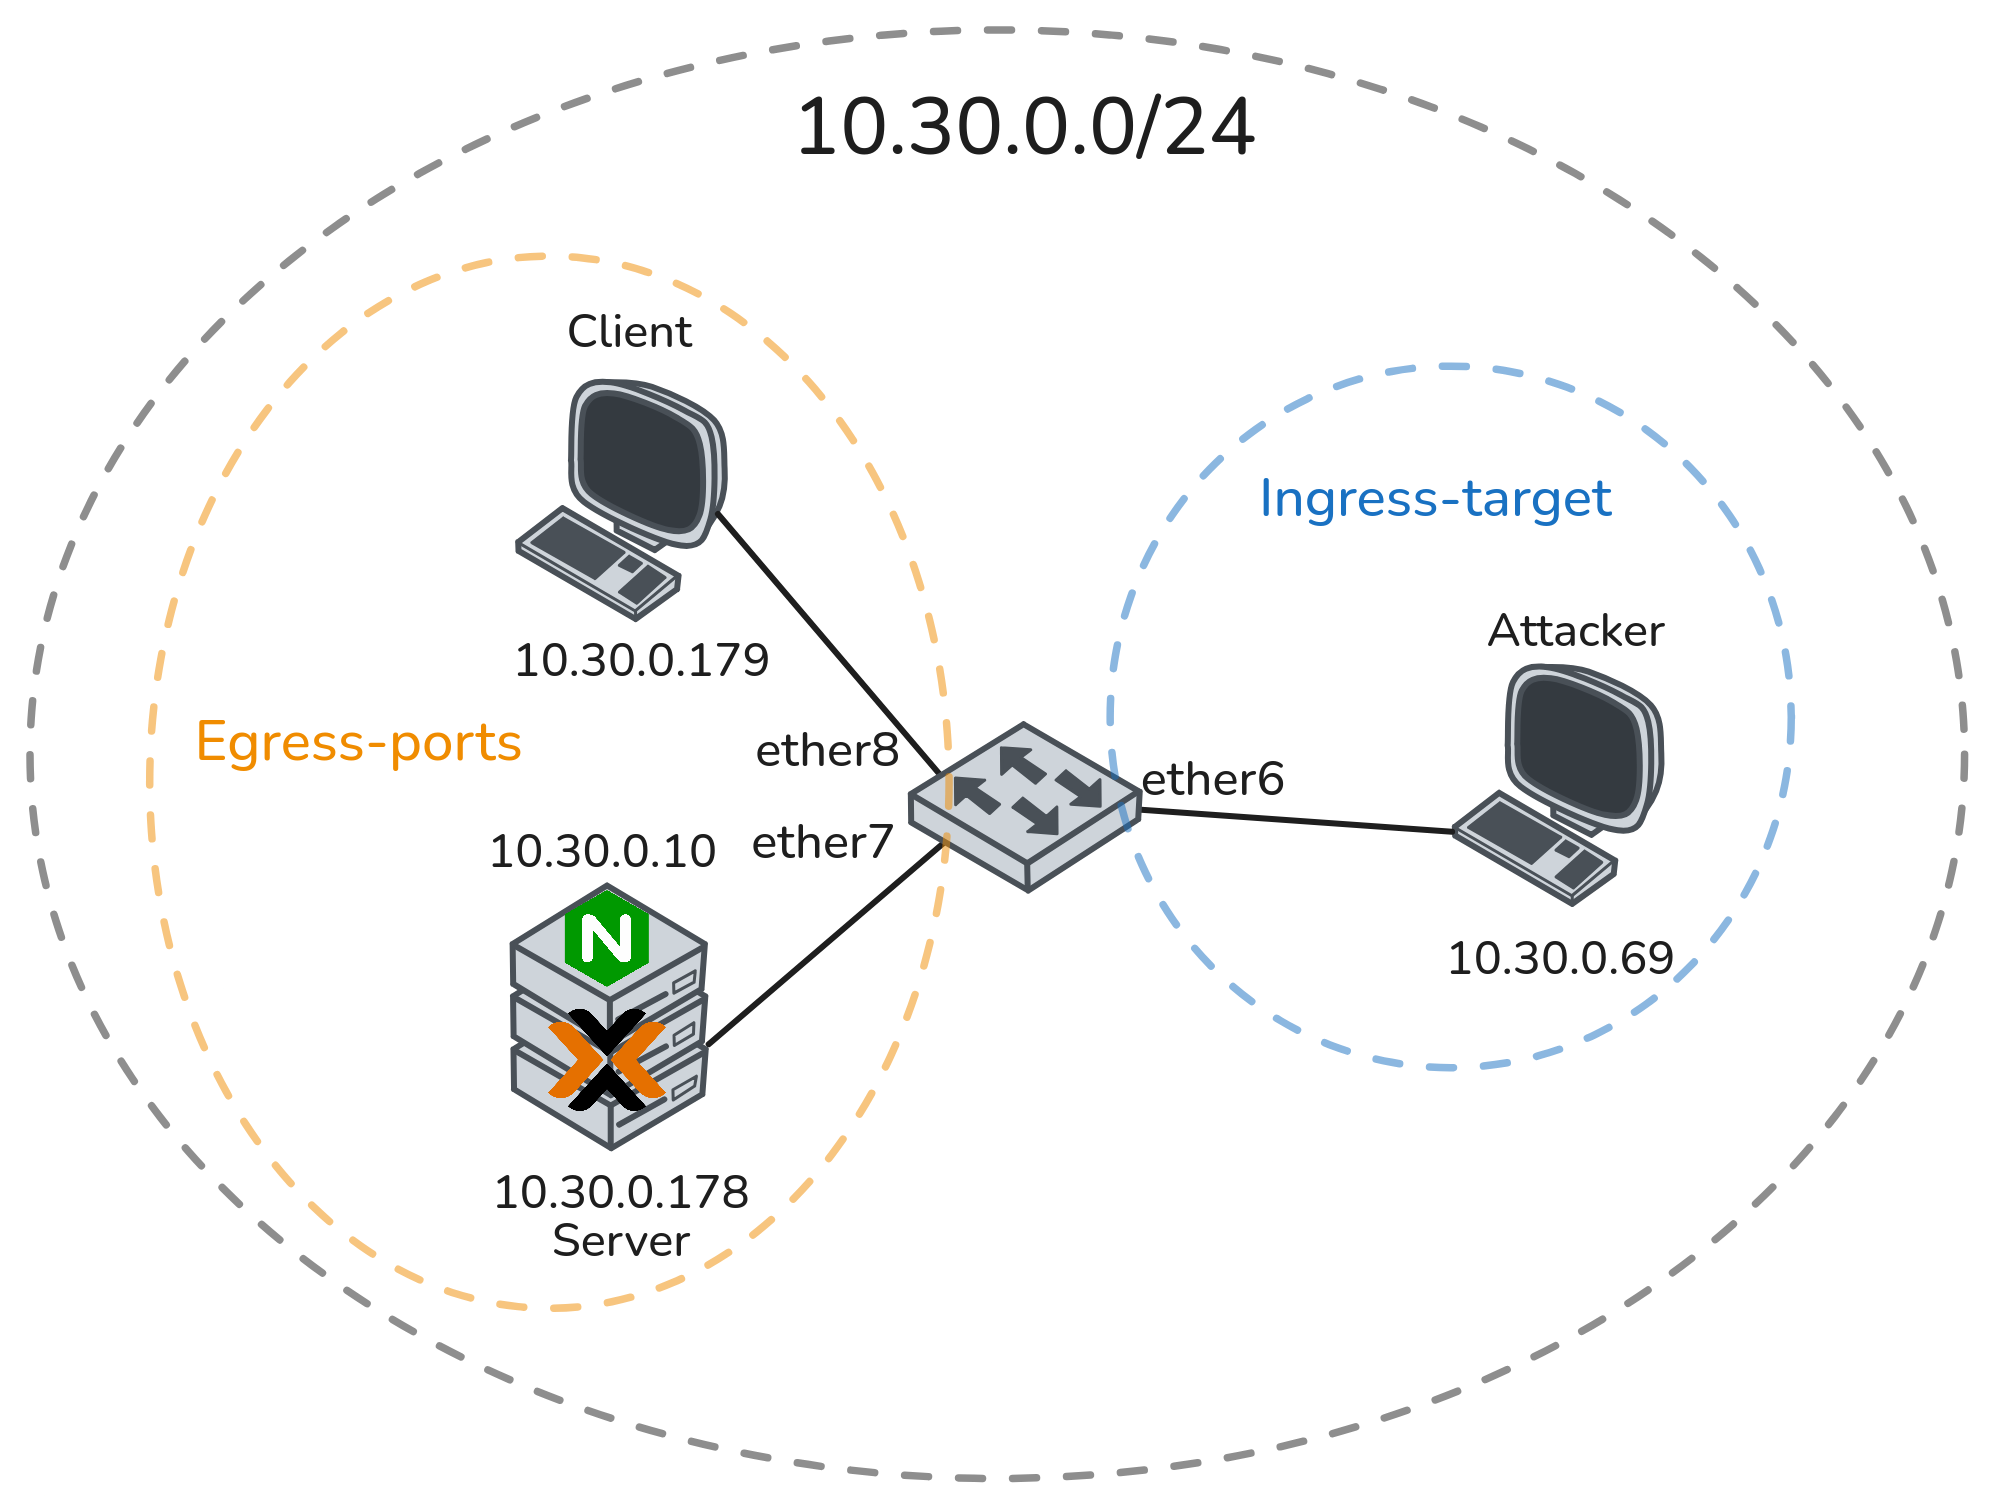
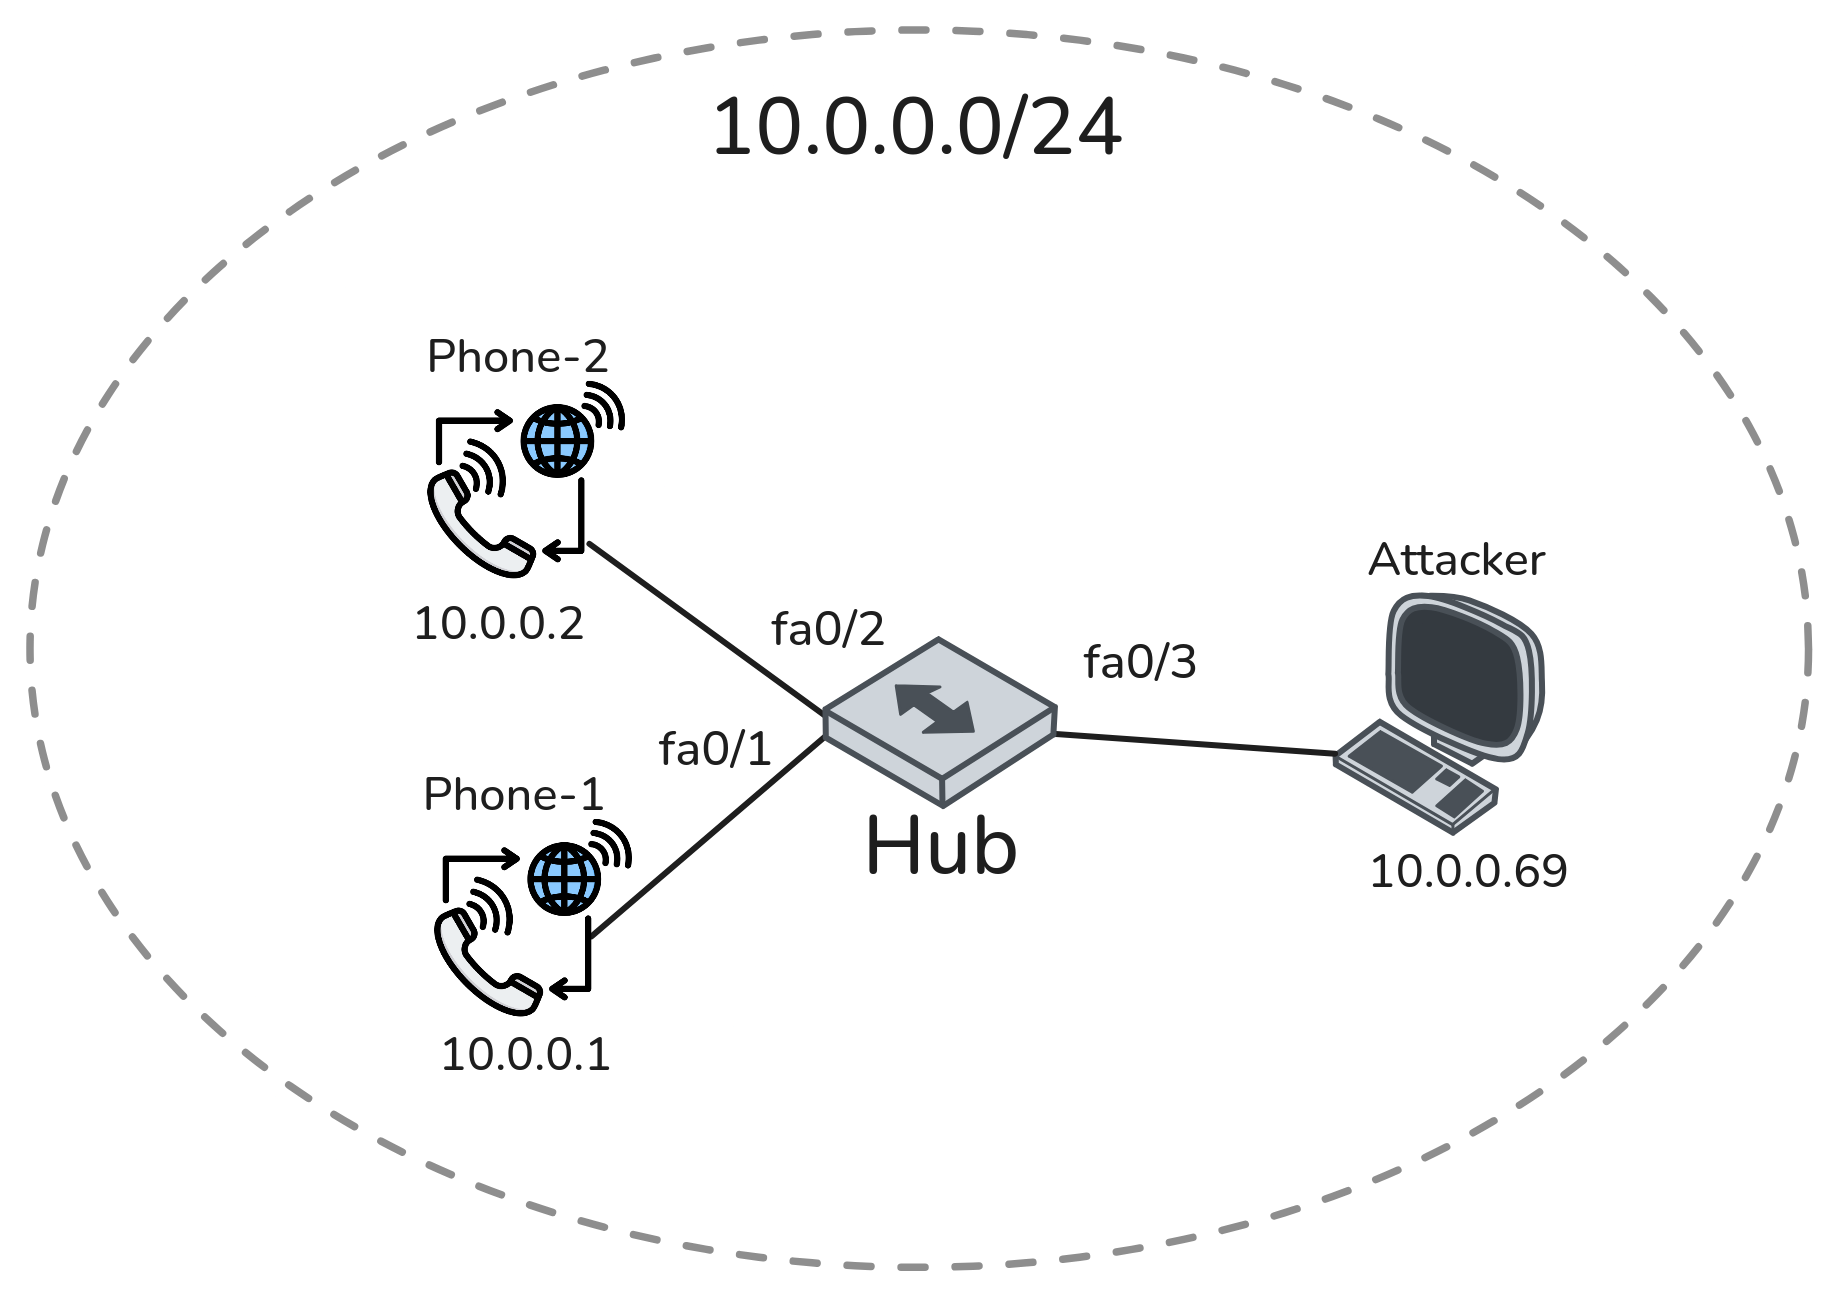
Complete network topology of the exercise
Exercise Execution
Building the Topologies
To build the topology from Figure 1, I chose the following hardware: a Mikrotik RB 5009 to act as the main “switch” due to RouterOS offering extensive settings in what I consider the best GUI to manage any network device.
For the server and clients, I used two old laptops running Proxmox, one of which has a Debian server VM running an Nginx web server with basic authentication set up. All of the devices have static IPs configured in the range 10.30.0.0/24. The attacker simply runs Linux with Wireshark to capture the traffic. The used IP addresses can be found in the addressing table below.
| Device | IP |
|---|---|
| Attacker | 10.30.0.69 |
| Server | 10.30.0.179 |
| Webserver | 10.30.0.10 |
| Client | 10.30.0.179 |
Mirroring traffic in RouterOS v7
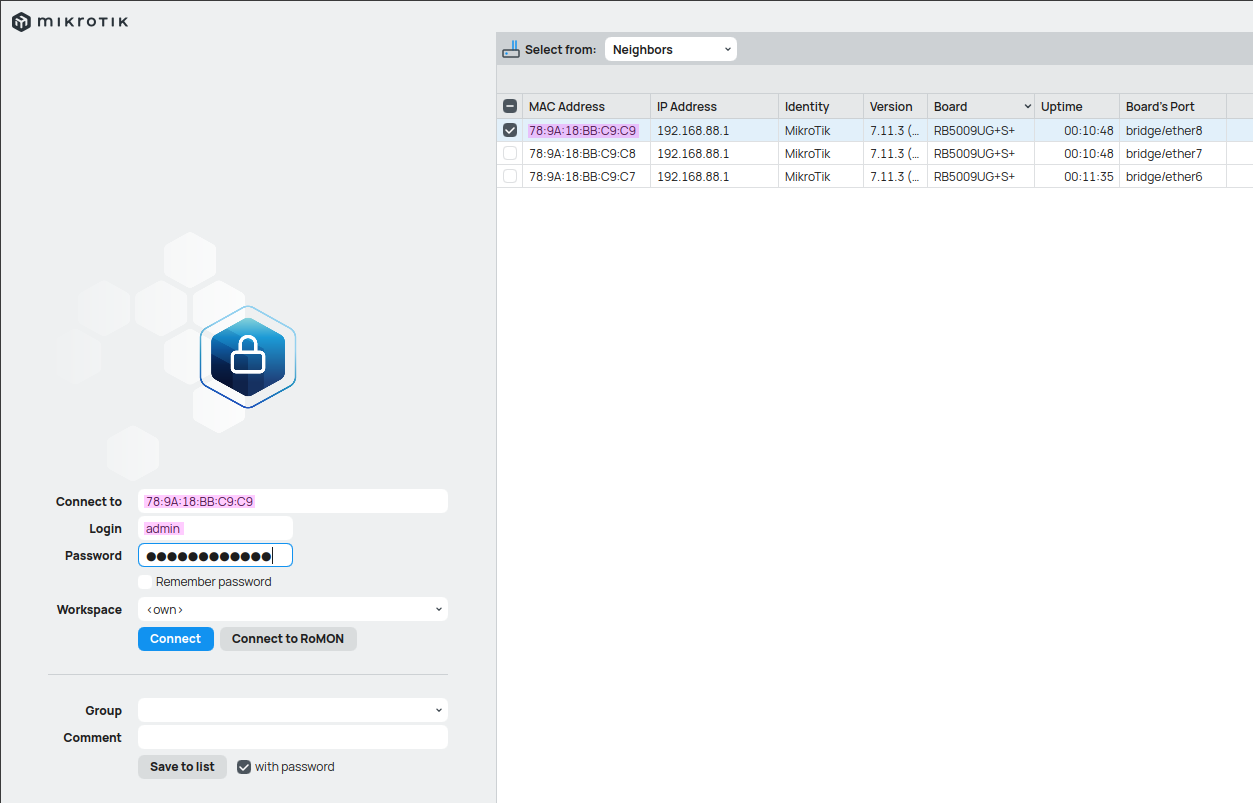
To configure the router, there are three options: either use the WebGUI, SSH into it, or use their program called WinBox, which is the option I went with. After connecting a port on the router, it automatically detects available ports, and I can simply select one of them and configure everything as needed via the MAC address.
Now that we are in the router’s configuration, we see a number of top-level options to choose from. To mirror traffic, we go to the Switch section and head to the Port tab, where we select the ports we want to mirror. If we double-click on an interface, it opens the port window, where we can choose whether to mirror only ingress traffic, egress traffic, or both.
We also specify an ingress target, which in this case is ether6, where the attacker’s laptop is plugged in so that it receives all the mirrored traffic. The configuration for both ether7 and ether8 is the same, which is why only one is shown below. Lastly, under the “Mirror Ingress”/“Mirror Egress” columns in the switch window table, we can see a “yes” in both columns, indicating that the configuration has been successfully applied. 1

Comparing the traffic before and after the configuration
Now we can use Wireshark on the attacker’s laptop to compare the traffic captured with and without mirroring.
When everything is idle and only ARP traffic is occurring in the background, the only difference is that instead of receiving each broadcast once, it is received twice—once from the connection itself and once from the mirroring.


Packet Sniffing on the Local Device
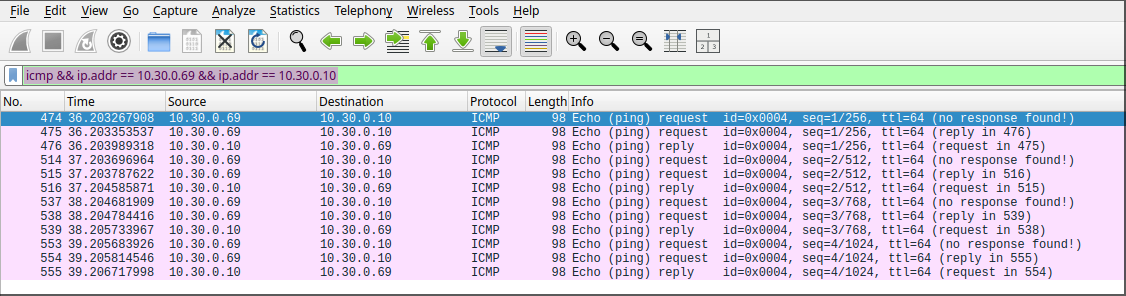
Now, with mirroring enabled, every device on the network is pinged so we can examine the behavior using the following filter: ip.src == 10.30.0.69 && icmp. This filter shows only ICMP frames with the source IP of the attacker’s laptop.
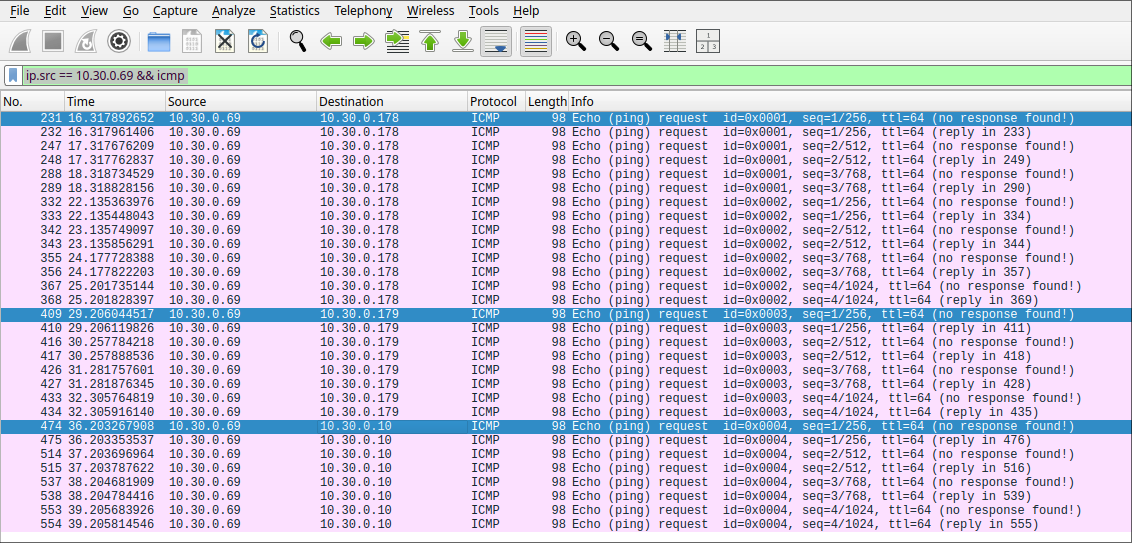
To display only the full connection between the two devices, the following filter can be used to show only the complete exchange, including replies: icmp && ip.addr == 10.30.0.69 && ip.addr == 10.30.0.178.
Capturing a Ping Between Two Targets
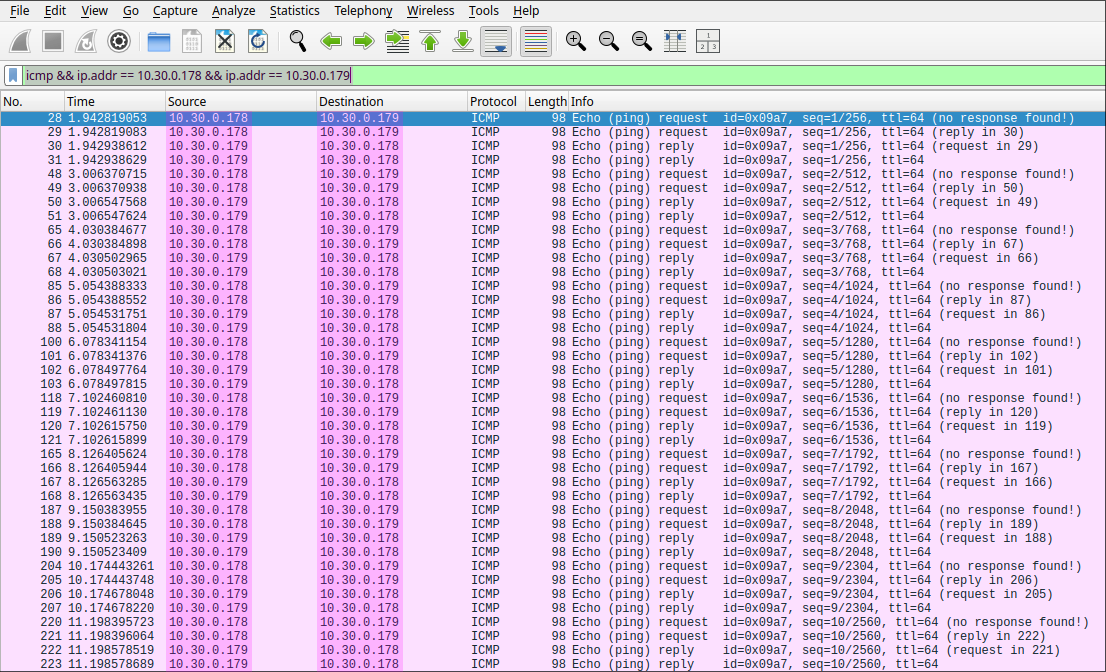
Since all ingress and egress traffic is being mirrored to the attacker’s port, it is possible to observe the entire ICMP exchange between the two victim machines directly from the attacker’s PC using Wireshark. If a ping is initiated between the two devices, we can apply the same filter as before—replacing the IP addresses with those of the communicating victims—to capture and analyze the exchanged packets.
ip.addr == <Victim1_IP> && ip.addr == <Victim2_IP>
As shown below, this traffic is visible only from the attacker’s Wireshark capture. The source and destination fields in the packets correspond to the two victim machines—at no point does the attacker’s IP address appear in the captured communication. This interception is possible solely due to port mirroring: all network traffic to and from the mirrored ports is duplicated to the attacker’s port. The two clients are unaware of this and communicate normally, while the attacker silently captures their traffic.
Capturing Plain Text Passwords
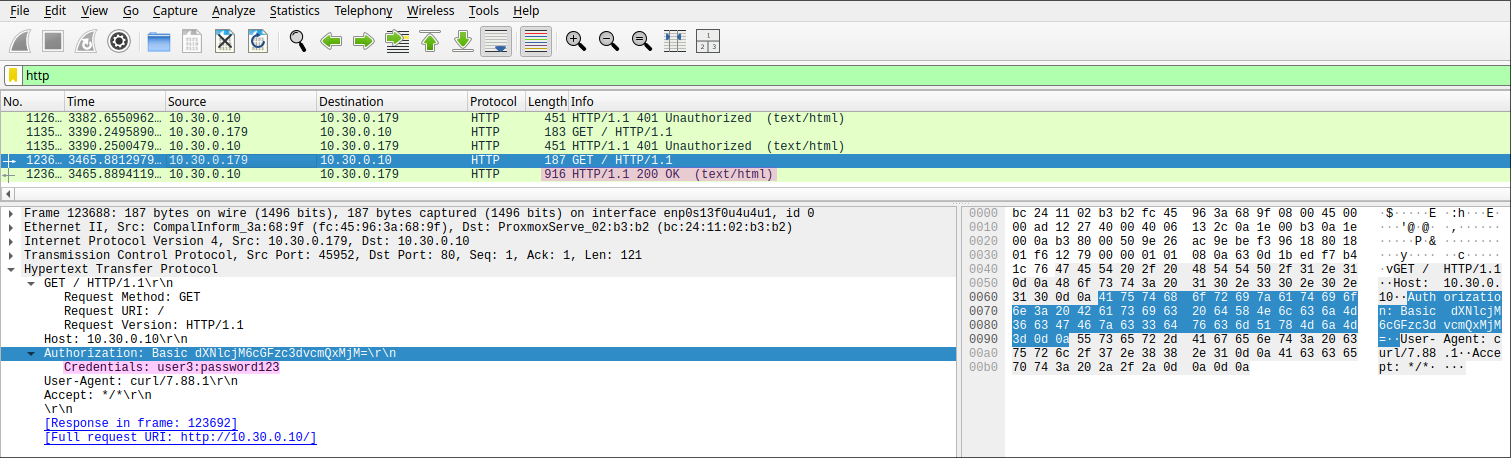
But let’s not stop at having two targets ping each other—we can also make use of the web server VM, which is simply the default Nginx page protected with basic authentication. If we make a request to the HTTP server—using either a web browser, curl, or any other method—and pass the Authorization header, it will contain Basic, which is the scheme name, followed by a Base64-encoded UTF-8 string of the username and password separated by a colon :. 2
The server then checks whether the provided credentials match an entry in the credentials file. If no match is found, an HTTP status code 401 Unauthorized is returned. 3
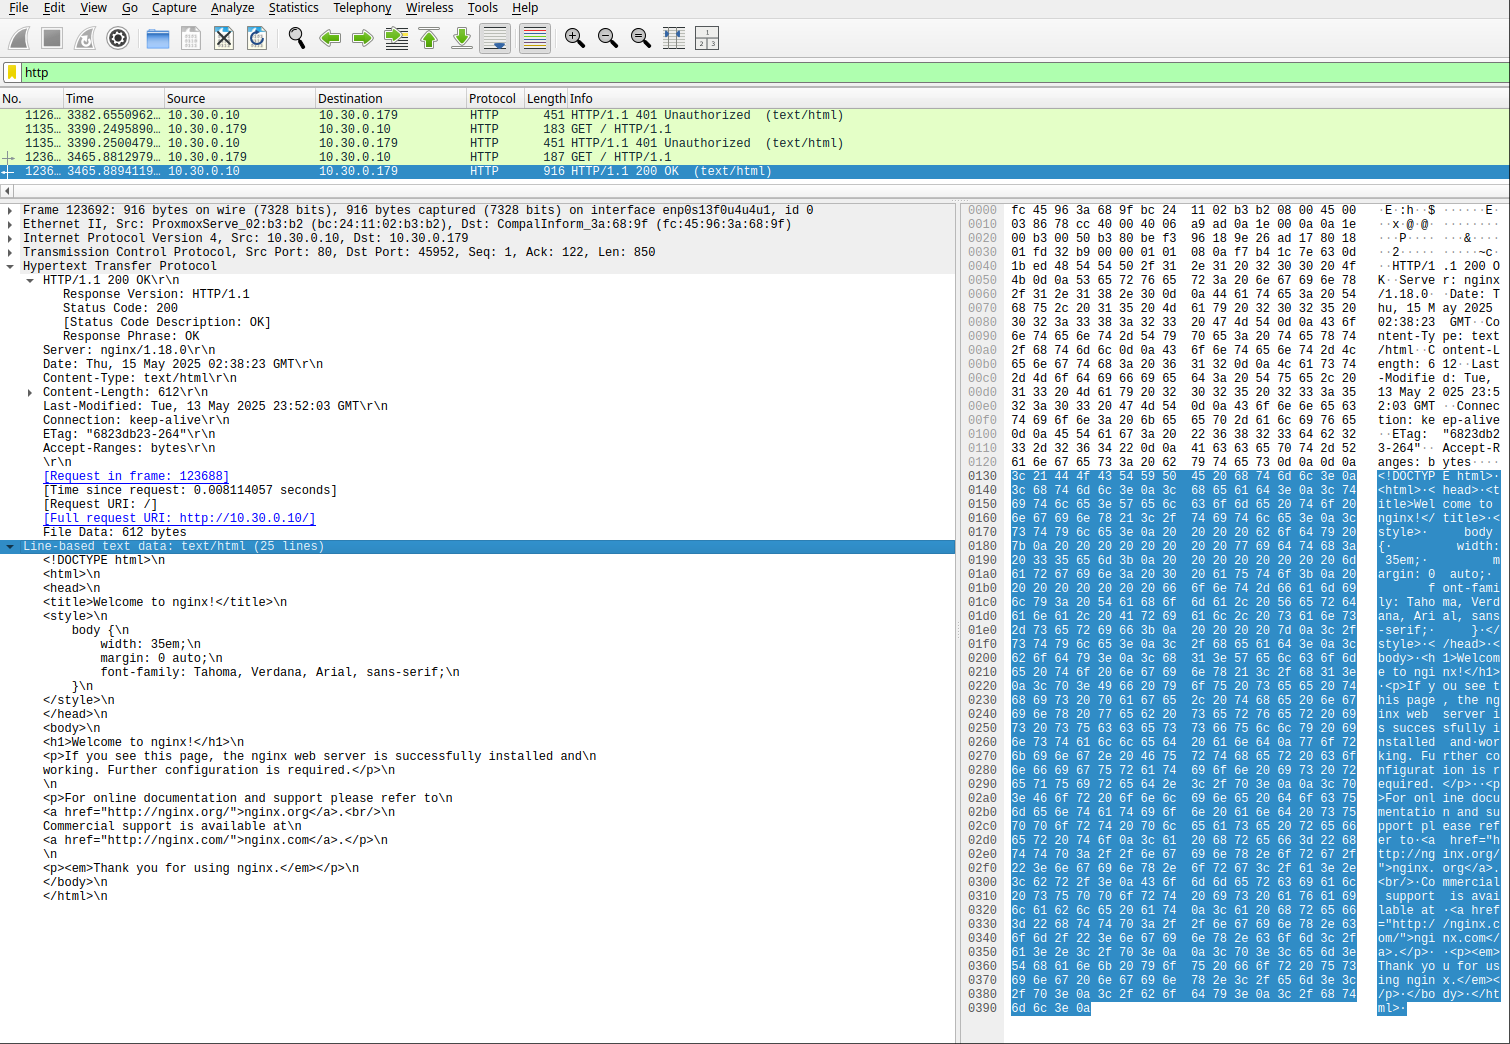
Later, a successful authentication is made, where the server instead returns status code 200, which indicates that the request has succeeded. 4
Again, we can see the credentials used in the request headers and now know that the credentials for this web server are user3:password123, as shown below. In addition, we receive the entire HTML code returned in the response from the server, which we can also view in plain text—essentially allowing us to see the same content as the client.
See also: Exercise 6: Hardening a Linux Webserver for details on setting up Nginx with basic authentication.5
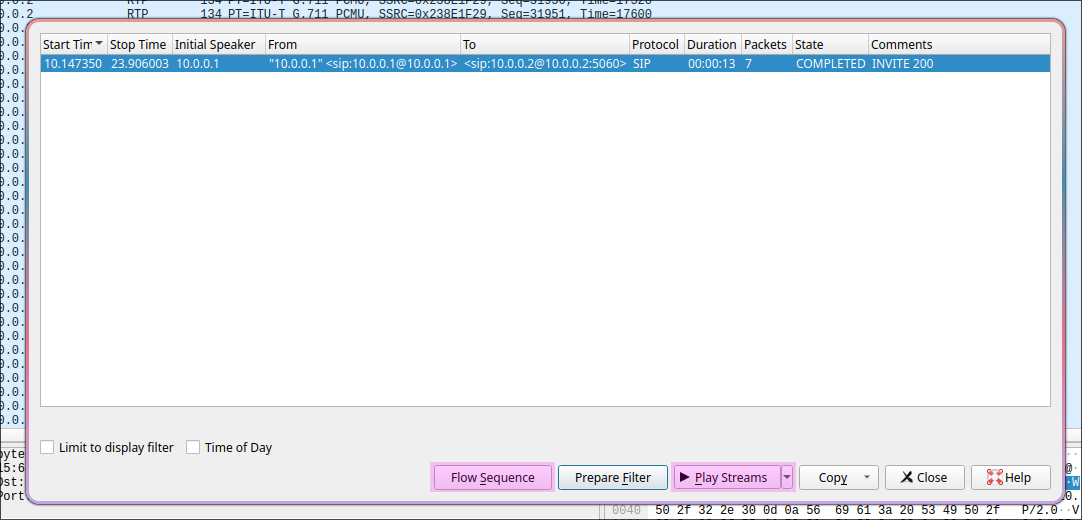
Capturing a VoIP Call
Lastly, VoIP traffic was captured and analyzed using Wireshark. For this, a different topology was used, as shown in Figure 2, since I do not own any VoIP phones. This part of the experiment was conducted in the school’s networking lab, where we used a hub and the address range 10.0.0.0/24. The attacker had the address 10.0.0.69, while the two phones had 10.0.0.1 and 10.0.0.2. Since a hub was used, no port mirroring had to be configured.
Voice over IP is an unencrypted protocol that uses the Real-time Transport Protocol (RTP) to transmit application data, which Wireshark has built-in tools to follow and even convert back into audio. 6 7
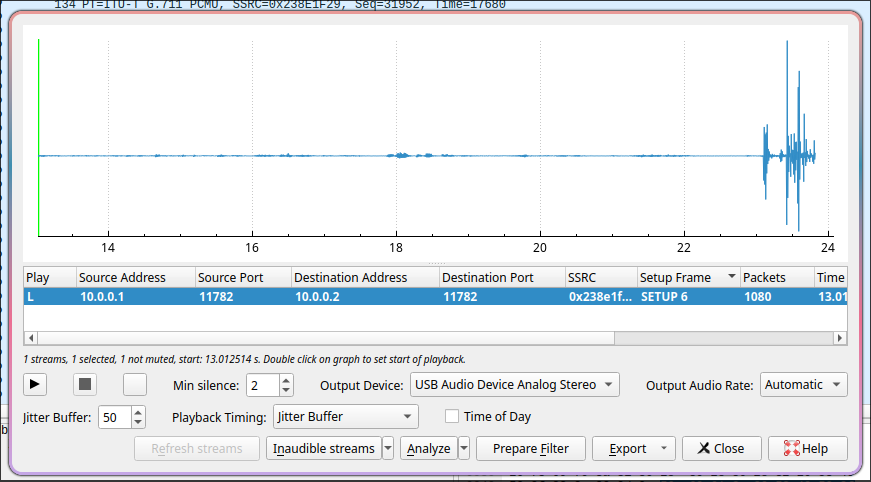
Wireshark provides these tools under Telephony → VoIP, which automatically detects the relevant streams and identifies the speakers. In the window that opens, we have several options, such as viewing the Flow Sequence, which shows when the call was ringing and who was speaking when. However, we are more interested in the “Play Streams” button, which displays the waveform of the call and allows us to export the audio as an MP3 file.
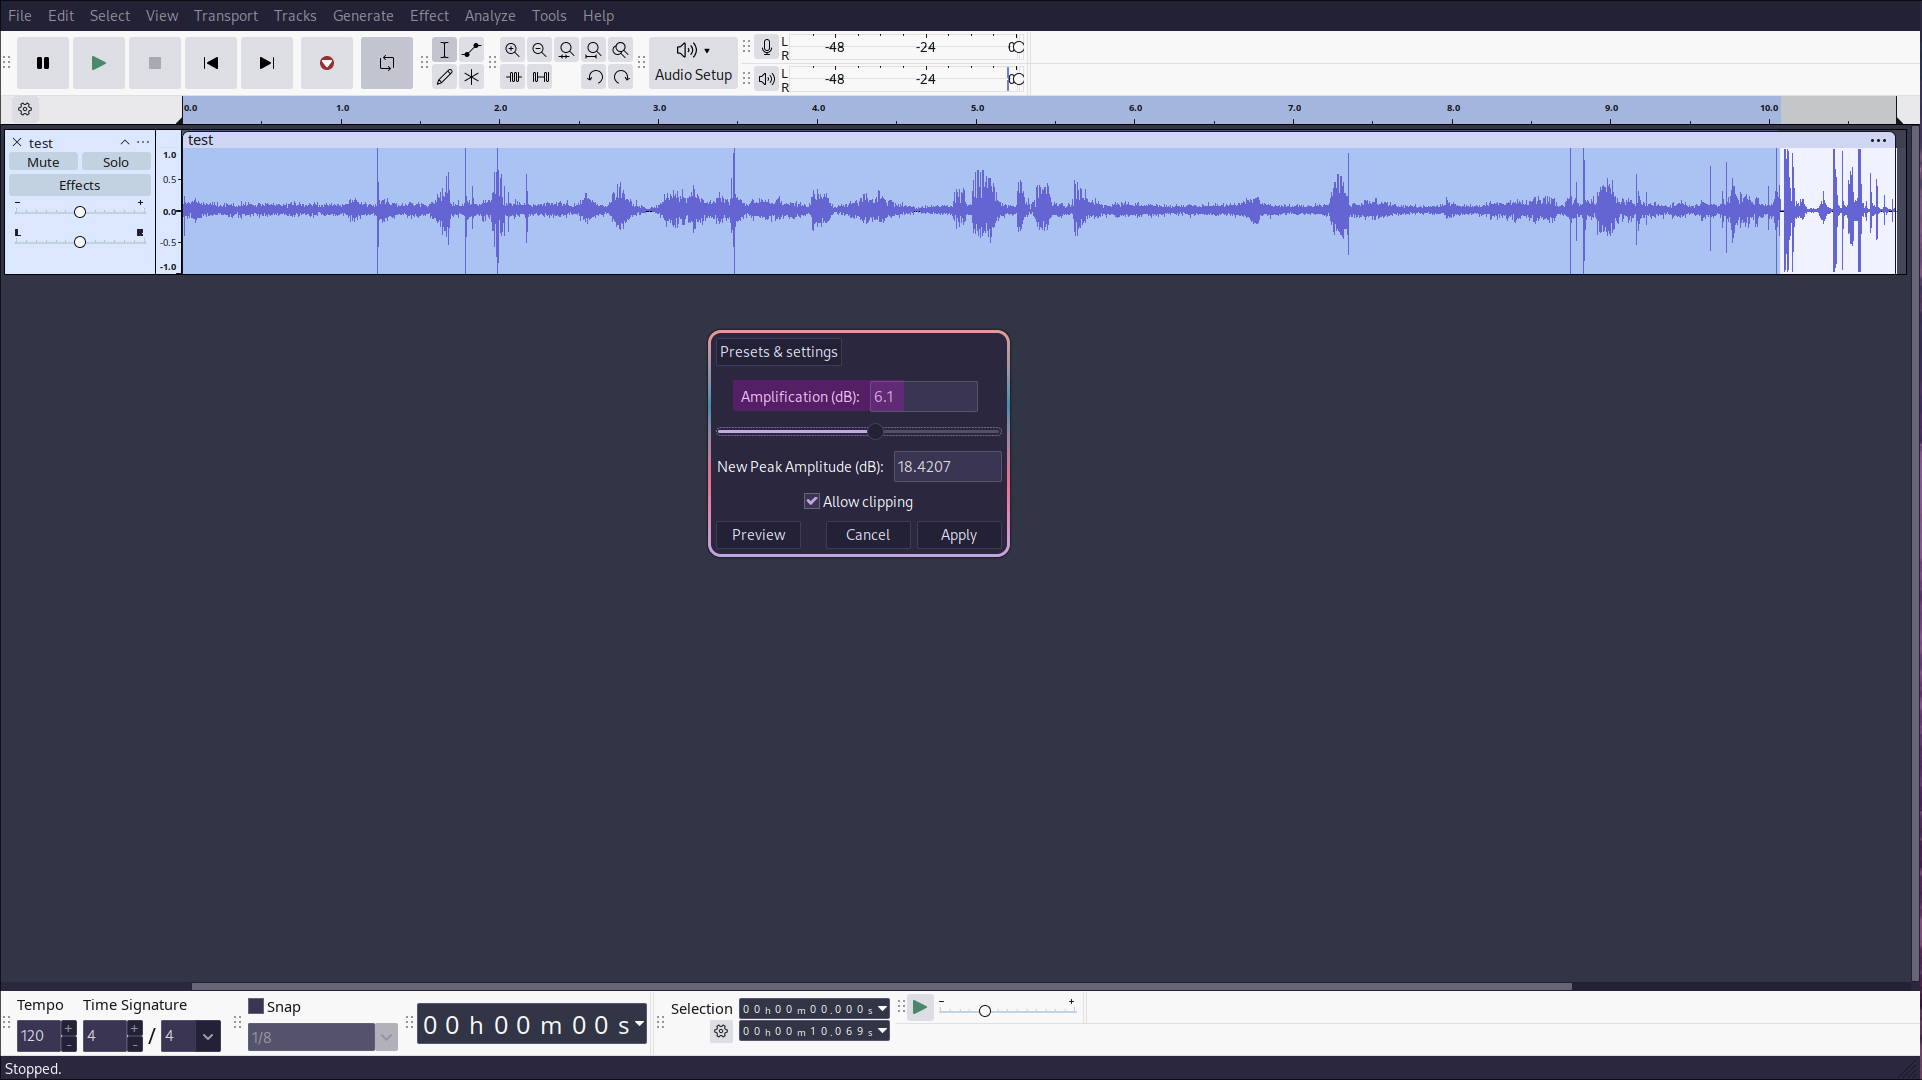
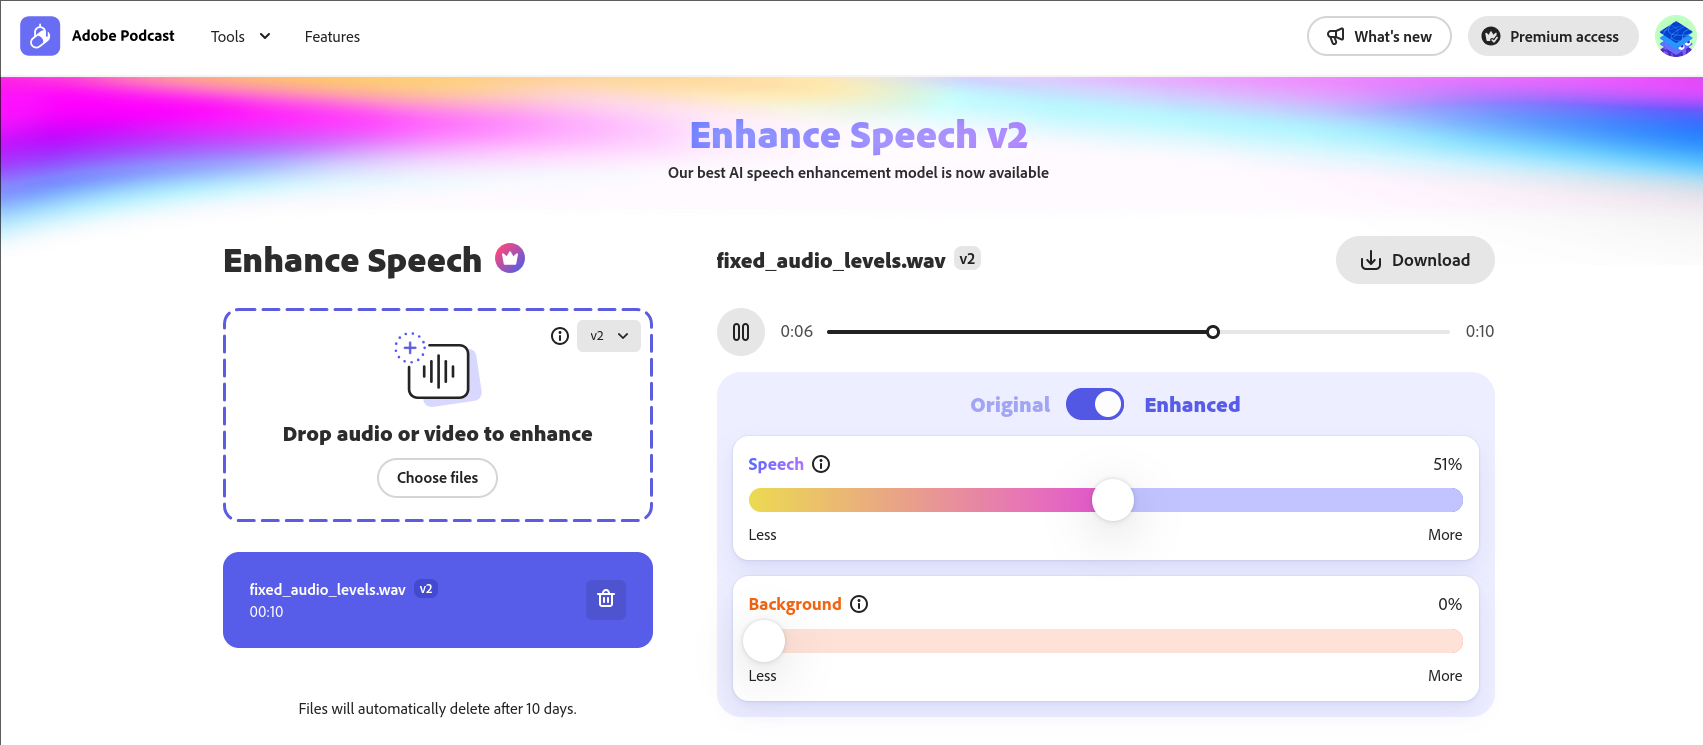
However, the audio levels of the MP3 were initially unbalanced—the beginning was far too quiet—so I boosted the volume using Audacity to normalize the audio levels. I then used the Adobe Podcast AI Audio Enhancer to remove background noise and isolate the conversation. The result was a surprisingly clean and understandable audio file, even though the microphone of the other phone was quite far away when I was speaking.
References
For a full bibliography, see the original BibTeX file.